Building REST APIs with .NET 5, ASP.NET Core, and PostgreSQL

By Kevin Campusano
July 9, 2021
 Photo by Sam Beasley
This is old news by now, but I’m still amazed by the fact that nowadays .NET is open source and can run on Linux. I truly believe that this new direction can help the technology realize its true potential, since it’s no longer shackled to Windows-based environments. I’ve personally been outside the .NET game for a good while, but with the milestone release that is .NET 5, I think now is a great time to dive back in.
So I thought of taking some time to do just that, really dive in, see what’s new, and get a sense of the general developer experience that the current incarnation of .NET offers. So in this blog post, I’m going to chronicle my experience developing a simple but complete REST API application. Along the way, I’ll touch on the most common problems that one runs into when developing such applications and how they are solved in the .NET world. So think of this piece as a sort of tutorial or overview of the most common framework features when it comes to developing REST APIs.
There’s a table of contents at the bottom.
First, let’s get familiar with what we’re building.
What we’re building
The demo application
You can find the finished product on my GitHub.
The application that we’ll be building throughout this article will address a request from a hypothetical car junker business. Our client wants to automate the process of calculating how much money to offer their customers for their vehicles, given certain information about them. And they want an app to do that. We are building the back-end component that will support that app. It is a REST API that allows users to provide vehicle information (year, make, model, condition, etc.) and will produce a quote of how much money our hypothetical client would be willing to pay for it.
Here’s a short list of features that we need to implement in order to fulfill that requirement:
- Given a vehicle model and condition, calculate a price.
- Store and manage rules that are used to calculate vehicle prices.
- Store and manage pricing overrides on a vehicle model basis. Price overrides are used regardless of the current rules.
- CRUD vehicle models so that overrides can be specified for them.
The data model
Here’s what our data model looks like:
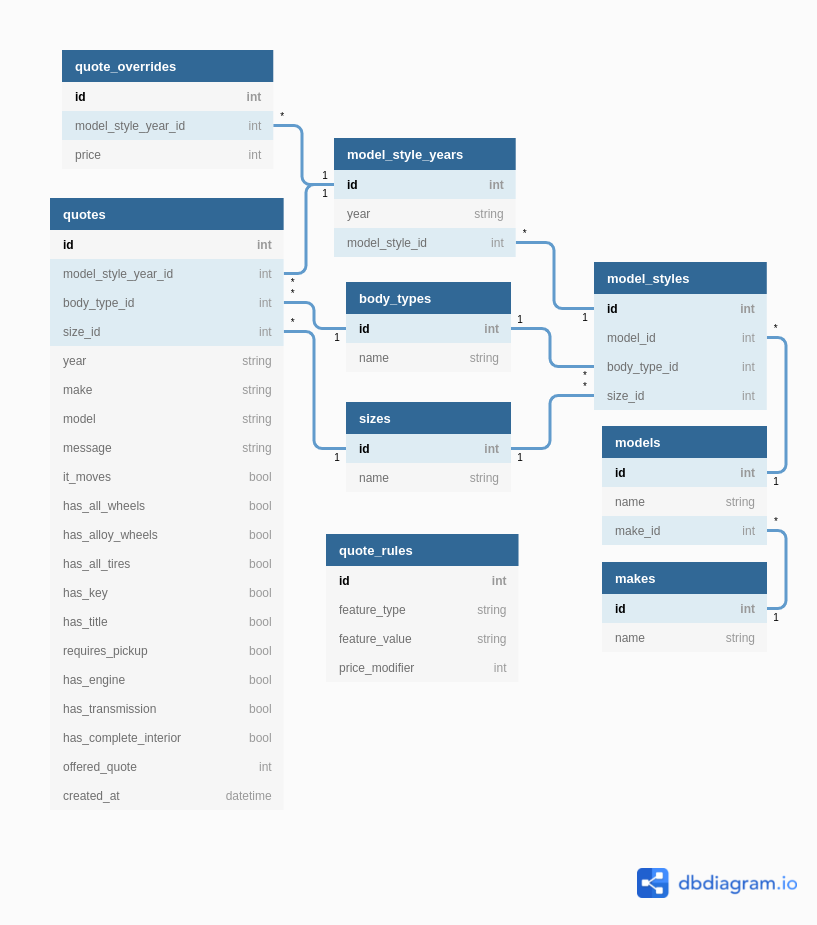
The main table in our model is the quotes table. It stores all the requests for quotes received from our client’s customers. It captures all the relevant vehicle information in terms of model and condition. It also captures the offered quote; that is, the money value that our system calculates for their vehicle.
The quotes table includes all the fields that identify a vehicle: year, make, model, body style and size. It also includes a model_style_year_id field which is an optional foreign key to another table. This FK points to the model_style_years table which contains specific vehicle models that our system can store explicitly.
The idea of this is that, when a customer submits a request for a quote, if we have their vehicle registered in our database, then we can populate this foreign key and link the quote with the specific vehicle that it’s quoting. If we don’t have their vehicle registered, then we leave that field unpopulated. Either way, we can offer a quote. The only difference is the level or certainty of the quote.
The records in the model_style_years table represent specific vehicles. That whole hierarchy works like this: A vehicle make (e.g. Honda, Toyota, etc. in the makes table) has many models (e.g. Civic, Corolla, etc. in the models table), each model has many styles (the model_styles table). Styles are combinations of body types (the body_types table) and sizes (e.g. Mid-size Sedan, Compact Coupe, etc. in the sizes table). And finally, each model style has many years in which they were being produced (via the model_style_years table).
This model allows us very fine-grained differentiation between vehicles. For example, we can have a “2008 Honda Civic Hatchback which is a Compact car” and also a “1990 Honda Civic Hatchback which is a Sub-compact”. That is, same model, different year, size or body type.
We also have a quote_rules table which stores the rules that are applied when it comes to calculating a vehicle quote. The rules are pairs of key-values with an associated monetary value. So for example, rules like “a vehicle that has alloy wheels is worth $10 more” can be expressed in the table with a record where feature_type is “has_alloy_wheels”, feature_value is “true” and price_modifier is “10”.
Finally, we have a quote_overrides table which specifies a flat, static price for specific vehicles (via the link to the model_style_years table). The idea here is that if some customer requests a quote for a vehicle for which we have an override, no price calculation rules are applied and they are offered what is specified in the override record.
The development environment
Setting up the PostgreSQL database with Docker
For this project, our database of choice is PostgreSQL. Luckily for us, getting a PostgreSQL instance up and running is very easy thanks to Docker.
If you want to learn more about dockerizing a typical web application, take a look at this article that explains the process in detail.
Once you have Docker installed in your machine, getting a PostgreSQL instance is as simple as running the following command:
$ docker run -d \
    --name vehicle-quote-postgres \
    -p 5432:5432 \
    --network host \
    -e POSTGRES_DB=vehicle_quote \
    -e POSTGRES_USER=vehicle_quote \
    -e POSTGRES_PASSWORD=password \
    postgres
Here we’re asking Docker to run a new container based on the latest postgres image from DockerHub, name it vehicle-quote-postgres, specify the port to use the default PostgreSQL one, make it accessible to the local network (with the --network host option) and finally, specify a few environment variables that the postgres image uses when building our new instance to set up the default database name, user and password (with the three -e options).
After Docker is done working its magic, you should be able to access the database with something like this:
$ docker exec -it vehicle-quote-postgres psql -U vehicle_quote
psql (13.2 (Debian 13.2-1.pgdg100+1))
Type "help" for help.

vehicle_quote=#
This command is connecting to our new vehicle-quote-postgres container and then, from within the container, using the command line client psql in order to connect to the database.
If you have psql installed on your own machine, you can use it directly to connect to the PostgreSQL instance running inside the container:
$ psql -h localhost -U vehicle_quoteThis is possible because we specified in our docker run command that the container would be accepting traffic over port 5432 (-p 5432:5432) and that it would be accesible within the same network as our actual machine (--network host).
Installing the .NET 5 SDK
Ok, with that out of the way, let’s install .NET 5.
.NET 5 truly is multi-platform, so whatever environment you prefer to work with, they’ve got you covered. You can go to the .NET 5 download page and pick your desired flavor of the SDK.
On Ubuntu 20.10, which is what I’m running, installation is painless. It’s your typical process with APT and this page from the official docs has all the details.
First step is to add the Microsoft package repository:
$ wget https://packages.microsoft.com/config/ubuntu/20.10/packages-microsoft-prod.deb -O packages-microsoft-prod.deb

$ sudo dpkg -i packages-microsoft-prod.deb
Then, install .NET 5 with APT like one would any other software package:
$ sudo apt-get update; \
  sudo apt-get install -y apt-transport-https && \
  sudo apt-get update && \
  sudo apt-get install -y dotnet-sdk-5.0
Run dotnet --version in your console and you should see something like this:
$ dotnet --version
5.0.301
Setting up the project
Creating our ASP.NET Core REST API project
Ok now that we have our requirements, database and SDK, let’s start setting up our project. We do so with the following command:
$ dotnet new webapi -o VehicleQuotesThis instructs the dotnet command line tool to create a new REST API web application project for us in a new VehicleQuotes directory.
As a result, dotnet will give you some messages, including this:
The template "ASP.NET Core Web API" was created successfully.A new directory was created with our web application files. The newly created VehicleQuotes project looks like this:
.
├── appsettings.Development.json
├── appsettings.json
├── Controllers
│   └── WeatherForecastController.cs
├── obj
│   ├── project.assets.json
│   ├── project.nuget.cache
│   ├── VehicleQuotes.csproj.nuget.dgspec.json
│   ├── VehicleQuotes.csproj.nuget.g.props
│   └── VehicleQuotes.csproj.nuget.g.targets
├── Program.cs
├── Properties
│   └── launchSettings.json
├── Startup.cs
├── VehicleQuotes.csproj
└── WeatherForecast.cs
Important things to note here are the appsettings.json and appsettings.Development.json files which contain environment specific configuration values; the Controllers directory where we define our application controllers and action methods (i.e. our REST API endpoints); the Program.cs and Startup.cs files that contain our application’s entry point and bootstrapping logic; and finally VehicleQuotes.csproj which is the file that contains project-wide configuration that the framework cares about like references, compilation targets, and other options. Feel free to explore.
The dotnet new command has given us quite a bit. These files make up a fully working application that we can run and play around with. It even has a Swagger UI, as I’ll demonstrate shortly. It’s a great place to get started from.
You can also get a pretty comprehensive
.gitignorefile by running thedotnet new gitignorecommand.
From inside the VehicleQuotes directory, you can run the application with:
$ dotnet runWhich will start up a development server and give out the following output:
$ dotnet run
Building...
info: Microsoft.Hosting.Lifetime[0]
      Now listening on: https://localhost:5001
info: Microsoft.Hosting.Lifetime[0]
      Now listening on: http://localhost:5000
info: Microsoft.Hosting.Lifetime[0]
      Application started. Press Ctrl+C to shut down.
info: Microsoft.Hosting.Lifetime[0]
      Hosting environment: Development
info: Microsoft.Hosting.Lifetime[0]
      Content root path: /home/kevin/projects/endpoint/blog/VehicleQuotes
Open up a browser window and go to https://localhost:5001/swagger to find a Swagger UI listing our API’s endpoints:
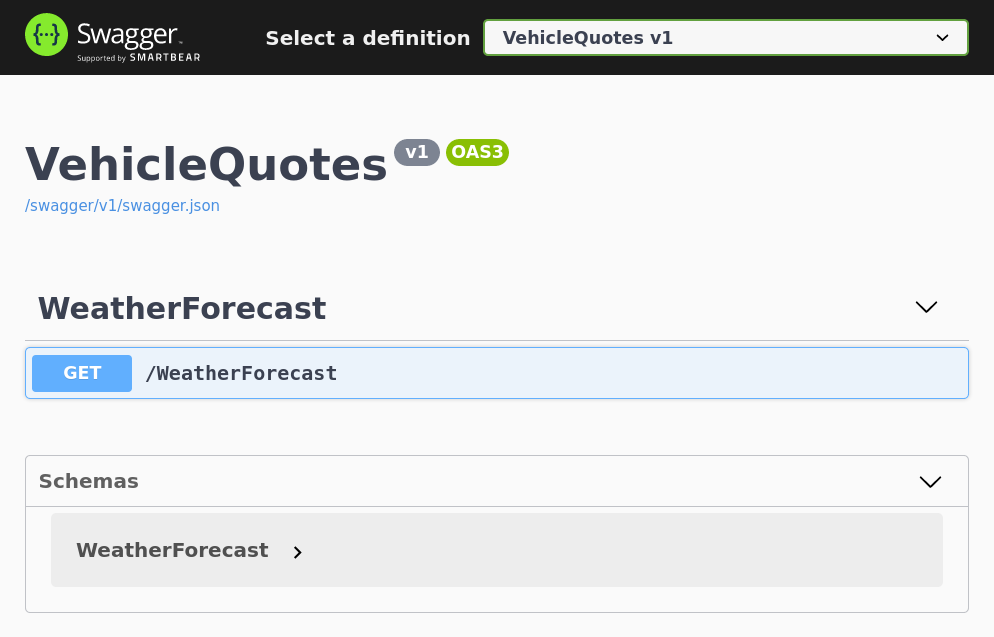
As you can see we’ve got a GET /WeatherForecast endpoint in our app. This is included by default in the webapi project template that we specified in our call to dotnet new. You can see it defined in the Controllers/WeatherForecastController.cs file.
Installing packages we’ll need
Now let’s install all the tools and libraries we will need for our application. First, we install the ASP.NET Code Generator tool which we’ll use later for scaffolding controllers:
$ dotnet tool install --global dotnet-aspnet-codegeneratorWe also need to install the Entity Framework command line tools which help us with creating and applying database migrations:
$ dotnet tool install --global dotnet-efNow, we need to install a few libraries that we’ll use in our project. First are all the packages that allow us to use Entity Framework Core, provide scaffolding support and give us a detailed debugging page for database errors:
$ dotnet add package Microsoft.VisualStudio.Web.CodeGeneration.Design
$ dotnet add package Microsoft.EntityFrameworkCore.Design
$ dotnet add package Microsoft.EntityFrameworkCore.SqlServer
$ dotnet add package Microsoft.AspNetCore.Diagnostics.EntityFrameworkCore
We also need the EF Core driver for PostgreSQL which will allow us to interact with our database:
$ dotnet add package Npgsql.EntityFrameworkCore.PostgreSQLFinally, we need another package that will allow us to use the snake case naming convention for our database tables, fields, etc. We need this because EF Core uses capitalized camel case by default, which is not very common in the PostgreSQL world, so this will allow us to play nice. This is the package:
$ dotnet add package EFCore.NamingConventionsConnecting to the database and performing initial app configuration
In order to connect to, query, and modify a database using EF Core, we need to create a DbContext. This is a class that serves as the entry point into the database. Create a new directory called Data in the project root and add this new VehicleQuotesContext.cs file to it:
using Microsoft.EntityFrameworkCore;

namespace VehicleQuotes
{
    public class VehicleQuotesContext : DbContext
    {
        public VehicleQuotesContext (DbContextOptions<VehicleQuotesContext> options)
            : base(options)
        {
        }
    }
}
As you can see this is just a simple class that inherits from EF Core’s DbContext class. That’s all we need for now. We will continue building on this class as we add new tables and configurations.
Now, we need to add this class into ASP.NET Core’s built-in IoC (inversion of control) container so that it’s available to controllers and other classes via Dependency Injection, and tell it how to find our database. Go to Startup.cs and add the following using statement near the top of the file:
using Microsoft.EntityFrameworkCore;That will allow us to do the following change in the ConfigureServices method:
 public void ConfigureServices(IServiceCollection services)
 {

     // ...

+    services.AddDbContext<VehicleQuotesContext>(options =>
+        options
+            .UseNpgsql(Configuration.GetConnectionString("VehicleQuotesContext"))
+    );
 }
UseNpgsqlis an extension method made available to us by theNpgsql.EntityFrameworkCore.PostgreSQLpackage that we installed in the previous step.
The services variable contains all the objects (known as “services”) that are available in the app for Dependency Injection. So here, we’re adding our newly created DbContext to it, specifying that it will connect to a PostgreSQL database (via the options.UseNpgsql call), and that it will use a connection string named VehicleQuotesContext from the app’s default configuration file. So let’s add the connection string then. To do so, change the appsettings.json like so:
 {
   "Logging": {
     "LogLevel": {
       "Default": "Information",
       "Microsoft": "Warning",
       "Microsoft.Hosting.Lifetime": "Information"
     }
   },
-  "AllowedHosts": "*"
+  "AllowedHosts": "*",
+  "ConnectionStrings": {
+      "VehicleQuotesContext": "Host=localhost;Database=vehicle_quote;Username=vehicle_quote;Password=password"
+  }
 }
This is your typical PostgreSQL connection string. The only gotcha is that it needs to be specified under the ConnectionStrings -> VehicleQuotesContext section so that our call to Configuration.GetConnectionString can find it.
Now let’s put the EFCore.NamingConventions package to good use and configure EF Core to use snake case when naming database objects. Add the following to the ConfigureServices method in Startup.cs:
public void ConfigureServices(IServiceCollection services)
{
    // ...

    services.AddDbContext<VehicleQuotesContext>(options =>
        options
            .UseNpgsql(Configuration.GetConnectionString("VehicleQuotesContext"))
+           .UseSnakeCaseNamingConvention()
    );
}
UseSnakeCaseNamingConventionis an extension method made available to us by theEFCore.NamingConventionspackage that we installed in the previous step.
Now let’s make logging a little bit more verbose with:
public void ConfigureServices(IServiceCollection services)
{
    // ...

    services.AddDbContext<VehicleQuotesContext>(options =>
        options
            .UseNpgsql(Configuration.GetConnectionString("VehicleQuotesContext"))
            .UseSnakeCaseNamingConvention()
+           .UseLoggerFactory(LoggerFactory.Create(builder => builder.AddConsole()))
+           .EnableSensitiveDataLogging()
    );
}
This will make sure full database queries appear in the log in the console, including parameter values. This could expose sensitive data so be careful when using EnableSensitiveDataLogging in production.
We can also add the following service configuration to have the app display detailed error pages when something related to the database or migrations goes wrong:
public void ConfigureServices(IServiceCollection services)
{
    // ...

+   services.AddDatabaseDeveloperPageExceptionFilter();
}
AddDatabaseDeveloperPageExceptionFilteris an extension method made available to us by theMicrosoft.AspNetCore.Diagnostics.EntityFrameworkCorepackage that we installed in the previous step.
Finally, one last configuration I like to do is have the Swagger UI show up at the root URL, so that instead of using https://localhost:5001/swagger, we’re able to just use https://localhost:5001. We do so by by updating the Configure method this time, in the same Startup.cs file that we’ve been working on:
public void Configure(IApplicationBuilder app, IWebHostEnvironment env)
{
    if (env.IsDevelopment())
    {
        app.UseDeveloperExceptionPage();
        app.UseSwagger();
-       app.UseSwaggerUI(c => c.SwaggerEndpoint("/swagger/v1/swagger.json", "VehicleQuotes v1"));
+       app.UseSwaggerUI(c => {
+           c.SwaggerEndpoint("/swagger/v1/swagger.json", "VehicleQuotes v1");
+           c.RoutePrefix = "";
+       });
    }
The magic is done by the c.RoutePrefix = ""; line which makes it so there’s no need to put any prefix in order to access the auto generated Swagger UI.
Try it out. Do dotnet run and navigate to https://localhost:5001 and you should see the Swagger UI there.
Building the application
Creating model entities, migrations and updating the database
Alright, with all that configuration out of the way, let’s implement some of our actual application logic now. Refer back to our data model. We’ll start by defining our three simplest tables: makes, sizes and body_types. With EF Core, we define tables via so-called POCO entities, which are simple C# classes with some properties. The classes become tables and the properties become the tables’ fields. Instances of these classes represent records in the database.
So, create a new Models directory in our project’s root and add these three files:
// Models/BodyType.cs
namespace VehicleQuotes.Models
{
    public class BodyType
    {
        public int ID { get; set; }
        public string Name { get; set; }
    }
}
// Models/Make.cs
namespace VehicleQuotes.Models
{
public class Make
{
public int ID { get; set; }
public string Name { get; set; }
}
}// Models/Size.cs
namespace VehicleQuotes.Models
{
public class Size
{
public int ID { get; set; }
public string Name { get; set; }
}
}Now, we add three corresponding DbSets to our DbContext in Data/VehicleQuoteContext.cs. Here’s the diff:
using Microsoft.EntityFrameworkCore;
+using VehicleQuotes.Models;

namespace VehicleQuotes
{
    public class VehicleQuotesContext : DbContext
    {
        public VehicleQuotesContext (DbContextOptions<VehicleQuotesContext> options)
            : base(options)
        {
        }

+       public DbSet<Make> Makes { get; set; }
+       public DbSet<Size> Sizes { get; set; }
+       public DbSet<BodyType> BodyTypes { get; set; }
    }
}
This is how we tell EF Core to build tables in our database for our entities. You’ll see later how we use those DbSets to access the data in those tables. For now, let’s create a migration script that we can later run to apply changes to our database. Run the following to have EF Core create it for us:
$ dotnet ef migrations add AddLookupTablesNow take a look at the newly created Migrations directory. It contains a few new files, but the one we care about right now is Migrations/{TIMESTAMP}_AddLookupTables.cs. In its Up method, it’s got some code that will modify the database structure when run. The EF Core tooling has inspected our project, identified the new entities, and automatically generated a migration script for us that creates tables for them. Notice also how the tables and fields use the snake case naming convention, just as we specified with the call to UseSnakeCaseNamingConvention in Startup.cs.
Now, to actually run the migration script and apply the changes to the database, we do:
$ dotnet ef database updateThat command inspects our project to find any migrations that haven’t been run yet, and applies them. In this case, we only have one, so that’s what it runs. Look at the output in the console to see it working its magic step by step:
$ dotnet ef database update
Build started...
Build succeeded.
warn: Microsoft.EntityFrameworkCore.Model.Validation[10400]
      Sensitive data logging is enabled. Log entries and exception messages may include sensitive application data; this mode should only be enabled during development.

...

info: Microsoft.EntityFrameworkCore.Database.Command[20101]
      Executed DbCommand (4ms) [Parameters=[], CommandType='Text', CommandTimeout='30']
      CREATE TABLE sizes (
          id integer GENERATED BY DEFAULT AS IDENTITY,
          name text NULL,
          CONSTRAINT pk_sizes PRIMARY KEY (id)
      );
info: Microsoft.EntityFrameworkCore.Database.Command[20101]
      Executed DbCommand (1ms) [Parameters=[], CommandType='Text', CommandTimeout='30']
      INSERT INTO "__EFMigrationsHistory" (migration_id, product_version)
      VALUES ('20210625212939_AddLookupTables', '5.0.7');
Done.
Notice how it warns us about potential exposure of sensitive data because of that EnableSensitiveDataLogging option we opted into in Startup.cs. Also, EF Core related logs are extra verbose showing all database operations because of another configuration option that we applied there: the UseLoggerFactory(LoggerFactory.Create(builder => builder.AddConsole())) one.
You can connect to the database with the psql command line client and see that the changes took effect:
$ psql -h localhost -U vehicle_quote

...

vehicle_quote=# \c vehicle_quote
psql (12.7 (Ubuntu 12.7-0ubuntu0.20.10.1), server 13.2 (Debian 13.2-1.pgdg100+1))
You are now connected to database "vehicle_quote" as user "vehicle_quote".
vehicle_quote=# \dt
                   List of relations
 Schema |         Name          | Type  |     Owner
--------+-----------------------+-------+---------------
 public | __EFMigrationsHistory | table | vehicle_quote
 public | body_types            | table | vehicle_quote
 public | makes                 | table | vehicle_quote
 public | sizes                 | table | vehicle_quote
(4 rows)

vehicle_quote=# \d makes
                            Table "public.makes"
 Column |  Type   | Collation | Nullable |             Default
--------+---------+-----------+----------+----------------------------------
 id     | integer |           | not null | generated by default as identity
 name   | text    |           |          |
Indexes:
    "pk_makes" PRIMARY KEY, btree (id)
There are our tables in all their normalized, snake-cased glory. The __EFMigrationsHistory table is used internally by EF Core to keep track of which migrations have been applied.
Creating controllers for CRUDing our tables
Now that we have that, let’s add a few endpoints to support basic CRUD of those tables. We can use the dotnet-aspnet-codegenerator scaffolding tool that we installed earlier. For the three tables that we have, we would do:
$ dotnet aspnet-codegenerator controller \
    -name MakesController \
    -m Make \
    -dc VehicleQuotesContext \
    -async \
    -api \
    -outDir Controllers

$ dotnet aspnet-codegenerator controller \
    -name BodyTypesController \
    -m BodyType \
    -dc VehicleQuotesContext \
    -async \
    -api \
    -outDir Controllers

$ dotnet aspnet-codegenerator controller \
    -name SizesController \
    -m Size \
    -dc VehicleQuotesContext \
    -async \
    -api \
    -outDir Controllers
Those commands tell the scaffolding tool to create new controllers that:
- Are named as given by the
-nameoption. - Use the model class specified in the
-moption. - Use our
VehicleQuotesContextto talk to the database. As per the-dcoption. - Define the methods using
async/awaitsyntax. Given by the-asyncoption. - Are API controllers. Specified by the
-apioption. - Are created in the
Controllersdirectory. Via the-outDiroption.
Explore the new files that got created in the Controllers directory: MakesController.cs, BodyTypesController.cd and SizesController.cs. The controllers have been generated with the necessary Action Methods to fetch, create, update and delete their corresponding entities. Try dotnet run and navigate to https://localhost:5001 to see the new endpoints in the Swagger UI:
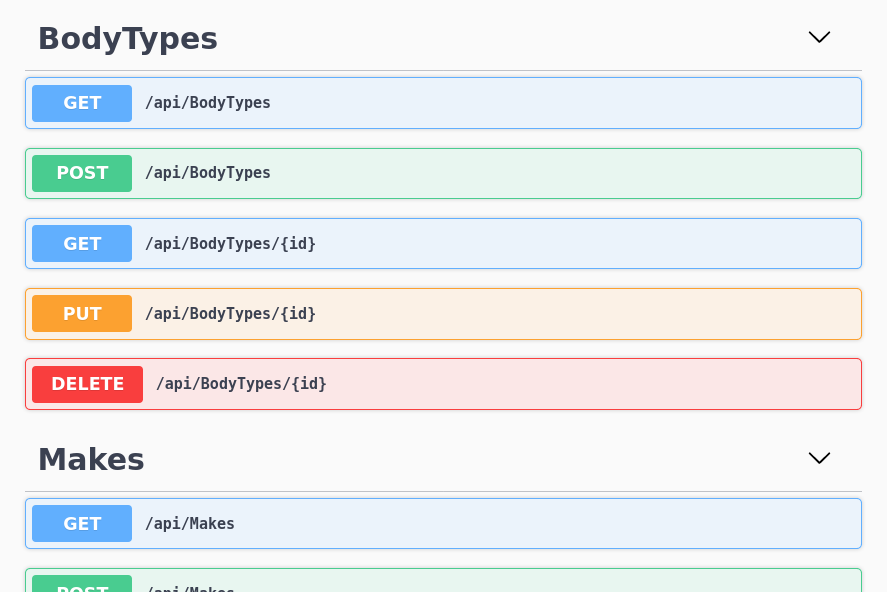
Try it out! You can interact with each of the endpoints from the Swagger UI and it all works as you’d expect.
Adding unique constraints via indexes
Ok, our app is coming along well. Right now though, there’s an issue with the tables that we’ve created. It’s possible to create vehicle makes with the same name. The same is true for body types and sizes. This doesn’t make much sense for these tables. So let’s fix that by adding a uniqueness constraint. We can do it by creating a unique database index using EF Core’s Index attribute. For example, we can modify our Models/Make.cs like so:
+using Microsoft.EntityFrameworkCore;

namespace VehicleQuotes.Models
{
+   [Index(nameof(Name), IsUnique = true)]
    public class Make
    {
        public int ID { get; set; }
        public string Name { get; set; }
    }
}
In fact, do the same for our other entities in Models/BodyType.cs and Models/Size.cs. Don’t forget the using Microsoft.EntityFrameworkCore statement.
With that, we can create a new migration:
$ dotnet ef migrations add AddUniqueIndexesToLookupTablesThat will result in a new migration script in Migrations/{TIMESTAMP}_AddUniqueIndexesToLookupTables.cs. Its Up method looks like this:
protected override void Up(MigrationBuilder migrationBuilder)
{
    migrationBuilder.CreateIndex(
        name: "ix_sizes_name",
        table: "sizes",
        column: "name",
        unique: true);

    migrationBuilder.CreateIndex(
        name: "ix_makes_name",
        table: "makes",
        column: "name",
        unique: true);

    migrationBuilder.CreateIndex(
        name: "ix_body_types_name",
        table: "body_types",
        column: "name",
        unique: true);
}
As you can see, new unique indexes are being created on the tables and fields that we specified. Like before, apply the changes to the database structure with:
$ dotnet ef database updateNow if you try to create, for example, a vehicle make with a repeated name, you’ll get an error. Try doing so by POSTing to /api/Makes via the Swagger UI:
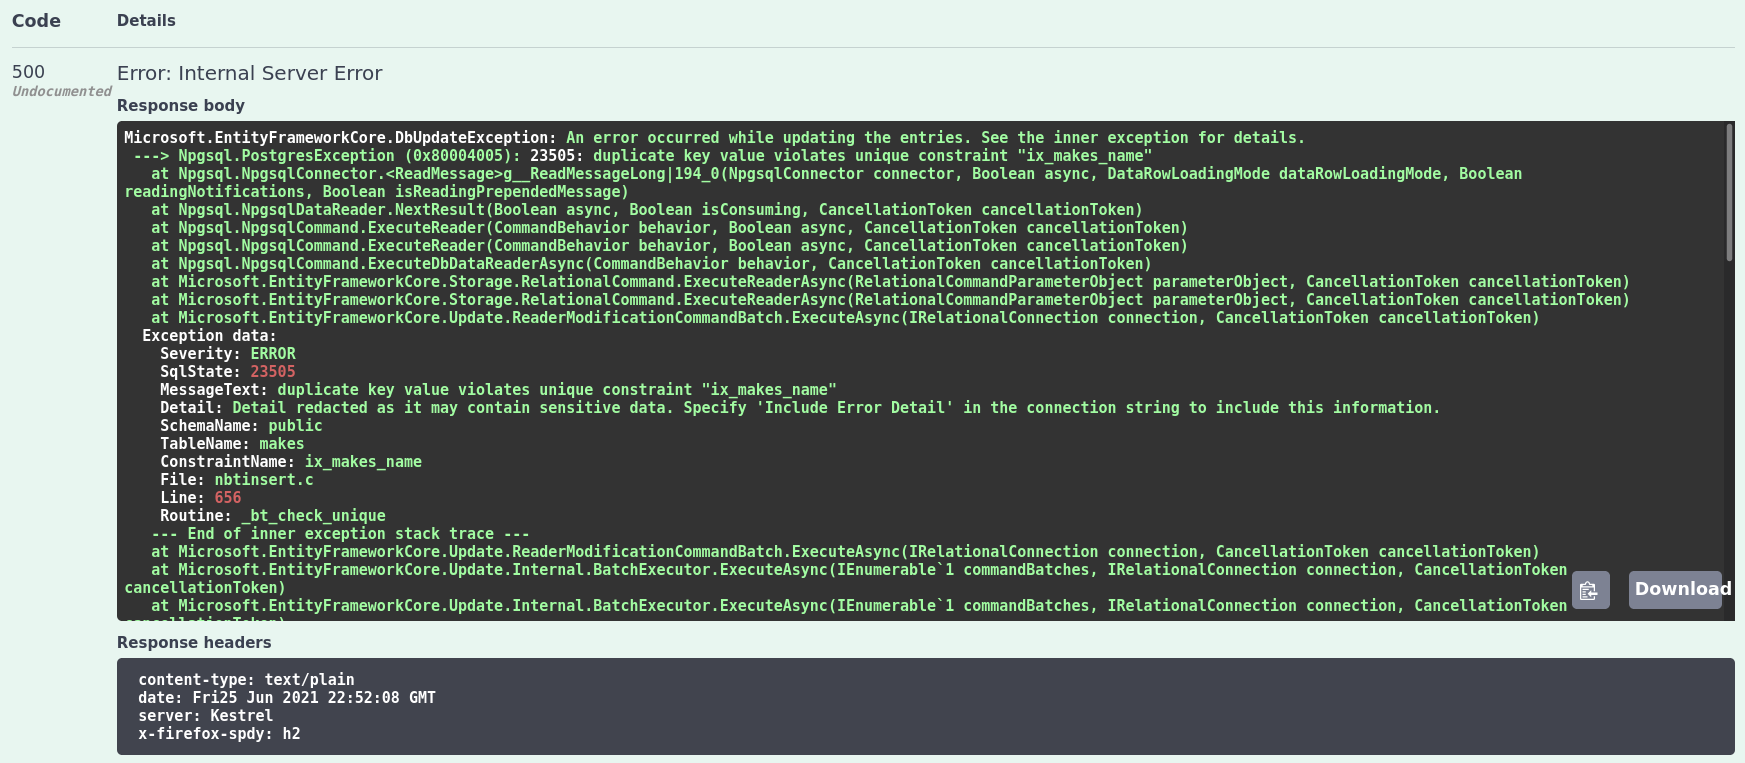
Responding with specific HTTP error codes (409 Conflict)
The fact that we can now enforce unique constraints is all well and good. But the error scenario is not very user friendly. Instead of returning a “500 Internal Server Error” status code with a wall of text, we should be responding with something more sensible. Maybe a “409 Conflict” would be more appropriate for this kind of error. We can easily update our controllers to handle that scenario. What we need to do is update the methods that handle the POST and PUT endpoints so that they catch the Microsoft.EntityFrameworkCore.DbUpdateException exception and return the proper response. Here’s how we would do it for the MakesController:
// ...
namespace VehicleQuotes.Controllers
{
    [Route("api/[controller]")]
    [ApiController]
    public class MakesController : ControllerBase
    {
        // ...

        [HttpPut("{id}")]
        public async Task<IActionResult> PutMake(int id, Make make)
        {
            // ...

            try
            {
                await _context.SaveChangesAsync();
            }
            // ...
+           catch (Microsoft.EntityFrameworkCore.DbUpdateException)
+           {
+               return Conflict();
+           }

            return NoContent();
        }

        [HttpPost]
        public async Task<ActionResult<Make>> PostMake(Make make)
        {
            _context.Makes.Add(make);
-           await _context.SaveChangesAsync();

+           try
+           {
+               await _context.SaveChangesAsync();
+           }
+           catch (Microsoft.EntityFrameworkCore.DbUpdateException)
+           {
+               return Conflict();
+           }

            return CreatedAtAction("GetMake", new { id = make.ID }, make);
        }

        // ...
    }
}
Go ahead and do the same for the other two controllers, and try again to POST a repeated make name via the Swagger UI. You should see this now instead:
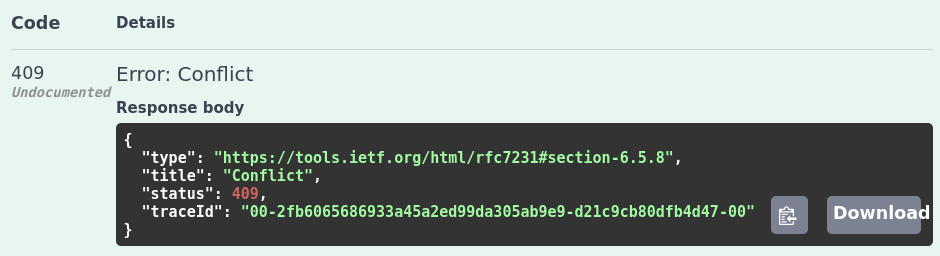
Much better now, don’t you think?
Adding a more complex entity to the model
Now let’s work on an entity that’s a little bit more complex: the one we will use to represent vehicle models.
For this entity, we don’t want our API to be as low level as the one for the other three, where it was basically a thin wrapper over database tables. We want it to be a little bit more abstract and not expose the entire database structure verbatim.
Refer back to the data model. We’ll add models, model_styles and model_style_years. Let’s start by adding the following classes:
// Models/Model.cs
using System.Collections.Generic;

namespace VehicleQuotes.Models
{
    public class Model
    {
        public int ID { get; set; }
        public string Name { get; set; }
        public int MakeID { get; set; }

        public Make Make { get; set; }

        public ICollection<ModelStyle> ModelStyles { get; set; }
    }
}
// Models/ModelStyle.cs
using System.Collections.Generic;
namespace VehicleQuotes.Models
{
public class ModelStyle
{
public int ID { get; set; }
public int ModelID { get; set; }
public int BodyTypeID { get; set; }
public int SizeID { get; set; }
public Model Model { get; set; }
public BodyType BodyType { get; set; }
public Size Size { get; set; }
public ICollection<ModelStyleYear> ModelStyleYears { get; set; }
}
}// Models/ModelStyleYear.cs
namespace VehicleQuotes.Models
{
public class ModelStyleYear
{
public int ID { get; set; }
public string Year { get; set; }
public int ModelStyleID { get; set; }
public ModelStyle ModelStyle { get; set; }
}
}Notice how some of these entities now include properties whose types are other entities. Some of them are collections even. These are called Navigation Properties and are how we tell EF Core that our entities are related to one another. These will result in foreign keys being created in the database.
Take the Model entity for example. It has a property Make of type Make. It also has a MakeID property of type int. EF Core sees this and figures out that there’s a relation between the makes and models tables. Specifically, that models have a make. A many-to-one relation where the models table stores a foreign key to the makes table.
Similarly, the Model entity has a ModelStyles property of type ICollection<ModelStyleYear>. This tells EF Core that models have many model_styles. This one is a one-to-many relation from the perspective of the models table. The foreign key lives in the model_styles table and points back to models.
The official documentation is a great resource to learn more details about how relationships work in EF Core.
After that, same as before, we have to add the corresponding DbSets to our DbContext:
// Data/VehicleQuotesContext.cs
// ...

namespace VehicleQuotes
{
    public class VehicleQuotesContext : DbContext
    {
        // ...

+       public DbSet<Model> Models { get; set; }
+       public DbSet<ModelStyle> ModelStyles { get; set; }
+       public DbSet<ModelStyleYear> ModelStyleYears { get; set; }
    }
}
Don’t forget the migration script. First create it:
$ dotnet ef migrations add AddVehicleModelTablesAnd then apply it:
$ dotnet ef database updateAdding composite unique indexes
These vehicle model related tables also need some uniqueness enforcement. This time, however, the unique keys are composite. Meaning that they involve multiple fields. For vehicle models, for example, it makes no sense to have multiple records with the same make and name. But it does make sense to have multiple models with the same name, as long as they belong to different makes. We can solve for that with a composite index. Here’s how we create one of those in Model with EF Core:
using System.Collections.Generic;
+using Microsoft.EntityFrameworkCore;

namespace VehicleQuotes.Models
{
+   [Index(nameof(Name), nameof(MakeID), IsUnique = true)]
    public class Model
    {
        // ...
    }
}
Very similar to what we did with the Make, BodyType, and Size entities. The only difference is that this time we included multiple fields in the parameters for the Index attribute.
We should do the same for ModelStyle and ModelStyleYear:
using System.Collections.Generic;
+using Microsoft.EntityFrameworkCore;

namespace VehicleQuotes.Models
{
+   [Index(nameof(ModelID), nameof(BodyTypeID), nameof(SizeID), IsUnique = true)]
    public class ModelStyle
    {
        // ...
    }
}
+using Microsoft.EntityFrameworkCore;

namespace VehicleQuotes.Models
{
+   [Index(nameof(Year), nameof(ModelStyleID), IsUnique = true)]
    public class ModelStyleYear
    {
        // ...
    }
}
Don’t forget the migrations:
$ dotnet ef migrations add AddUniqueIndexesForVehicleModelTables

$ dotnet ef database update
Adding controllers with custom routes
Our data model dictates that vehicle models belong in a make. In other words, a vehicle model has no meaning by itself. It only has meaning within the context of a make. Ideally, we want our API routes to reflect this concept. In other words, instead of URLs for models to look like this: /api/Models/{id}; we’d rather them look like this: /api/Makes/{makeId}/Models/{modelId}. Let’s go ahead and scaffold a controller for this entity:
$ dotnet aspnet-codegenerator controller \
    -name ModelsController \
    -m Model \
    -dc VehicleQuotesContext \
    -async \
    -api \
    -outDir Controllers
Now let’s change the resulting Controllers/ModelsController.cs to use the URL structure that we want. To do so, we modify the Route attribute that’s applied to the ModelsController class to this:
[Route("api/Makes/{makeId}/[controller]/")]
Do a dotnet run and take a peek at the Swagger UI on https://localhost:5001 to see what the Models endpoint routes look like now:
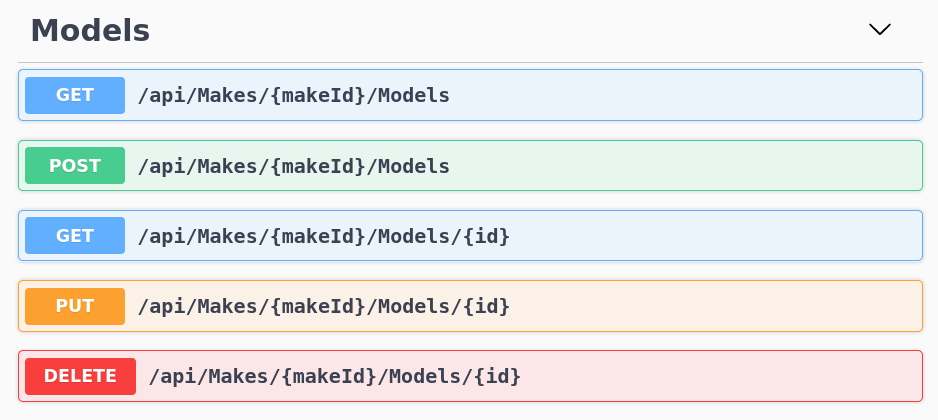
The vehicle model routes are now nested within makes, just like we wanted.
Of course, this is just eye candy for now. We need to actually use this new makeId parameter for the logic in the endpoints. For example, one would expect a GET to /api/Makes/1/Models to return all the vehicle models that belong to the make with id 1. But right now, all vehicle models are returned regardless. All other endpoints behave similarly, there’s no limit to the operations on the vehicle models. The given makeId is not taken into consideration at all.
Let’s update the ModelsController’s GetModels method (which is the one that handles the GET /api/Makes/{makeId}/Models endpoint) to behave like one would expect. It should look like this:
[HttpGet]
public async Task<ActionResult<IEnumerable<Model>>> GetModels([FromRoute] int makeId)
{
    var make = await _context.Makes.FindAsync(makeId);

    if (make == null)
    {
        return NotFound();
    }

    return await _context.Models.Where(m => m.MakeID == makeId).ToListAsync();
}
See how we’ve included a new parameter to the method: [FromRoute] int makeId. This [FromRoute] attribute is how we tell ASP.NET Core that this endpoint will use that makeId parameter coming from the URL route. Then, we use our DbContext to try to find the make that corresponds to the given identifier. This is done in _context.Makes.FindAsync(makeId). Then, if we can’t find the given make, we return a 404 Not Found HTTP status code with the return NotFound(); line. Finally, we query the models table for all the records whose make_id matches the given parameter. That’s done in the last line of the method.
We have access to the
DbContextbecause it has been injected as a dependency into the controller via its constructor by the framework.
The official documentation is a great resource to learn about all the possibilities when querying data with EF Core.
Let’s update the GetModel method, which handles the GET /api/Makes/{makeId}/Models/{id} endpoint, similarly.
[HttpGet("{id}")]
-public async Task<ActionResult<Model>> GetModel(int id)
+public async Task<ActionResult<Model>> GetModel([FromRoute] int makeId, int id)
{
-   var model = await _context.Models.FindAsync(id);
+   var model = await _context.Models.FirstOrDefaultAsync(m =>
+       m.MakeID == makeId && m.ID == id
+   );

    if (model == null)
    {
        return NotFound();
    }

    return model;
}
We’ve once again included the makeId as a parameter to the method and modified the EF Core query to use both the make ID and the vehicle model ID when looking for the record.
And that’s the gist of it. Other methods would need to be updated similarly. The next section will include these methods in their final form, so I won’t go through each one of them here.
Using resource models as DTOs for controllers
Now, I did say at the beginning that we wanted the vehicle model endpoint to be a bit more abstract. Right now it’s operating directly over the EF Core entities and our table. As a result, creating new vehicle models via the POST /api/Makes/{makeId}/Models endpoint is a pain. Take a look at the Swagger UI request schema for that endpoint:
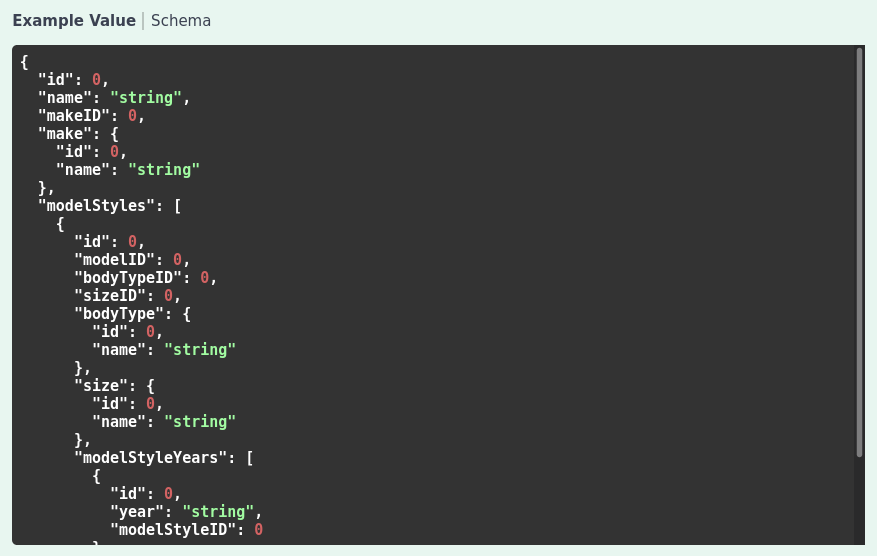
This is way too much. Let’s make it a little bit more user friendly by making it more abstract.
To do that, we will introduce what I like to call a Resource Model (or DTO, Data Transfer Object, or View Model). This is a class whose only purpose is to streamline the API contract of the endpoint by defining a set of fields that clients will use to make requests and interpret responses. Something that’s simpler than our actual database structure, but still captures all the information that’s important for our application. We will update the ModelsController so that it’s able to receive objects of this new class as requests, operate on them, translate them to our EF Core entities and actual database records, and return them as a response. The hope is that, by hiding the details of our database structure, we make it easier for clients to interact with our API.
So let’s create a new ResourceModels directory in our project’s root and add these two classes:
// ResourceModels/ModelSpecification.cs
namespace VehicleQuotes.ResourceModels
{
    public class ModelSpecification
    {
        public int ID { get; set; }
        public string Name { get; set; }

        public ModelSpecificationStyle[] Styles { get; set; }
    }
}
// ResourceModels/ModelSpecificationStyle.cs
namespace VehicleQuotes.ResourceModels
{
public class ModelSpecificationStyle
{
public string BodyType { get; set; }
public string Size { get; set; }
public string[] Years { get; set; }
}
}Thanks to these two, instead of that mess from above, clients POSTing to /api/Makes/{makeId}/Models will be able to use a request body like this:
{
  "name": "string",
  "styles": [
    {
      "bodyType": "string",
      "size": "string",
      "years": [
        "string"
      ]
    }
  ]
}
Which is much simpler. We have the vehicle model name and an array of styles. Each style has a body type and a size, which we can specify by their names because those are unique keys. We don’t need their integer IDs (i.e. primary keys) in order to find to them. Then, each style has an array of strings that contain the years in which those styles are available for that model. The make is part of the URL already, so we don’t need to also specify it in the request payload.
Let’s update our ModelsController to use these Resource Models instead of the Model EF Core entity. Be sure to include the namespace where the Resource Models are defined by adding the following using statement: using VehicleQuotes.ResourceModels;. Now, let’s update the GetModels method (which handles the GET /api/Makes/{makeId}/Models endpoint) so that it looks like this:
[HttpGet]
// Return a collection of `ModelSpecification`s and expect a `makeId` from the URL.
public async Task<ActionResult<IEnumerable<ModelSpecification>>> GetModels([FromRoute] int makeId)
{
    // Look for the make identified by `makeId`.
    var make = await _context.Makes.FindAsync(makeId);

    // If we can't find the make, then we return a 404.
    if (make == null)
    {
        return NotFound();
    }

    // Build a query to fetch the relevant records from the `models` table and
    // build `ModelSpecification` with the data.
    var modelsToReturn = _context.Models
        .Where(m => m.MakeID == makeId)
        .Select(m => new ModelSpecification {
            ID = m.ID,
            Name = m.Name,
            Styles = m.ModelStyles.Select(ms => new ModelSpecificationStyle {
                BodyType = ms.BodyType.Name,
                Size = ms.Size.Name,
                Years = ms.ModelStyleYears.Select(msy => msy.Year).ToArray()
            }).ToArray()
        });

    // Execute the query and respond with the results.
    return await modelsToReturn.ToListAsync();
}
The first thing that we changed was the return type. Instead of Task<ActionResult<IEnumerable<Model>>>, the method now returns Task<ActionResult<IEnumerable<ModelSpecification>>>. We’re going to use our new Resource Models as these endpoints’ contract, so we need to make sure we are returning those. Next, we considerably changed the LINQ expression that searches the database for the vehicle model records we want. The filtering logic (given by the Where) is the same. That is, we’re still searching for vehicle models within the given make ID. What we changed was the projection logic in the Select. Our Action Method now returns a collection of ModelSpecification objects, so we updated the Select to produce such objects, based on the records from the models table that match our search criteria. We build ModelSpecifications using the data coming from models records and their related model_styles and model_style_years. Finally, we asynchronously execute the query to fetch the data from the database and return it.
Next, let’s move on to the GetModel method, which handles the GET /api/Makes/{makeId}/Models/{id} endpoint. This is what it should look like:
[HttpGet("{id}")]
// Return a `ModelSpecification`s and expect `makeId` and `id` from the URL.
public async Task<ActionResult<ModelSpecification>> GetModel([FromRoute] int makeId, [FromRoute] int id)
{
    // Look for the model specified by the given identifiers and also load
    // all related data that we care about for this method.
    var model = await _context.Models
        .Include(m => m.ModelStyles).ThenInclude(ms => ms.BodyType)
        .Include(m => m.ModelStyles).ThenInclude(ms => ms.Size)
        .Include(m => m.ModelStyles).ThenInclude(ms => ms.ModelStyleYears)
        .FirstOrDefaultAsync(m => m.MakeID == makeId && m.ID == id);

    // If we couldn't find it, respond with a 404.
    if (model == null)
    {
        return NotFound();
    }

    // Use the fetched data to construct a `ModelSpecification` to use in the response.
    return new ModelSpecification {
        ID = model.ID,
        Name = model.Name,
        Styles = model.ModelStyles.Select(ms => new ModelSpecificationStyle {
            BodyType = ms.BodyType.Name,
            Size = ms.Size.Name,
            Years = ms.ModelStyleYears.Select(msy => msy.Year).ToArray()
        }).ToArray()
    };
}
Same as before, we changed the return type of the method to be ModelSpecification. Then, we modified the query so that it loads all the related data for the Model entity via its navigation properties. That’s what the Include and ThenInclude calls do. We need this data loaded because we use it in the method’s return statement to build the ModelSpecification that will be included in the response. The logic to build it is very similar to that of the previous method.
You can learn more about the various available approaches for loading data with EF Core in the official documentation.
Next is the PUT /api/Makes/{makeId}/Models/{id} endpoint, handled by the PutModel method:
[HttpPut("{id}")]
// Expect `makeId` and `id` from the URL and a `ModelSpecification` from the request payload.
public async Task<IActionResult> PutModel([FromRoute] int makeId, int id, ModelSpecification model)
{
    // If the id in the URL and the request payload are different, return a 400.
    if (id != model.ID)
    {
        return BadRequest();
    }

    // Obtain the `models` record that we want to update. Include any related
    // data that we want to update as well.
    var modelToUpdate = await _context.Models
        .Include(m => m.ModelStyles)
        .FirstOrDefaultAsync(m => m.MakeID == makeId && m.ID == id);

    // If we can't find the record, then return a 404.
    if (modelToUpdate == null)
    {
        return NotFound();
    }

    // Update the record with what came in the request payload.
    modelToUpdate.Name = model.Name;

    // Build EF Core entities based on the incoming Resource Model object.
    modelToUpdate.ModelStyles = model.Styles.Select(style => new ModelStyle {
        BodyType = _context.BodyTypes.Single(bodyType => bodyType.Name == style.BodyType),
        Size = _context.Sizes.Single(size => size.Name == style.Size),

        ModelStyleYears = style.Years.Select(year => new ModelStyleYear {
            Year = year
        }).ToList()
    }).ToList();

    try
    {
        // Try saving the changes. This will run the UPDATE statement in the database.
        await _context.SaveChangesAsync();
    }
    catch (Microsoft.EntityFrameworkCore.DbUpdateException)
    {
        // If there's an error updating, respond accordingly.
        return Conflict();
    }

    // Finally return a 204 if everything went well.
    return NoContent();
}
The purpose of this endpoint is to update existing resources. So, it receives a representation of said resource as a parameter that comes from the request body. Before, it expected an instance of the Model entity, but now, we’ve changed it to receive a ModelSpecification. The rest of the method is your usual structure of first obtaining the record to update by the given IDs, then changing its values according to what came in as a parameter, and finally, saving the changes.
You probably get the idea by now: since the API is using the Resource Model, we need to change input and output values for the methods and run some logic to translate between Resource Model objects and Data Model objects that EF Core can understand so that it can perform its database operations.
That said, here’s what the PostModel Action Method, handler of the POST /api/Makes/{makeId}/Models endpoint, should look like:
[HttpPost]
// Return a `ModelSpecification`s and expect `makeId` from the URL and a `ModelSpecification` from the request payload.
public async Task<ActionResult<ModelSpecification>> PostModel([FromRoute] int makeId, ModelSpecification model)
{
    // First, try to find the make specified by the incoming `makeId`.
    var make = await _context.Makes.FindAsync(makeId);

    // Respond with 404 if not found.
    if (make == null)
    {
        return NotFound();
    }

    // Build out a new `Model` entity, complete with all related data, based on
    // the `ModelSpecification` parameter.
    var modelToCreate = new Model {
        Make = make,
        Name = model.Name,

        ModelStyles = model.Styles.Select(style => new ModelStyle {
            // Notice how we search both body type and size by their name field.
            // We can do that because their names are unique.
            BodyType = _context.BodyTypes.Single(bodyType => bodyType.Name == style.BodyType),
            Size = _context.Sizes.Single(size => size.Name == style.Size),

            ModelStyleYears = style.Years.Select(year => new ModelStyleYear {
                Year = year
            }).ToArray()
        }).ToArray()
    };

    // Add it to the DbContext.
    _context.Add(modelToCreate);

    try
    {
        // Try running the INSERTs.
        await _context.SaveChangesAsync();
    }
    catch (Microsoft.EntityFrameworkCore.DbUpdateException)
    {
        // Return accordingly if an error happens.
        return Conflict();
    }

    // Get back the autogenerated ID of the record we just INSERTed.
    model.ID = modelToCreate.ID;

    // Finally, return a 201 including a location header containing the newly
    // created resource's URL and the resource itself in the response payload.
    return CreatedAtAction(
        nameof(GetModel),
        new { makeId = makeId, id = model.ID },
        model
    );
}
All that should be pretty self explanatory by now. Moving on to the DeleteModel method which handles the DELETE /api/Makes/{makeId}/Models/{id} endpoint:
[HttpDelete("{id}")]
// Expect `makeId` and `id` from the URL.
public async Task<IActionResult> DeleteModel([FromRoute] int makeId, int id)
{
// Try to find the record identified by the ids from the URL.
var model = await _context.Models.FirstOrDefaultAsync(m => m.MakeID == makeId && m.ID == id);
// Respond with a 404 if we can't find it.
if (model == null)
{
return NotFound();
}
// Mark the entity for removal and run the DELETE.
_context.Models.Remove(model);
await _context.SaveChangesAsync();
// Respond with a 204.
return NoContent();
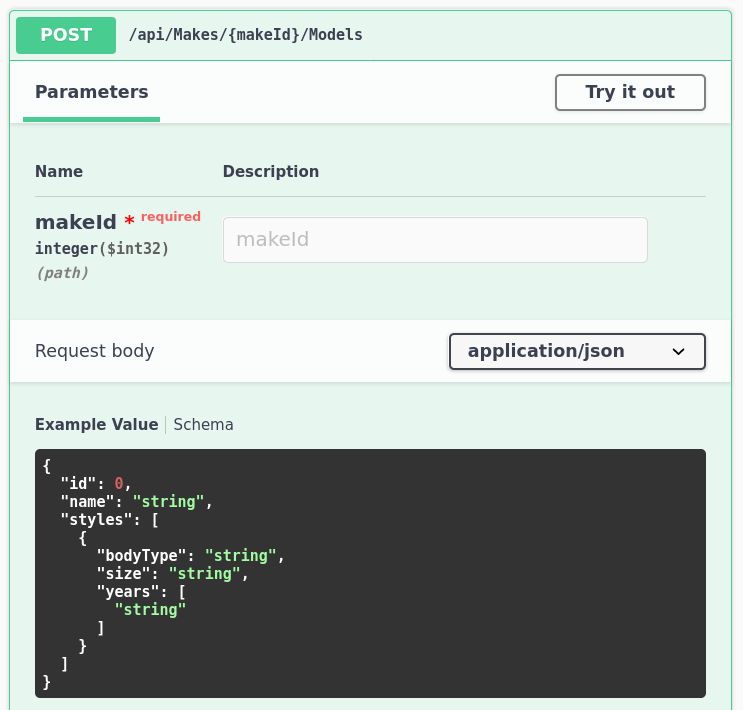
}And that’s all for that controller. Hopefully that demonstrated what it looks like to have endpoints that operate using objects other than the EF Core entities. Fire up the app with dotnet run and explore the Swagger UI and you’ll see the changes that we’ve made reflected in there. Try it out. Try CRUDing some vehicle models. And don’t forget to take a look at our POST endpoint specification which looks much more manageable now:
Which means that you can send in something like this, for example:
{
    "name": "Corolla",
    "styles": [
        {
            "bodyType": "Sedan",
            "size": "Compact",
            "years": [ "2000", "2001" ]
        }
    ]
}
This will work assuming you’ve created at least one make to add the vehicle model to, as well as a body type whose name is
Sedanand a size whose name isCompact.
There’s also a
ModelExistsmethod in that controller which we don’t need anymore. You can delete it.
Validation using built-in Data Annotations
Depending on how “creative” you were in the previous section when trying to CRUD models, you may have run into an issue or two regarding the data that’s allowed into our database. We solve that by implementing input validation. In ASP.NET Core, the easiest way to implement validation is via Data Annotation attributes on the entities or other objects that controllers receive as request payloads. So let’s see about adding some validation to our app. Since our ModelsController uses the ModelSpecification and ModelSpecificationStyle Resource Models to talk to clients, let’s start there. Here’s the diff:
+using System.ComponentModel.DataAnnotations;

namespace VehicleQuotes.ResourceModels
{
    public class ModelSpecification
    {
        public int ID { get; set; }
+       [Required]
        public string Name { get; set; }

+       [Required]
        public ModelSpecificationStyle[] Styles { get; set; }
    }
}
+using System.ComponentModel.DataAnnotations;

namespace VehicleQuotes.ResourceModels
{
    public class ModelSpecificationStyle
    {
+       [Required]
        public string BodyType { get; set; }
+       [Required]
        public string Size { get; set; }

+       [Required]
+       [MinLength(1)]
        public string[] Years { get; set; }
    }
}
And just like that, we get a good amount of functionality. We use the Required and MinLength attributes from the System.ComponentModel.DataAnnotations namespace to specify that some fields are required, and that our Years array needs to contain at least one element. When the app receives a request to the PUT or POST endpoints — which are the ones that expect a ModelSpecification as the payload — validation kicks in. If it fails, the action method is never executed and a 400 status code is returned as a response. Try POSTing to /api/Makes/{makeId}/Models with a payload that violates some of these rules to see for yourself. I tried for example sending this:
{
  "name": null,
  "styles": [
    {
      "bodyType": "Sedan",
      "size": "Full size",
      "years": []
    }
  ]
}
And I got back a 400 response with this payload:
{
  "type": "https://tools.ietf.org/html/rfc7231#section-6.5.1",
  "title": "One or more validation errors occurred.",
  "status": 400,
  "traceId": "00-0fd4f00eeb9f2f458ccefc180fcfba1c-79a618f13218394b-00",
  "errors": {
    "Name": [
      "The Name field is required."
    ],
    "Styles[0].Years": [
      "The field Years must be a string or array type with a minimum length of '1'."
    ]
  }
}
Pretty neat, huh? With minimal effort, we have some basic validation rules in place and a pretty usable response for when errors occur.
To learn more about model validation, including all the various validation attributes included in the framework, check the official documentation: Model validation and System.ComponentModel.DataAnnotations Namespace.
Validation using custom attributes
Of course, the framework is never going to cover all possible validation scenarios with the built-in attributes. Case in point, it’d be great to validate that the Years array contains values that look like actual years. That is, four-character, digit-only strings. There are no validation attributes for that. So, we need to create our own. Let’s add this file into a new Validations directory:
// Validations/ContainsYearsAttribute.cs
using System;
using System.ComponentModel.DataAnnotations;
using System.Linq;
using System.Runtime.CompilerServices;

namespace VehicleQuotes.Validation
{
    // In the .NET Framework, attribute classes need to have their name suffixed with the word "Attribute".
    // Validation attributes need to inherit from `System.ComponentModel.DataAnnotations`'s `ValidationAttribute` class
    // and override the `IsValid` method.
    public class ContainsYearsAttribute : ValidationAttribute
    {
        private string propertyName;

        // This constructor is called by the framework when the attribute is applied to some member. In this specific
        // case, we define a `propertyName` parameter annotated with a `CallerMemberName` attribute. This makes it so
        // the framework sends in the name of the member to which our `ContainsYears` attribute is applied to.
        // We store the value to use it later when constructing our validation error message.
        // Check https://docs.microsoft.com/en-us/dotnet/api/system.runtime.compilerservices.callermembernameattribute?view=net-5.0
        // for more info on `CallerMemberName`.
        public ContainsYearsAttribute([CallerMemberName] string propertyName = null)
        {
            this.propertyName = propertyName;
        }

        // This method is called by the framework during validation. `value` is the actual value of the field that this
        // attribute will validate.
        protected override ValidationResult IsValid(object value, ValidationContext validationContext)
        {
            // By only applying the validation checks when the value is not null, we make it possible for this
            // attribute to work on optional fields. In other words, this attribute will skip validation if there is no
            // value to validate.
            if (value != null)
            {
                // Check if all the elements of the string array are valid years. Check the `IsValidYear` method below
                // to see what checks are applied for each of the array elements.
                var isValid = (value as string[]).All(IsValidYear);

                if (!isValid)
                {
                    // If not, return an error.
                    return new ValidationResult(GetErrorMessage());
                }
            }

            // Return a successful validation result if no errors were detected.
            return ValidationResult.Success;
        }

        // Determines if a given value is valid by making sure it's not null, nor empty, that its length is 4 and that
        // all its characters are digits.
        private bool IsValidYear(string value) =>
            !String.IsNullOrEmpty(value) && value.Length == 4 && value.All(Char.IsDigit);

        // Builds a user friendly error message which includes the name of the field that this validation attribute has
        // been applied to.
        private string GetErrorMessage() =>
            $"The {propertyName} field must be an array of strings containing four digits.";
    }
}
Check the comments in the code for more details into how that class works. Then, we apply our custom attribute to our ModelSpecificationStyle class in the same way that we applied the built in ones:
using System.ComponentModel.DataAnnotations;
+using VehicleQuotes.Validation;

namespace VehicleQuotes.ResourceModels
{
    public class ModelSpecificationStyle
    {
        // ...

        [Required]
        [MinLength(1)]
+       [ContainsYears]
        public string[] Years { get; set; }
    }
}
Now do a dotnet run and try to POST to /api/Makes/{makeId}/Models this payload:
{
  "name": "Rav4",
  "styles": [
    {
      "bodyType": "SUV",
      "size": "Mid size",
      "years": [ "not_a_year" ]
    }
  ]
}
That should make the API respond with this:
{
  "type": "https://tools.ietf.org/html/rfc7231#section-6.5.1",
  "title": "One or more validation errors occurred.",
  "status": 400,
  "traceId": "00-9980325f3e388f48a5975ef382d5b137-2d55da1bb9613e4f-00",
  "errors": {
    "Styles[0].Years": [
      "The Years field must be an array of strings containing four numbers."
    ]
  }
}
That’s our custom validation attribute doing its job.
There’s another aspect that we could validate using a custom validation attribute. What happens if we try to POST a payload with a body type or size that doesn’t exist? These queries from the PostModel method would throw an InvalidOperationException:
BodyType = _context.BodyTypes.Single(bodyType => bodyType.Name == style.BodyType)and
Size = _context.Sizes.Single(size => size.Name == style.Size)They do so because we used the Single method, which is designed like that. It tries to find a body type or size whose name is the given value, can’t find it, and thus, throws an exception.
If, for example, we wanted not-founds to return
null, we could have usedSingleOrDefaultinstead.
This unhandled exception results in a response that’s quite unbecoming:
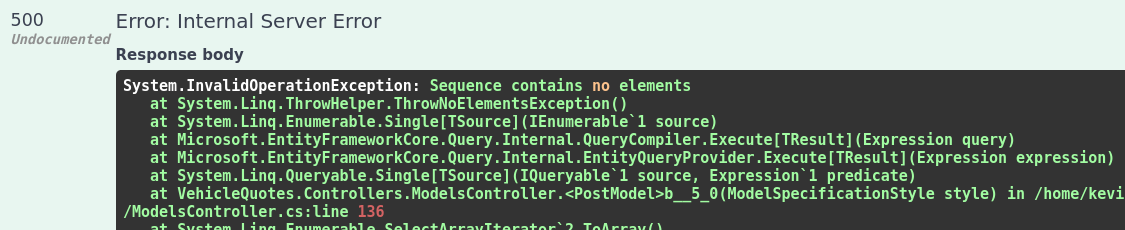
So, to prevent that exception and control the error messaging, we need a couple of new validation attributes that go into the body_types and sizes tables and check if the given values exist. Here’s what one would look like:
// Validations/VehicleBodyTypeAttribute.cs
using System;
using System.ComponentModel.DataAnnotations;
using Microsoft.EntityFrameworkCore;
using System.Linq;

namespace VehicleQuotes.Validation
{
    public class VehicleBodyTypeAttribute : ValidationAttribute
    {
        protected override ValidationResult IsValid(object value, ValidationContext validationContext)
        {
            if (value == null) return ValidationResult.Success;

            var dbContext = validationContext.GetService(typeof(VehicleQuotesContext)) as VehicleQuotesContext;

            var bodyTypes = dbContext.BodyTypes.Select(bt => bt.Name).ToList();

            if (!bodyTypes.Contains(value))
            {
                var allowed = String.Join(", ", bodyTypes);
                return new ValidationResult(
                    $"Invalid vehicle body type {value}. Allowed values are {allowed}."
                );
            }

            return ValidationResult.Success;
        }
    }
}
You can find the other one here: Validations/VehicleSizeAttribute.cs.
These two are very similar to one another. The most interesting part is how we use the IsValid method’s second parameter (ValidationContext) to obtain an instance of VehicleQuotesContext that we can use to query the database. The rest should be pretty self-explanatory. These attributes are classes that inherit from System.ComponentModel.DataAnnotations’s ValidationAttribute and implement the IsValid method. The method then checks that the value under scrutiny exists in the corresponding table and if it does not, raises a validation error. The validation error includes a list of all allowed values. They can be applied to our ModelSpecificationStyle class like so:
// ...
namespace VehicleQuotes.ResourceModels
{
    public class ModelSpecificationStyle
    {
        [Required]
+       [VehicleBodyType]
        public string BodyType { get; set; }

        [Required]
+       [VehicleSize]
        public string Size { get; set; }

        //...
    }
}
Now, a request like this:
{
  "name": "Rav4",
  "styles": [
    {
      "bodyType": "not_a_body_type",
      "size": "Mid size",
      "years": [ "2000" ]
    }
  ]
}
Produces a response like this:
{
  "type": "https://tools.ietf.org/html/rfc7231#section-6.5.1",
  "title": "One or more validation errors occurred.",
  "status": 400,
  "traceId": "00-9ad59a7aff60944ab54c19a73be73cc7-eeabafe03df74e40-00",
  "errors": {
    "Styles[0].BodyType": [
      "Invalid vehicle body type not_a_body_type. Allowed values are Coupe, Sedan, Convertible, Hatchback, SUV, Truck."
    ]
  }
}
Implementing endpoints for quote rules and overrides
At this point we’ve explored many of the most common features available to us for developing Web APIs. So much so that implementing the next two pieces of functionality for our app doesn’t really introduce any new concepts. So, I wont discuss that here in great detail.
Feel free to browse the source code on GitHub if you want though. These are the relevant files:
- Controllers/QuoteOverridesController.cs
- Controllers/QuoteRulesController.cs
- Models/QuoteOverride.cs
- Models/QuoteRule.cs
- ResourceModels/QuoteOverrideSpecification.cs
- Validation/FeatureTypeAttribute.cs
- Migrations/20210627204444_AddQuoteRulesAndOverridesTables.cs
The FeatureTypeAttribute class is interesting in that it provides another example of a validation attribute. This time is one that makes sure the value being validated is included in an array of strings that’s defined literally in the code.
Other than that, it’s all stuff we’ve already covered: models, migrations, scaffolding controllers, custom routes, resource models, etc.
If you are following along, be sure to add those files and run a dotnet ef database update to apply the migration.
Implementing the quote model
Let’s now start implementing the main capability of our app: calculating quotes for vehicles. Let’s start with the Quote entity. This is what the new Models/Quote.cs file containing the entity class will look like:
// Models/Quote.cs
using System;
using System.ComponentModel.DataAnnotations.Schema;

namespace VehicleQuotes.Models
{
    public class Quote
    {
        public int ID { get; set; }

        // Directly tie this quote record to a specific vehicle that we have
        // registered in our db, if we have it.
        public int? ModelStyleYearID { get; set; }

        // If we don't have the specific vehicle in our db, then store the
        // vehicle model details independently.
        public string Year { get; set; }
        public string Make { get; set; }
        public string Model { get; set; }
        public int BodyTypeID { get; set; }
        public int SizeID { get; set; }

        public bool ItMoves { get; set; }
        public bool HasAllWheels { get; set; }
        public bool HasAlloyWheels { get; set; }
        public bool HasAllTires { get; set; }
        public bool HasKey { get; set; }
        public bool HasTitle { get; set; }
        public bool RequiresPickup { get; set; }
        public bool HasEngine { get; set; }
        public bool HasTransmission { get; set; }
        public bool HasCompleteInterior { get; set; }

        public int OfferedQuote { get; set; }
        public string Message { get; set; }
        public DateTime CreatedAt { get; set; }

        public ModelStyleYear ModelStyleYear { get; set; }

        public BodyType BodyType { get; set; }
        public Size Size { get; set; }
    }
}
This should be pretty familiar by now. It’s a plain old class that defines a number of properties, one for each of the fields in the resulting table and a few navigation properties that serve to access related data.
The only aspect worth noting is that we’ve defined the ModelStyleYearID property as a nullable integer (with int?). This is because, like we discussed at the beginning, the foreign key from quotes to vehicle_style_years is actually optional. The reason being that we may receive a quote request for a vehicle that we don’t have registered in our database. We need to be able to support quoting those vehicles too, so if we don’t have the requested vehicle registered, then that foreign key will stay unpopulated and we’ll rely on the other fields (i.e. Year, Make, Model, BodyTypeID and SizeID) to identify the vehicle and calculate the quote for it.
Using Dependency Injection
So far we’ve been putting a lot of logic in our controllers. That’s generally not ideal, but fine as long as the logic is simple. The problem is that a design like that can quickly become a hindrance for maintainability and testing as our application grows more complex. For the logic that calculates a quote, we’d be better served by implementing it in its own class, outside of the controller that should only care about defining endpoints and handling HTTP concerns. Then, the controller can be given access to that class and delegate to it all the quote calculation logic. Thankfully, ASP.NET Core includes an IoC container by default, which allows us to use Dependency Injection to solve these kinds of problems. Let’s see what that looks like.
For working with quotes, we want to offer two endpoints:
- A
POST api/Quotesthat captures the vehicle information, calculates the quote, keeps record of the request, and responds with the calculated value. - A
GET api/Quotesthat returns all the currently registered quotes in the system.
Using the Dependency Injection capabilities, a controller that implements those two could look like this:
using System.Collections.Generic;
using System.Threading.Tasks;
using Microsoft.AspNetCore.Mvc;
using VehicleQuotes.ResourceModels;
using VehicleQuotes.Services;

namespace VehicleQuotes.Controllers
{
    [Route("api/[controller]")]
    [ApiController]
    public class QuotesController : ControllerBase
    {
        private readonly QuoteService _service;

        // When intiating the request processing logic, the framework recognizes
        // that this controller has a dependency on QuoteService and expects an
        // instance of it to be injected via the constructor. The framework then
        // does what it needs to do in order to provide that dependency.
        public QuotesController(QuoteService service)
        {
            _service = service;
        }

        // GET: api/Quotes
        [HttpGet]
        // This method returns a collection of a new resource model instead of just the `Quote` entity directly.
        public async Task<ActionResult<IEnumerable<SubmittedQuoteRequest>>> GetAll()
        {
            // Instead of directly implementing the logic in this method, we call on
            // the service class and let it take care of the rest.
            return await _service.GetAllQuotes();
        }

        // POST: api/Quotes
        [HttpPost]
        // This method receives as a paramater a `QuoteRequest` of just the `Quote` entity directly.
        // That way callers of this endpoint don't need to be exposed to the details of our data model implementation.
        public async Task<ActionResult<SubmittedQuoteRequest>> Post(QuoteRequest request)
        {
            // Instead of directly implementing the logic in this method, we call on
            // the service class and let it take care of the rest.
            return await _service.CalculateQuote(request);
        }
    }
}
As you can see, we’ve once again opted to abstract away clients from the implementation details of our data model and used Resource Models for the API contract instead of the Quote entity directly. We have one for input data that’s called QuoteRequest and another one for output: SubmittedQuoteRequest. Not very remarkable by themselves, but feel free to explore the source code in the GitHub repo.
This controller has a dependency on QuoteService, which it uses to perform all of the necessary logic. This class is not defined yet so let’s do that next:
using System;
using System.Collections.Generic;
using System.Linq;
using System.Threading.Tasks;
using Microsoft.EntityFrameworkCore;
using VehicleQuotes.Models;
using VehicleQuotes.ResourceModels;

namespace VehicleQuotes.Services
{
    public class QuoteService
    {
        private readonly VehicleQuotesContext _context;

        // This constructor defines a dependency on VehicleQuotesContext, similar to most of our controllers.
        // Via the built in dependency injection features, the framework makes sure to provide this parameter when
        // creating new instances of this class.
        public QuoteService(VehicleQuotesContext context)
        {
            _context = context;
        }

        // This method takes all the records from the `quotes` table and constructs `SubmittedQuoteRequest`s with them.
        // Then returns that as a list.
        public async Task<List<SubmittedQuoteRequest>> GetAllQuotes()
        {
            var quotesToReturn = _context.Quotes.Select(q => new SubmittedQuoteRequest
            {
                ID = q.ID,
                CreatedAt = q.CreatedAt,
                OfferedQuote = q.OfferedQuote,
                Message = q.Message,

                Year = q.Year,
                Make = q.Make,
                Model = q.Model,
                BodyType = q.BodyType.Name,
                Size = q.Size.Name,

                ItMoves = q.ItMoves,
                HasAllWheels = q.HasAllWheels,
                HasAlloyWheels = q.HasAlloyWheels,
                HasAllTires = q.HasAllTires,
                HasKey = q.HasKey,
                HasTitle = q.HasTitle,
                RequiresPickup = q.RequiresPickup,
                HasEngine = q.HasEngine,
                HasTransmission = q.HasTransmission,
                HasCompleteInterior = q.HasCompleteInterior,
            });

            return await quotesToReturn.ToListAsync();
        }

        // This method takes an incoming `QuoteRequest` and calculates a quote based on the vehicle described by it.
        // To calculate this quote, it looks for any overrides before trying to use the currently existing rules defined
        // in the `quote_rules` table. It also stores a record on the `quotes` table with all the incoming data and the
        // quote calculation result. It returns back the quote value as well as a message explaining the conditions of
        // the quote.
        public async Task<SubmittedQuoteRequest> CalculateQuote(QuoteRequest request)
        {
            var response = this.CreateResponse(request);
            var quoteToStore = await this.CreateQuote(request);
            var requestedModelStyleYear = await this.FindModelStyleYear(request);
            QuoteOverride quoteOverride = null;

            if (requestedModelStyleYear != null)
            {
                quoteToStore.ModelStyleYear = requestedModelStyleYear;

                quoteOverride = await this.FindQuoteOverride(requestedModelStyleYear);

                if (quoteOverride != null)
                {
                    response.OfferedQuote = quoteOverride.Price;
                }
            }

            if (quoteOverride == null)
            {
                response.OfferedQuote = await this.CalculateOfferedQuote(request);
            }

            if (requestedModelStyleYear == null)
            {
                response.Message = "Offer subject to change upon vehicle inspection.";
            }

            quoteToStore.OfferedQuote = response.OfferedQuote;
            quoteToStore.Message = response.Message;

            _context.Quotes.Add(quoteToStore);
            await _context.SaveChangesAsync();

            response.ID = quoteToStore.ID;
            response.CreatedAt = quoteToStore.CreatedAt;

            return response;
        }

        // Creates a `SubmittedQuoteRequest`, initialized with default values, using the data from the incoming
        // `QuoteRequest`. `SubmittedQuoteRequest` is what gets returned in the response payload of the quote endpoints.
        private SubmittedQuoteRequest CreateResponse(QuoteRequest request)
        {
            return new SubmittedQuoteRequest
            {
                OfferedQuote = 0,
                Message = "This is our final offer.",

                Year = request.Year,
                Make = request.Make,
                Model = request.Model,
                BodyType = request.BodyType,
                Size = request.Size,

                ItMoves = request.ItMoves,
                HasAllWheels = request.HasAllWheels,
                HasAlloyWheels = request.HasAlloyWheels,
                HasAllTires = request.HasAllTires,
                HasKey = request.HasKey,
                HasTitle = request.HasTitle,
                RequiresPickup = request.RequiresPickup,
                HasEngine = request.HasEngine,
                HasTransmission = request.HasTransmission,
                HasCompleteInterior = request.HasCompleteInterior,
            };
        }

        // Creates a `Quote` based on the data from the incoming `QuoteRequest`. This is the object that gets eventually
        // stored in the database.
        private async Task<Quote> CreateQuote(QuoteRequest request)
        {
            return new Quote
            {
                Year = request.Year,
                Make = request.Make,
                Model = request.Model,
                BodyTypeID = (await _context.BodyTypes.SingleAsync(bt => bt.Name == request.BodyType)).ID,
                SizeID = (await _context.Sizes.SingleAsync(s => s.Name == request.Size)).ID,

                ItMoves = request.ItMoves,
                HasAllWheels = request.HasAllWheels,
                HasAlloyWheels = request.HasAlloyWheels,
                HasAllTires = request.HasAllTires,
                HasKey = request.HasKey,
                HasTitle = request.HasTitle,
                RequiresPickup = request.RequiresPickup,
                HasEngine = request.HasEngine,
                HasTransmission = request.HasTransmission,
                HasCompleteInterior = request.HasCompleteInterior,

                CreatedAt = DateTime.Now
            };
        }

        // Tries to find a registered vehicle that matches the one for which the quote is currently being requested.
        private async Task<ModelStyleYear> FindModelStyleYear(QuoteRequest request)
        {
            return await _context.ModelStyleYears.FirstOrDefaultAsync(msy =>
                msy.Year == request.Year &&
                msy.ModelStyle.Model.Make.Name == request.Make &&
                msy.ModelStyle.Model.Name == request.Model &&
                msy.ModelStyle.BodyType.Name == request.BodyType &&
                msy.ModelStyle.Size.Name == request.Size
            );
        }

        // Tries to find an override for the vehicle for which the quote is currently being requested.
        private async Task<QuoteOverride> FindQuoteOverride(ModelStyleYear modelStyleYear)
        {
            return await _context.QuoteOverides
                .FirstOrDefaultAsync(qo => qo.ModelStyleYear == modelStyleYear);
        }

        // Uses the rules stored in the `quote_rules` table to calculate how much money to offer for the vehicle
        // described in the incoming `QuoteRequest`.
        private async Task<int> CalculateOfferedQuote(QuoteRequest request)
        {
            var rules = await _context.QuoteRules.ToListAsync();

            // Given a vehicle feature type, find a rule that applies to that feature type and has the value that
            // matches the condition of the incoming vehicle being quoted.
            Func<string, QuoteRule> theMatchingRule = featureType =>
                rules.FirstOrDefault(r =>
                    r.FeatureType == featureType &&
                    r.FeatureValue == request[featureType]
                );

            // For each vehicle feature that we care about, sum up the the monetary values of all the rules that match
            // the given vehicle condition.
            return QuoteRule.FeatureTypes.All
                .Select(theMatchingRule)
                .Where(r => r != null)
                .Sum(r => r.PriceModifier);
        }
    }
}
Finally, we need to tell the framework that this class is available for Dependency Injection. Similarly to how we did with our VehicleQuotesContext, we do so in the Startup.cs file’s ConfigureServices method. Just add this line at the top:
services.AddScoped<Services.QuoteService>();The core tenet of Inversion of Control is to depend on abstractions, not on implementations. So ideally, we would not have our controller directly call for a
QuoteServiceinstance. Instead, we would have it reference an abstraction, e.g. an interface likeIQuoteService. The statement onStartup.cswould then look like this instead:services.AddScoped<Services.IQuoteService, Services.QuoteService>();.This is important because it would allow us to unit test the component that depends on our service class (i.e. the controller in this case) by passing it a mock object — one that also implements
IQuoteServicebut does not really implement all the functionality of the actualQuoteServiceclass. Since the controller only knows about the interface (that is, it “depends on an abstraction”), the actual object that we give it as a dependency doesn’t matter to it, as long as it implements that interface. This ability to inject mocks as dependencies is invaluable during testing. Testing is beyond the scope of this article though, so I’ll stick with the simpler approach with a static dependency on a concrete class. Know that this is not a good practice when it comes to actual production systems.
And that’s all it takes. Once you add a few rules via POST /api/QuoteRules, you should be able to get some vehicles quoted with POST /api/Quotes. And also see what the system has stored via GET /api/Quotes.

And that’s all the functionality that we set out to build into our REST API! There are a few other neat things that I thought I’d include though.
Adding seed data for lookup tables
Our vehicle size and body type data isn’t meant to really change much. In fact, we could even preload that data when our application starts. EF Core provides a data seeding feature that we can access via configurations on the DbContext itself. For our case, we could add this method to our VehicleQuotesContext:
protected override void OnModelCreating(ModelBuilder modelBuilder)
{
    modelBuilder.Entity<Size>().HasData(
        new Size { ID = 1, Name = "Subcompact" },
        new Size { ID = 2, Name = "Compact" },
        new Size { ID = 3, Name = "Mid Size" },
        new Size { ID = 5, Name = "Full Size" }
    );

    modelBuilder.Entity<BodyType>().HasData(
        new BodyType { ID = 1, Name = "Coupe" },
        new BodyType { ID = 2, Name = "Sedan" },
        new BodyType { ID = 3, Name = "Hatchback" },
        new BodyType { ID = 4, Name = "Wagon" },
        new BodyType { ID = 5, Name = "Convertible" },
        new BodyType { ID = 6, Name = "SUV" },
        new BodyType { ID = 7, Name = "Truck" },
        new BodyType { ID = 8, Name = "Mini Van" },
        new BodyType { ID = 9, Name = "Roadster" }
    );
}
OnModelCreating is a hook that we can define to run some code at the time the model is being created for the first time. Here, we’re using it to seed some data. In order to apply that, a migration needs to be created and executed. If you’ve added some data to the database, be sure to wipe it before running the migration so that we don’t run into unique constraint violations. Here are the migrations:
$ dotnet ef migrations add AddSeedDataForSizesAndBodyTypes

$ dotnet ef database update
After that’s done, it no longer makes sense to allow creating, updating, deleting and fetching individual sizes and body types, so I would delete those endpoints from the respective controllers.
There are other options for data seeding in EF Core. Take a look: Data Seeding.
Improving the Swagger UI via XML comments
Our current auto-generated Swagger UI is pretty awesome. Especially considering that we got it for free. It’s a little lacking when it comes to more documentation about specific endpoint summaries or expected responses. The good news is that there’s a way to leverage C# XML Comments in order to improve the Swagger UI.
We can add support for that by configuring our project to produce, at build time, an XML file with the docs that we write. In order to do so, we need to update the VehicleQuotes.csproj like this:
<Project Sdk="Microsoft.NET.Sdk.Web">

  <PropertyGroup>
    <!-- ... -->
+   <GenerateDocumentationFile>true</GenerateDocumentationFile>
+   <NoWarn>$(NoWarn);1591</NoWarn>
  </PropertyGroup>

  <!-- ... -->
</Project>
GenerateDocumentationFile is the flag that tells the .NET 5 build tools to generate the documentation file. The NoWarn element prevents our build output from getting cluttered with a lot of warnings saying that some classes and methods are not properly documented. We don’t want that because we just want to write enough documentation for the Swagger UI. And that includes only the controllers.
You can run dotnet build and look for the new file in bin/Debug/net5.0/VehicleQuotes.xml.
Then, we need to update Startup.cs. First we need to add the following using statements:
using System.IO;
using System.Reflection;
And add the following code to the ConfigureServices method on Startup.cs:
public void ConfigureServices(IServiceCollection services)
{
    // ...

    services.AddSwaggerGen(c =>
    {
        c.SwaggerDoc("v1", new OpenApiInfo { Title = "VehicleQuotes", Version = "v1" });

+       c.IncludeXmlComments(
+           Path.Combine(
+               AppContext.BaseDirectory,
+               $"{Assembly.GetExecutingAssembly().GetName().Name}.xml"
+           )
        );
    });

    // ...
}
This makes it so the SwaggerGen service knows to look for the XML documentation file when building up the Open API specification file used for generating the Swagger UI.
Now that all of that is set up, we can actually write some XML comments and attributes that will enhance our Swagger UI. As an example, put this on top of ModelsController’s Post method:
/// <summary>
/// Creates a new vehicle model for the given make.
/// </summary>
/// <param name="makeId">The ID of the vehicle make to add the model to.</param>
/// <param name="model">The data to create the new model with.</param>
/// <response code="201">When the request is valid.</response>
/// <response code="404">When the specified vehicle make does not exist.</response>
/// <response code="409">When there's already another model in the same make with the same name.</response>
[HttpPost]
[ProducesResponseType(StatusCodes.Status201Created)]
[ProducesResponseType(StatusCodes.Status404NotFound)]
[ProducesResponseType(StatusCodes.Status409Conflict)]
public async Task<ActionResult<ModelSpecification>> Post([FromRoute] int makeId, ModelSpecification model)
{
    // ...
}
Then, the Swagger UI now looks like this for this endpoint:
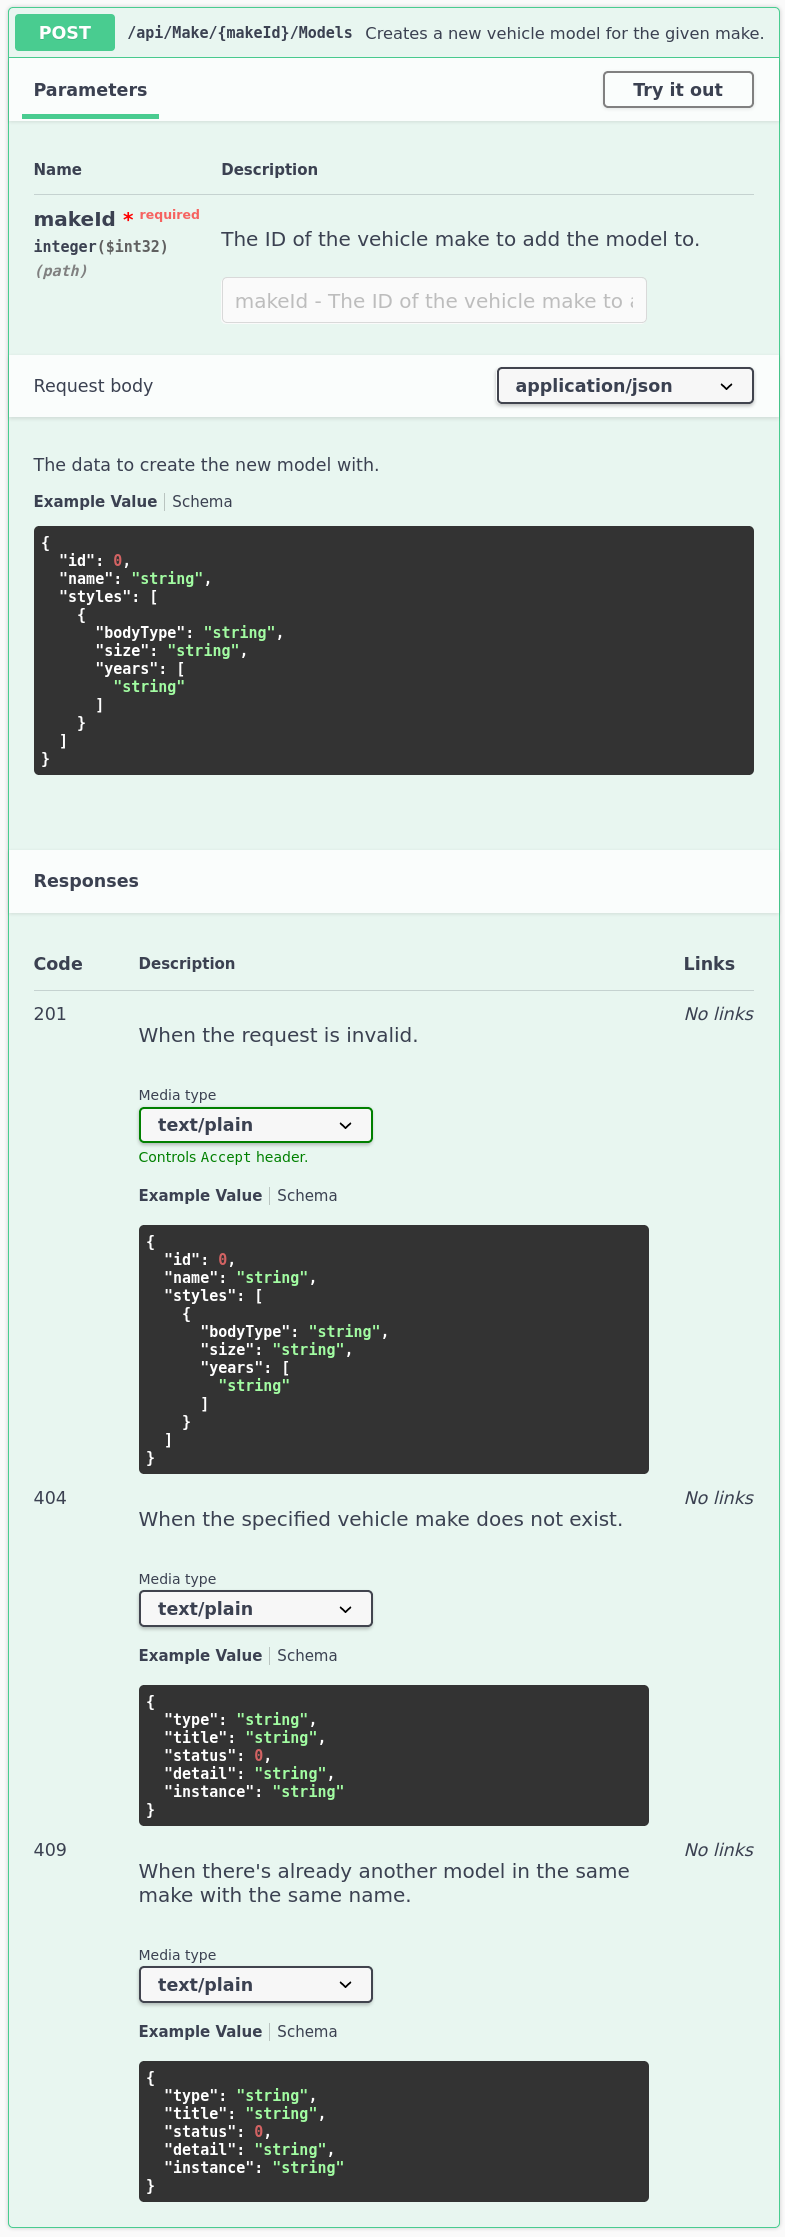
Configuring the app via settings files and environment variables
Another aspect that’s important to web applications is having them be configurable via things like configuration files or environment variables. The framework already has provision for this, we just need to use it. I’m talking about the appsettings files.
We have two of them created for us by default: appsettings.json which is applied in all environments, and appsettings.Development.json that is applied only under development environments. The environment is given by the ASPNETCORE_ENVIRONMENT environment variable, and it can be set to either Development, Staging, or Production by default. That means that if we had, for example, an appsettings.Staging.json file, the settings defined within would be loaded if the ASPNETCORE_ENVIRONMENT environment variable were set to Staging. You get the idea.
You can learn more about configuration and environments in the official documentation.
Anyway, let’s add a new setting on appsettings.json:
{
  // ...
+ "DefaultOffer": 77
}
We’ll use this setting to give default offers when we’re not able to calculate appropriate quotes for vehicles. This can happen if we don’t have rules, or if the ones we have don’t match any of the incoming vehicle features or if for some other reason the final sum ends up in zero or negative number. We can use this setting in our QuoteService like so:
// ...
+using Microsoft.Extensions.Configuration;

namespace VehicleQuotes.Services
{
    public class QuoteService
    {
        // ...
+       private readonly IConfiguration _configuration;

-       public QuoteService(VehicleQuotesContext context)
+       public QuoteService(VehicleQuotesContext context, IConfiguration configuration)
        {
            _context = context;
+           _configuration = configuration;
        }

        // ...

        public async Task<SubmittedQuoteRequest> CalculateQuote(QuoteRequest request)
        {
            // ...

+           if (response.OfferedQuote <= 0)
+           {
+               response.OfferedQuote = _configuration.GetValue<int>("DefaultOffer", 0);
+           }

            quoteToStore.OfferedQuote = response.OfferedQuote;

            // ...
        }

        // ...
    }
}
Here, we’ve added a new parameter to the constructor to specify that VehicleQuotesContext has a dependency on IConfiguration. This prompts the framework to provide an instance of that when instantiating the class. We can use that instance to access the settings that we defined in the appsettings.json file via its GetValue method, like I demonstrated above.
The value of the settings in appsettings.json can be overridden by environment variables as well. On Linux, for example, we can run the app and set an environment value with a line like this:
$ DefaultOffer=123 dotnet runThis will make the application use 123 instead of 77 when it comes to the DefaultOffer setting. This flexibility is great from a DevOps perspective. And we had to do minimal work in order to get that going.
That’s all for now
And that’s it! In this article we’ve gone through many of the features offered in .NET 5, ASP.NET Core, and Entity Framework Core to support some of the most common use cases when it comes to developing Web API applications.
We’ve installed .NET 5 and created an ASP.NET Core Web API project with EF Core and a few bells and whistles, created controllers to support many different endpoints, played a little bit with routes and response codes, created and built upon a data model and updated a database via entities and migrations, implemented database constraints using unique indexes, implemented input validation using both built-in and custom validation attributes, implemented resource models as DTOs for defining the contract of some of our API endpoints, tapped into the built-in dependency injection capabilities, explored and improved the auto-generated Swagger UI, added seed data for our database, learned about configuration via settings files and environment variables.
.NET 5 is looking great.
Table of contents
- What we’re building
- The development environment
- Setting up the project
- Building the application
- Creating model entities, migrations and updating the database
- Creating controllers for CRUDing our tables
- Adding unique constraints via indexes
- Responding with specific HTTP error codes (409 Conflict)
- Adding a more complex entity to the model
- Adding composite unique indexes
- Adding controllers with custom routes
- Using resource models as DTOs for controllers
- Validation using built-in Data Annotations
- Validation using custom attributes
- Implementing endpoints for quote rules and overrides
- Implementing the quote model
- Using Dependency Injection
- Adding seed data for lookup tables
- Improving the Swagger UI via XML comments
- Configuring the app via settings files and environment variables
- That’s all for now
dotnet aspdotnet csharp rest api postgres docker containers
Comments