How to create a Hugo website without a theme

By Seth Jensen
February 14, 2023

Since converting this website to the Hugo static site generator a couple of years ago, I’ve used Hugo for lots of other projects. It’s blazing fast, simple, and makes small website projects much easier.
One of the sites I’ve built with Hugo is a simple site to keep notes for my university classes. Hugo’s documentation tends to assume you’re using a theme, but for such a basic site using a theme would add unnecessary complexity I didn’t want to deal with. So, in this article I’ll show you how to create a site without a theme.
Creating a site
First, install Hugo.
If you want to use SCSS, as I do in the example below, make sure to install the “extended” version of Hugo.
Then, run the following command to create a Hugo site:
$ hugo new site notesGet into the new notes directory, and let’s edit the config file:
baseURL = "http://example.org/"
languageCode = "en-us"
title = "Notes"
pluralizelisttitles = false
Other than the title, the only thing I changed here is disabling pluralizelisttitles. Hugo expects you to name your sections something singular (e.g., put your blog posts in a post directory), then automatically pluralizes the title when listing content in that section (Posts). I prefer the singular for my university class names (Math 112 instead of Math 112s and so on).
Layout
For a site as simple as ours, we only need a few layout files. Create a directory called _default in the layout directory, to put three files in: baseof.html, list.html, and single.html. We’ll go through each of these files and what it does.
If you need to add different templates for different sections, or if you’re curious about why we use
_defaulthere, see Hugo’s lookup order docs.
baseof.html
Every page on the site looks for a base template, which we provide in baseof.html. We’ll use it for the HTML boilerplate — <!doctype html>, the <html> tag, the <head> tag with some logic for what to load, and the <body> tag with a block template for the page content.
<!doctype html>
<html>
  <head>
    <meta charset="utf-8">
    <meta name="viewport" content="width=device-width, initial-scale=1">
    <title>{{ or .Title .Site.Title }}{{ if ne .Kind "home" }} | {{ .CurrentSection.Title }}{{ end }}</title>
    {{ $style := resources.Get "scss/style.scss" | toCSS | minify }}
    <link rel="stylesheet" href="{{ $style.RelPermalink }}">
  </head>
  <body>
    {{ block "page" . }}{{ end }}
  </body>
</html>
list.html
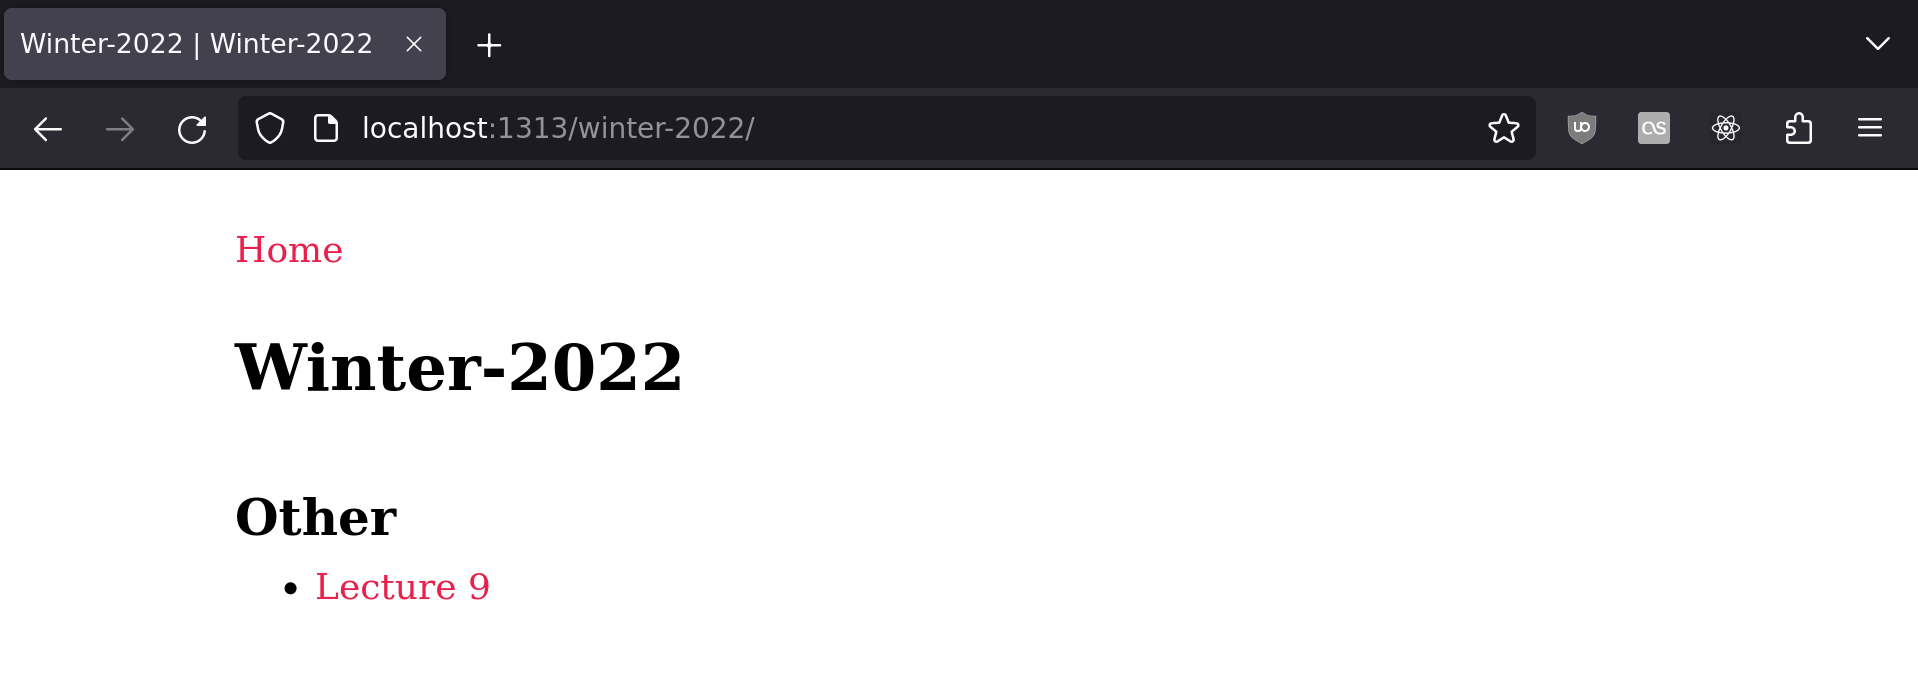
The list template defines the layout for section list pages. Sections are defined by directories in the content folder.
Read more about Sections in the Hugo docs.
{{ define "page" }}
<article class="container">
  {{ if ne .Kind "home" }}
  <a href="{{ .Site.Home.RelPermalink }}">Home</a>
  {{ end }}
  <h1>{{ .Title }}</h1>
  {{ range .Sections }}
  <h2><a href="{{ .RelPermalink }}">{{ .Title }}</a></h2>
  <ul>
    {{ range .Pages }}
      <li>
        <a href="{{ .RelPermalink }}">{{ or .Title .RelPermalink }}</a>
      </li>
    {{ end }}
  </ul>
  {{ end }}
  <h2>Other</h2>
  <ul>
    {{ range .RegularPages }}
      <li>
        <a href="{{ .RelPermalink }}">{{ or .Title .RelPermalink }}</a>
      </li>
    {{ end }}
  </ul>
</article>
{{ end }}
Here’s a breakdown of what’s going on:
-
We define the
pageblock we saw in the base template. -
If we’re not on a
homepage, we show a link to home. -
We range through every subsection of the current Section, listing all the pages for each.
Note that in Hugo, everything is a Page, of varying types (like Section). A Section can have multiple subsections as well as Regular Pages, which are just Markdown files with some front matter. This allows us to list direct subsections alongside the Regular Pages for each section, while listing non-section Pages in our “Other” section. You can read about all the available Pages variables in Hugo’s docs.
-
Then, we list the Regular Pages of the current section.
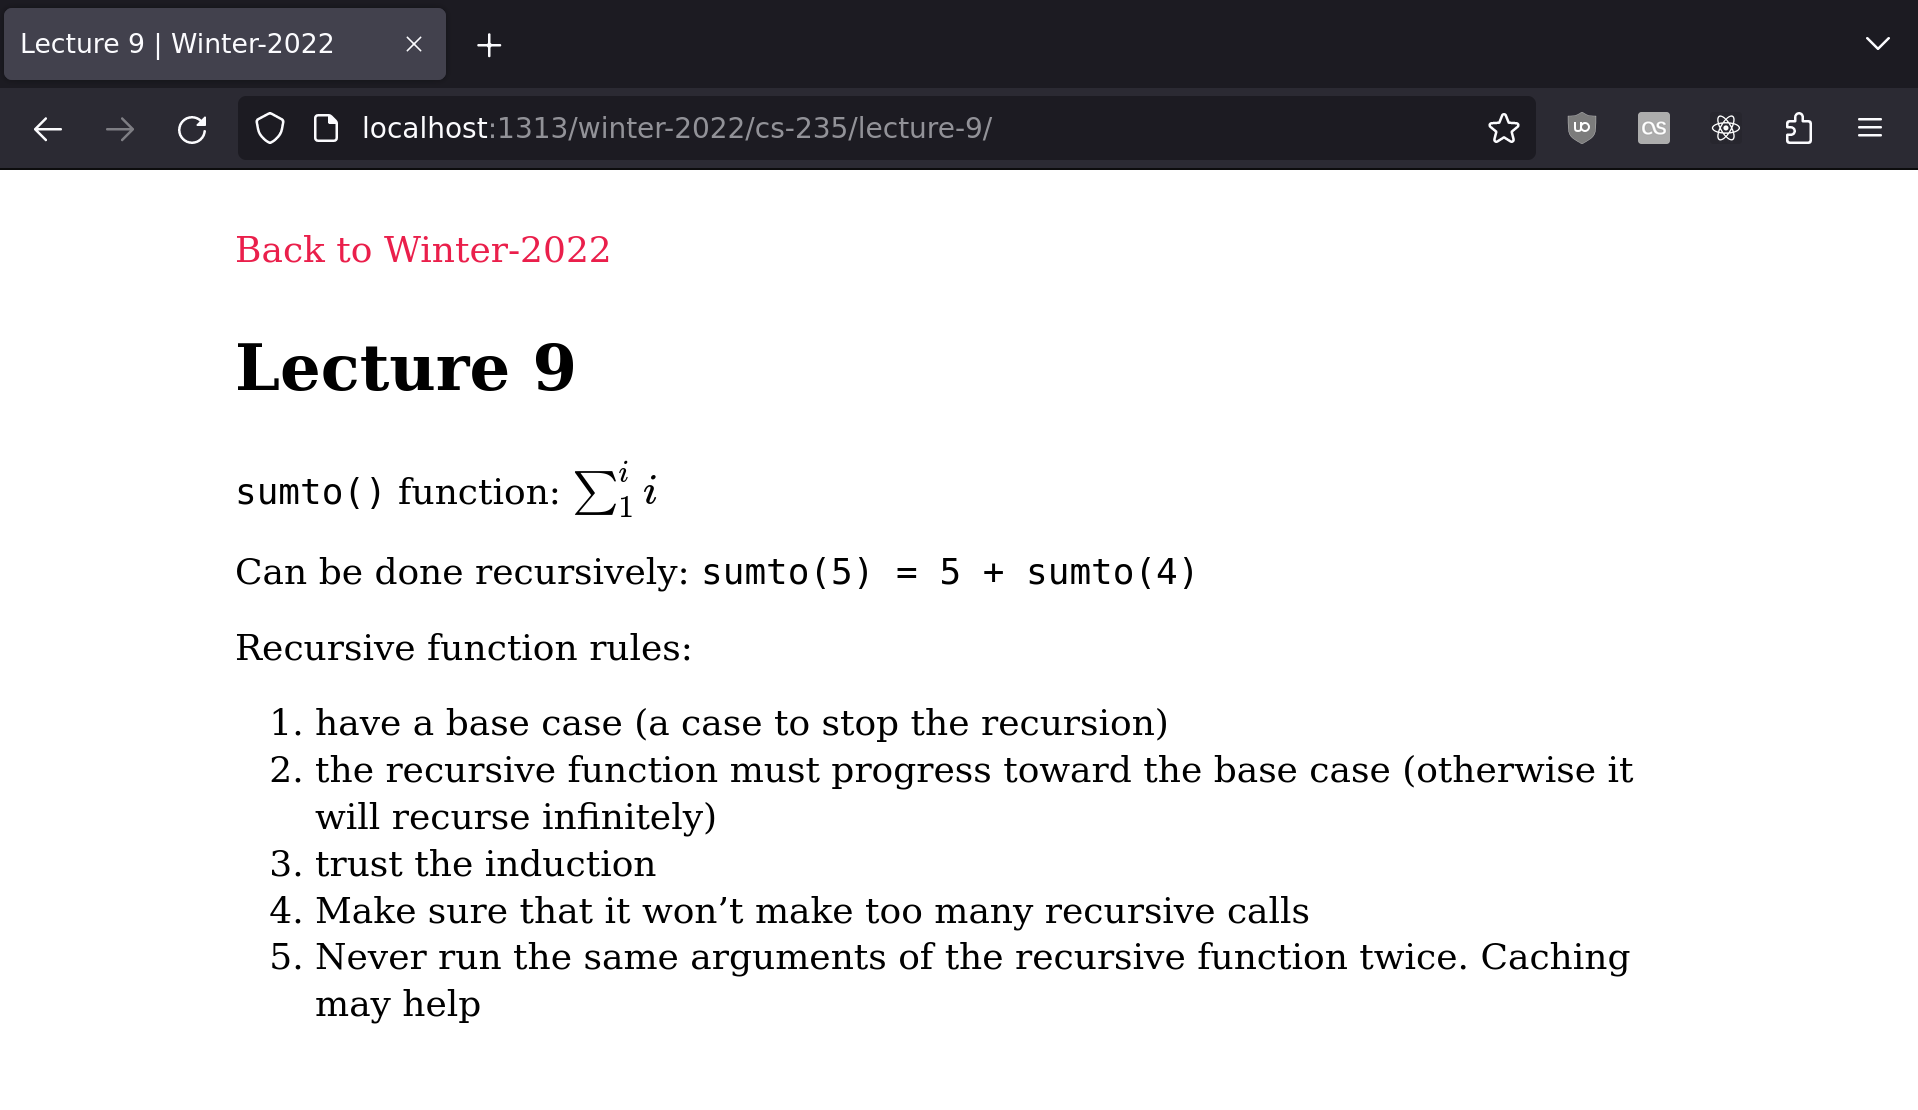
single.html
{{ define "page" }}
<article class="container">
  <a href="{{ .CurrentSection.RelPermalink }}">Back to {{ .CurrentSection.Title }}</a>
  <h1>{{ .Title }}</h1>
  {{ .Content }}
</article>
{{ end }}
This one’s simple:
- Define the same
pageblock — remember, thelistandsingletemplates both extend from the samebaseoftemplate. - Provide a link back to the current Section’s list page.
- Get the title from the page’s front matter.
- Show the content (here that means everything except the front matter) run through a Markdown parser.
Styling
I prefer to style with SCSS, which Hugo supports with Pipes.
Because I’m using SCSS, I’ll put my styling in the assets/scss directory (you’ll need to create it). If you want to use plain CSS, you could put it in a static/css folder — everything in static is copied to the build folder, preserving the existing structure. Then, you can link to it normally, without the Hugo Pipe I use for SCSS parsing.
To keep it simple, my style.scss is less than 100 lines long. Here’s part of it:
$paradise-pink: #EA1F4B;
$paradise-pink-light: #EF5778;

html {
  font-size: 62.5%;
}

body {
  font-size: 1.6rem;
  line-height: 1.3;
}

h2, h3, h4, h5, h6 {
  margin: 3.8rem 0 .6rem;
}

h1 {
  font-size: 3.2rem;
}

h2 {
  font-size: 2.5rem;
}

p, ul, ol {
  font-size: 1.8rem;
  margin: 0 0 .8em;
}

a {
  text-decoration: none;
  color: $paradise-pink;

  &:hover {
    color: $paradise-pink-light;
  }
}

article {
  padding: 2rem 1rem;
  max-width: calc(44em + 2rem);
  margin: 0 auto;
}
See Aleksandr Hovhannisyan’s article for a good explanation of setting the
htmlfont size to 62.5%.
Content
As I mentioned earlier, Hugo’s sections are defined by directories in the content directory. Here’s what my notes look like after I organize them by university semester:
└── content
    ├── _index.md
    ├── winter-2022
    │   ├── _index.md
    │   ├── cs-235
    │   │   ├── _index.md
    │   │   ├── lecture-9.md
    │   │   ├── lecture-10.md
    │   │   └── quicksort-getting-started.md
    └── winter-2023
        ├── _index.md
        └── ec-en-240
            ├── _index.md
            └── lecture-01-09.md
The _index.md files are used to add frontmatter and content to list pages. In this site, I just use them to name my sections. If you don’t specify anything, it’ll use the directory name.
---
title: Electrical and Computer Engineering 240
---
And here’s one of those Markdown files; I’ll use lecture-9.md as an example:
---
title: "Lecture 9"
date: 2022-02-01T09:39:28-07:00
katex: true
---

`sumto()` function: \\(\sum_1^i i\\)

Can be done recursively: `sumto(5) = 5 + sumto(4)`

Recursive function rules:

1. have a base case (a case to stop the recursion)
2. the recursive function must progress toward the base case (otherwise it will recurse infinitely)
3. trust the induction
4. Make sure that it won't make too many recursive calls
5. Never run the same arguments of the recursive function twice. Caching may help
You may notice a katex: true key & value in the front matter. That’s an optional extra goody I’ve added, which we’ll go over soon!
Building and using the development server
To deploy the site to the build directory, run:
$ hugoOr to use Hugo’s development server (one of its strongest features, in my opinion), go to the base site directory and start it:
$ cd notes
$ hugo serve
It will give you a localhost address with a port (1313 unless it’s taken by another service) that you can open in your browser of choice.
Now you should have a shiny new Hugo site to work with, no theme required!
Here’s the list page template in action:
And the single page template, plus our content file:
Adding KaTeX support
KaTeX is a lightweight JavaScript TeX implementation. I use enough math in my notes as an engineering student that I wanted an easy way to show math notation.
Although I use math notation pretty often, I wanted to only load the JavaScript when necessary. For this, I set a front matter variable (katex), and render a katex.html partial in the site’s <head> if it’s there.
Add the following to baseof.html, in the <head> tag:
{{ if .Params.katex }}{{ partial "partials/katex.html" . }}{{ end }}The partial function takes a path relative to layouts, so partials/katex.html finds the file in layouts/partials/katex.html.
Put the following in layouts/partials/katex.html:
<link rel="stylesheet" href="/katex/katex.min.css">
<script defer src="/katex/katex.min.js"></script>
<script defer src="/katex/contrib/auto-render.min.js" onload="renderMathInElement(document.body);"></script>
I downloaded KaTeX myself, which is nice for serving your own content while offline. But you could easily modify this partial to use CDN-hosted files.
If you host the files yourself, just download and move the necessary files to static/katex. You only need to keep a few files out of the ones KaTeX ships with:
└── static
    └── katex
        ├── contrib
        │   └── auto-render.min.js
        ├── fonts
        │   ├── KaTeX_AMS-Regular.ttf
        │   ├── KaTeX_AMS-Regular.woff
        │   ├── KaTeX_AMS-Regular.woff2
        │   ├── KaTeX_Caligraphic-Bold.ttf
        │   ├── KaTeX_Caligraphic-Bold.woff
        │   ├── KaTeX_Caligraphic-Bold.woff2
        │   ├── KaTeX_Caligraphic-Regular.ttf
        │   └── … (more fonts here, not shown to save space)
        ├── katex.min.css
        └── katex.min.js
Remember that the contents of static are directly copied to the build directory, so you don’t need to include static/ when referencing them in your templates.
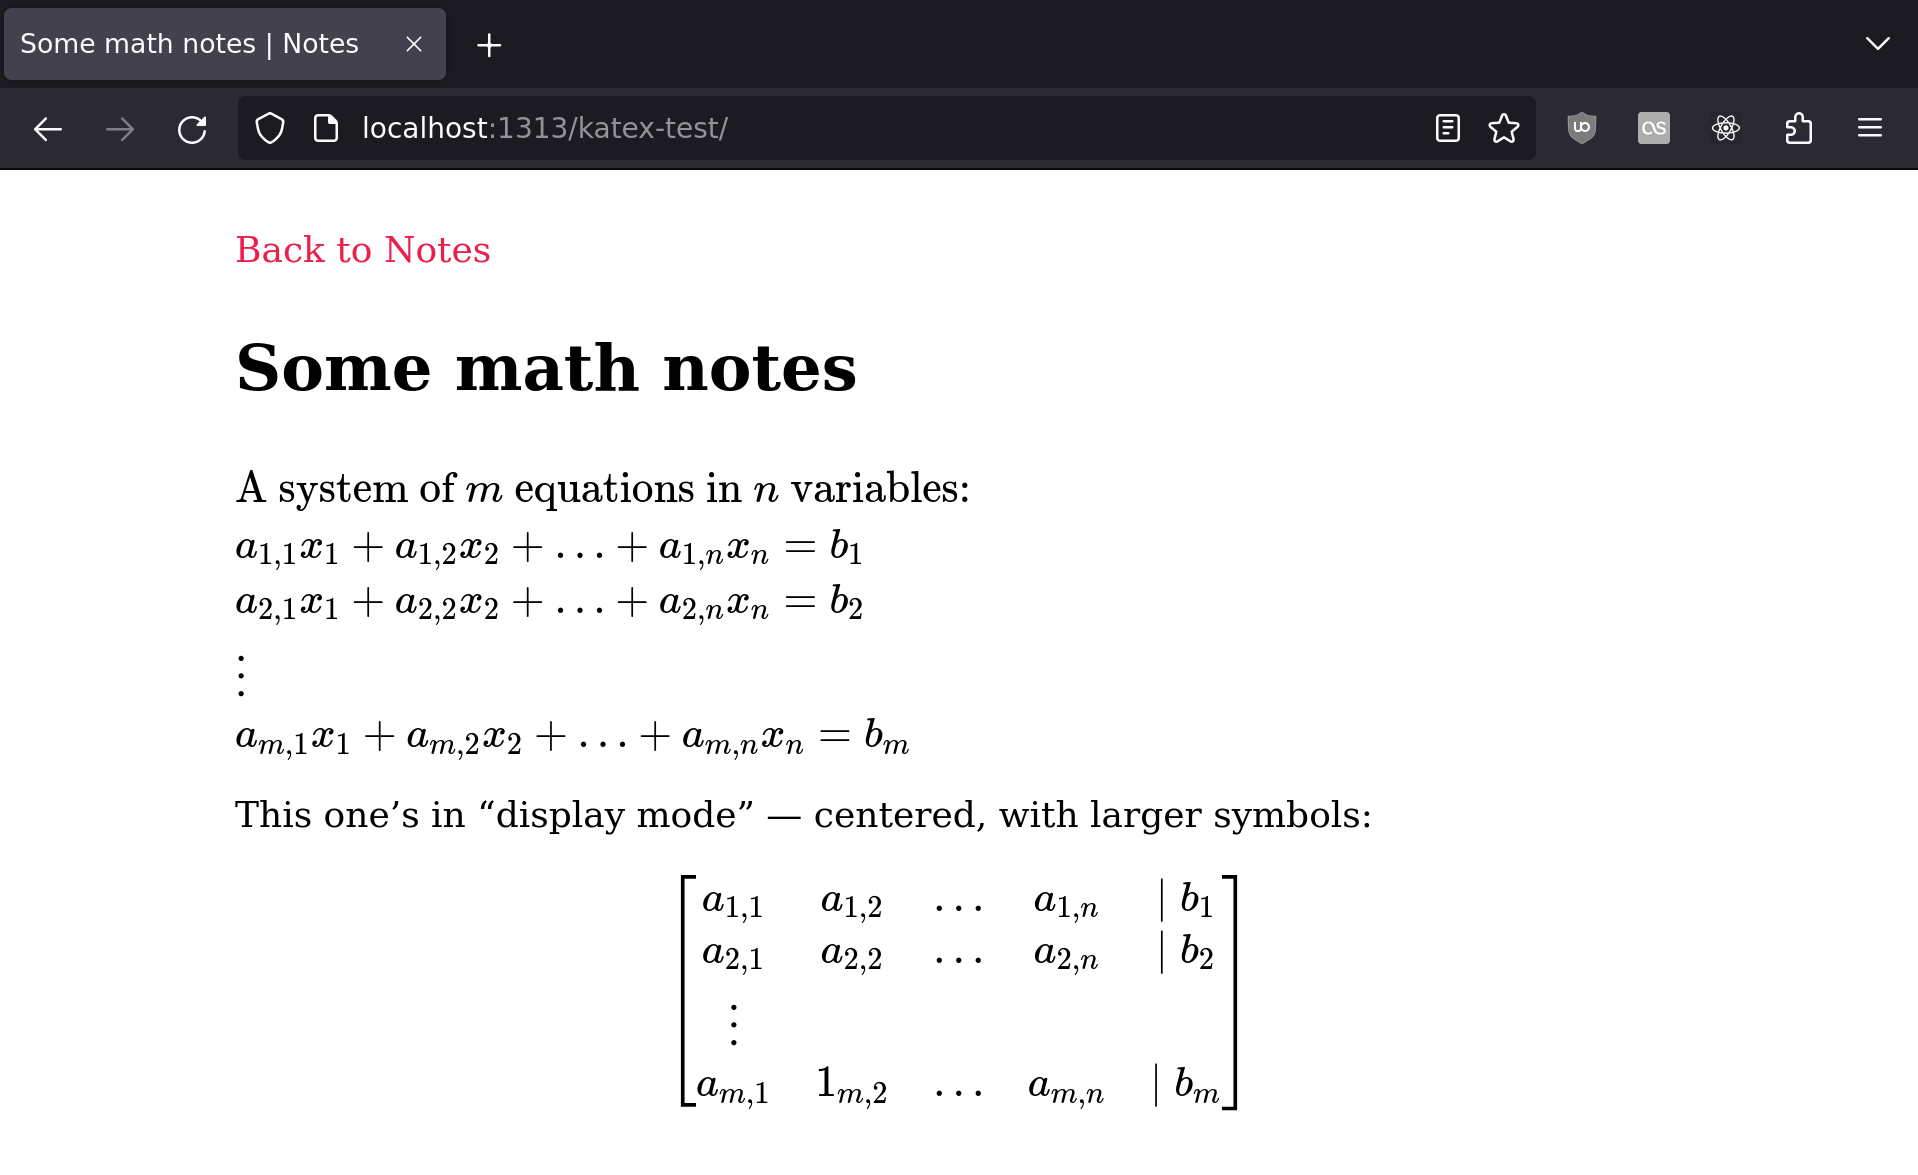
Now we can turn on the katex switch and use math notation! The auto-render extension will, by default, look for blocks denoted by \\( \\), or $$ $$ for bigger symbols and centered.
Let’s make a new file in content called katex-test.md:
---
title: "Some math notes"
katex: true
---

\\(
\text{A system of } m \text{ equations in } n \text{ variables:}\\newline
a_{1,1}x_1 + a_{1,2}x_2 + ... + a_{1,n}x_n = b_1\\newline
a_{2,1}x_1 + a_{2,2}x_2 + ... + a_{2,n}x_n = b_2\\newline
\vdots\\newline
a_{m,1}x_1 + a_{m,2}x_2 + ... + a_{m,n}x_n = b_m
\\)

This one's in "display mode" — centered, with larger symbols:

$$
\begin{bmatrix}
a_{1,1} & a_{1,2} & ... & a_{1,n} & \mid b_1\\\\
a_{2,1} & a_{2,2} & ... & a_{2,n} & \mid b_2\\\\
\vdots\\\\
a_{m,1} & 1_{m,2} & ... & a_{m,n} & \mid b_m
\end{bmatrix}
$$
The highlighting here works fine, but it doesn’t work exactly how I’d expect. Markdown should always render first, then KaTeX should search for delimiters in the generated HTML, but the backslash behavior doesn’t seem consistent — I have to escape the backslash in
\newlineor Markdown catches the\n, but\\(collapses to\(and works fine, even with KaTeX looking for\\((which looks like\\\\(when properly escaped in Markdown). Exploring that may be a topic for another blog post…
Now you should be able to include math notation in your notes to your heart’s content!
html development static-site-generator
Comments