Kubernetes From The Ground Up With AWS EC2

By Jeffry Johar
October 6, 2022

Photo by Darry Lin
One way to learn Kubernetes infrastructure is to build it from scratch. This way of learning was introduced by the founding father of Kubernetes himself: Mr. Kelsey Hightower. The lesson is known as “Kubernetes The Hard Way”.
For this blog entry I would like to take a less demanding approach than Kubernetes The Hard Way, while still being educational. I would like to highlight only the major steps in creating a Kubernetes cluster and what is covered in CKA (Certified Kubernetes Administrator) exams. Thus we are going to use the kubeadm tools to build the Kubernetes cluster.
The steps of creating a Kubernetes cluster are hidden to you if you are using a Kubernetes as a service such as AWS EKS, GCP GKE or the enterprise suites of Kubernetes such as Red Hat Openshift or VMware Tanzu. All of these products let you use Kubernetes without the need to worry about creating it.
Prerequisites
For this tutorial we will need the following from AWS:
- An active AWS account
- EC2 instances with Amazon Linux 2 as the OS
- AWS Keys for SSH to access control node and managed nodes
- Security group which allows SSH and HTTP
- A decent editor such as Vim or Notepad++ to create the inventory and the playbook
EC2 Instances provisioning
Provisioning of the the control plane, a.k.a. the master node:
- Go to AWS Console → EC2 → Launch Instances.
- Set the Name tag to
Master. - Select the Amazon Linux 2 AMI.
- Select a key pair. If there are no available key pairs, please create one according to Amazon’s instructions.
- Allow SSH and 6443 TCP ports.
- Set Number of Instances to 1.
- Click Launch Instance.
Provisioning of the worker nodes, a.k.a. the minions:
- Go to AWS Console → EC2 → Launch Instances.
- Set the Name tag to
Node. - Select the Amazon Linux 2 AMI.
- Select a key pair. If there are no available key pairs, please create one according to Amazon’s instructions.
- Allow SSH TCP port.
- Set Number of Instances to 2.
- Click Launch Instance.
Installing the container runtime
All Kubernetes nodes require some sort of container runtime engine. For these nodes we are going to use Docker. Log in to all EC2 instances and execute the following:
-
Install Docker.
sudo yum update -y sudo amazon-linux-extras install docker -y sudo usermod -a -G docker ec2-user sudo service docker start sudo systemctl enable docker.service sudo su - ec2-user -
Verify the Docker installation.
docker psWe should get an empty Docker status:
CONTAINER ID IMAGE COMMAND CREATED STATUS PORTS NAMES -
Install TC (Traffic Controller). This is required by the kubeadm tool.
sudo yum install tc -y
Kubernetes control plane setup
-
Add the Kubernetes repository. Log in to the node and paste the following:
cat <<'EOF' | sudo tee /etc/yum.repos.d/kubernetes.repo [kubernetes] name=Kubernetes baseurl=https://packages.cloud.google.com/yum/repos/kubernetes-el7-$basearch enabled=1 gpgcheck=1 gpgkey=https://packages.cloud.google.com/yum/doc/yum-key.gpg https://packages.cloud.google.com/yum/doc/rpm-package-key.gpg exclude=kubelet kubeadm kubectl EOF -
Install the Kubernetes binaries for Control Plane (
kubelet,kubeadm,kubectl) and enable it.sudo yum install -y kubelet kubeadm kubectl --disableexcludes=kubernetes sudo systemctl enable --now kubelet -
Initiate the Control Plane. The
--ignore-preflight-errorsswitch is required because we are using a system which has fewer than 2 CPUs and less than 2 GB of RAM. The--pod-network-cidrvalue is the default value for flannel (a networking add-on).sudo kubeadm init --ignore-preflight-errors=NumCPU,Mem --pod-network-cidr=10.244.0.0/16There are 3 important points from the output of this command. They are the successful note on the cluster initalization, the kubeconfig setup and the worker node joining string. The following is a sample output:
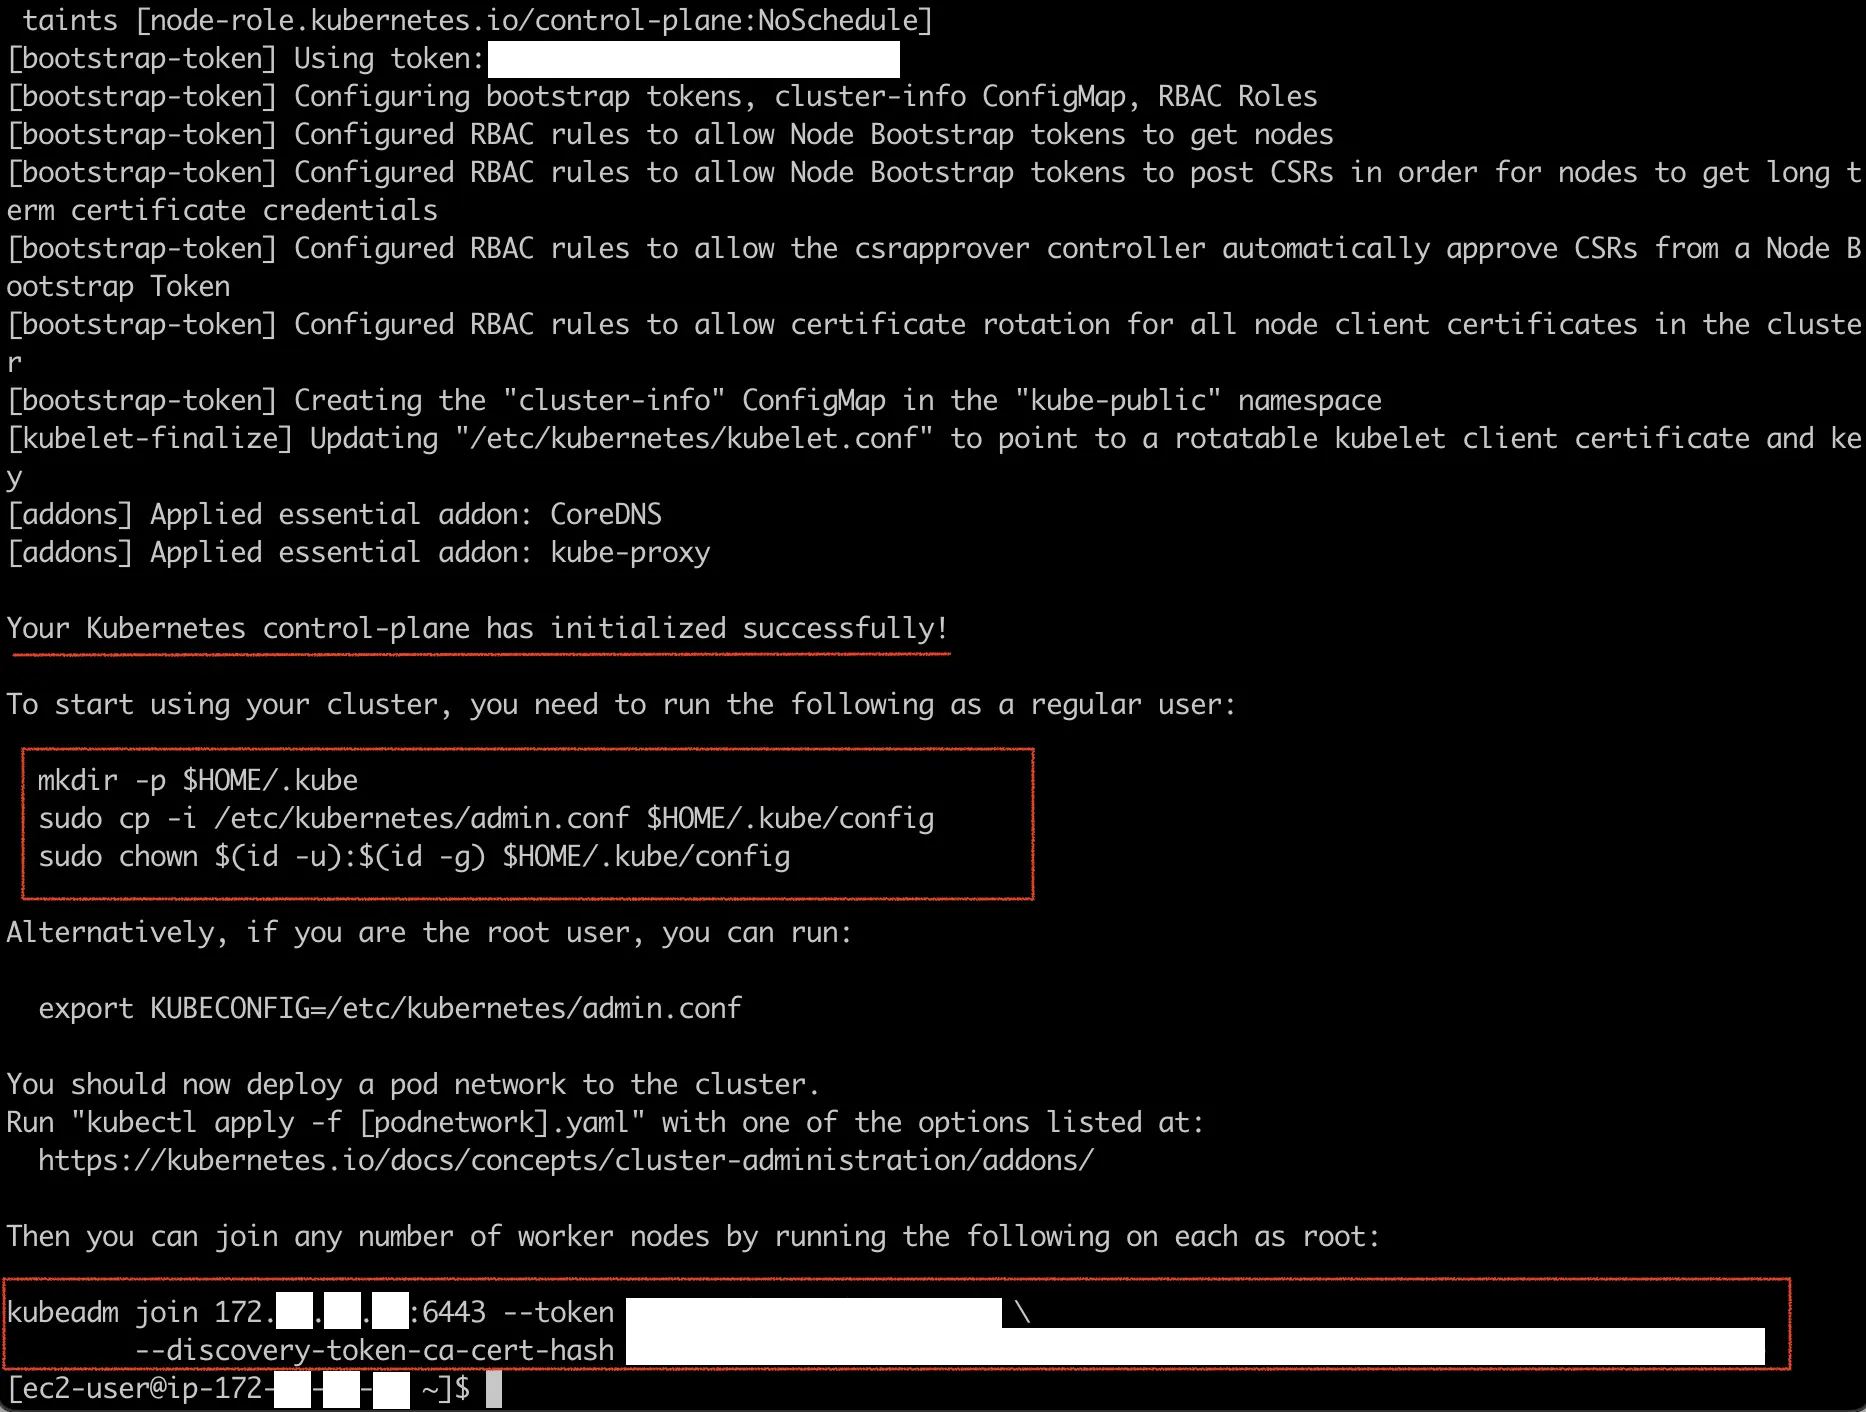
-
Create the configuration file for kubectl a.k.a. kubeconfig to connect to the Kubernetes cluster. The scripts are from previous output:
mkdir -p $HOME/.kube sudo cp -i /etc/kubernetes/admin.conf $HOME/.kube/config sudo chown $(id -u):$(id -g) $HOME/.kube/config -
Install the pod network add-on. We are going to use flannel.
kubectl apply -f https://raw.githubusercontent.com/flannel-io/flannel/master/Documentation/kube-flannel.yml
Kubernetes worker nodes setup
Execute the following in all worker nodes:
-
Add the Kubernetes repository. Log in to the node and paste the following
cat <<'EOF' | sudo tee /etc/yum.repos.d/kubernetes.repo [kubernetes] name=Kubernetes baseurl=https://packages.cloud.google.com/yum/repos/kubernetes-el7-$basearch enabled=1 gpgcheck=1 gpgkey=https://packages.cloud.google.com/yum/doc/yum-key.gpg https://packages.cloud.google.com/yum/doc/rpm-package-key.gpg exclude=kubelet kubeadm EOF -
Install the Kubernetes binaries for worker nodes (kubelet, kubeadm) and enable kubelet.
sudo yum install -y kubelet kubeadm --disableexcludes=kubernetes sudo systemctl enable --now kubelet -
Execute the join command with
sudo. This command is from step #3 in the Kubernetes Control Plane Setup section.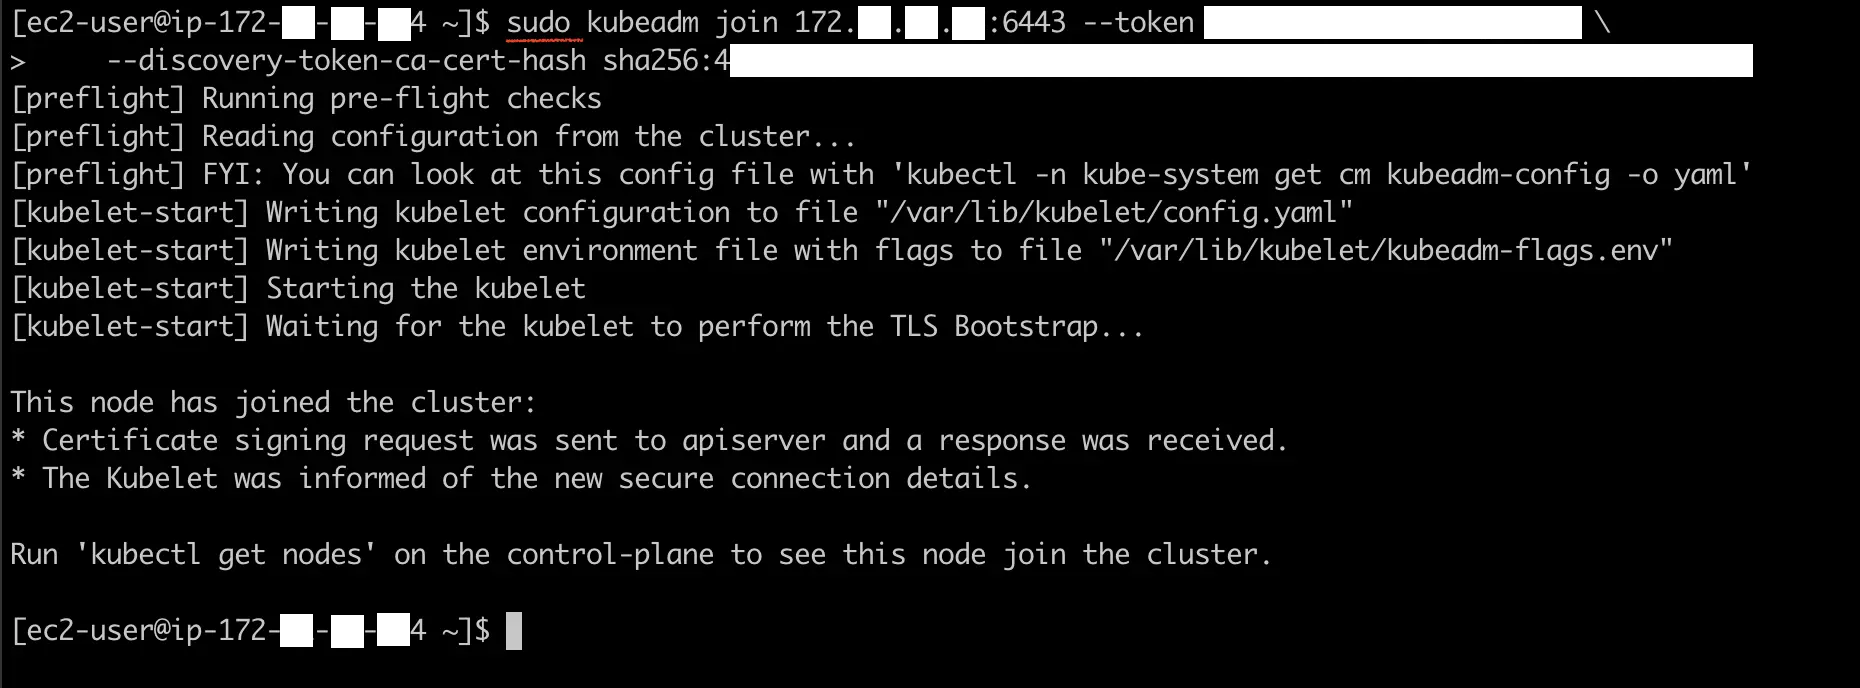
Hello, Kubernetes :)
We have successfully created a Kubernetes cluster. Let’s check on the cluster and try to deploy some sample applications.
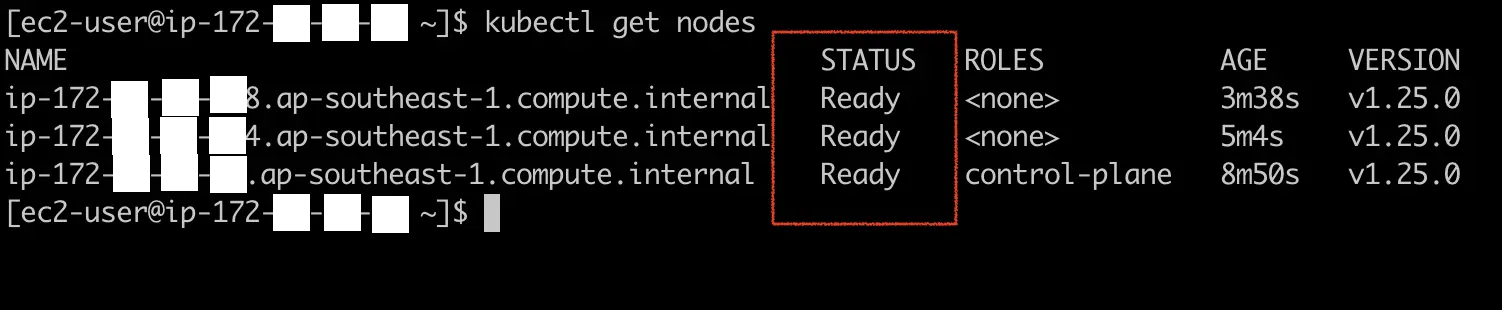
- Get the latest status of the nodes. You might need to wait a minute or more for all nodes to become
Ready.
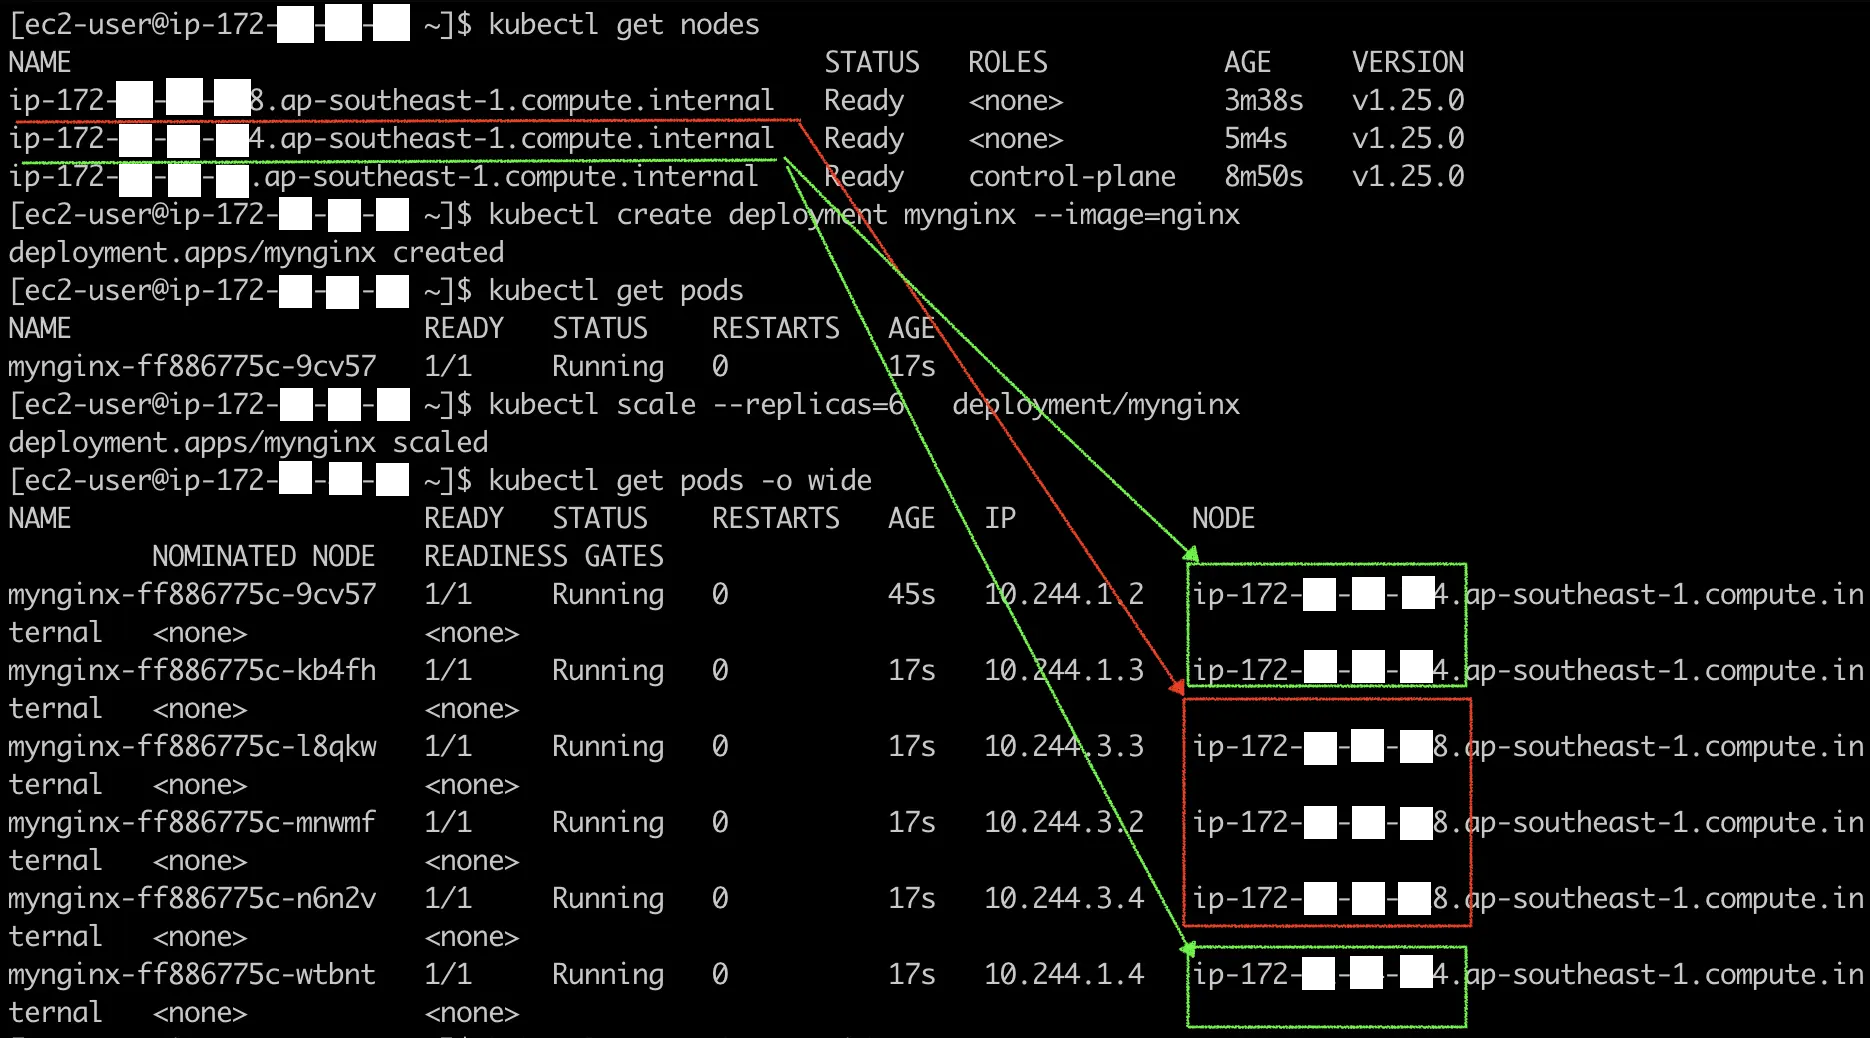
kubectl get nodesSample output:
- Deploy a sample Nginx web server
kubectl create deployment mynginx --image=nginx- Scale the Deployment to have 6 replicas and check on where the pods run. The pods should be assigned randomly to the available worker nodes.
kubectl scale --replicas=6 deployment/mynginx
kubectl get pods -o wide
Sample output:
Conclusion
That’s all, folks. I hope this blog entry has shed some insights on what it takes to create a Kubernetes cluster. Have a nice day :)
kubernetes docker containers aws devops
Comments