CI/CD with Azure DevOps

By Dylan Wooters
August 28, 2022

Photo by Dylan Wooters, 2022.
A development process that includes manual builds, tests, and deployments can work for a small-scale project, but as your codebase and team grow, it can quickly become time-consuming and unwieldy. This can be particularly true if you’re a .NET developer. We all know the struggle of merging in the latest feature and clicking build in Visual Studio, only to have it fail, citing cryptic errors. “Maybe a clean will fix it?”
If this sounds like your current situation, it’s likely time to consider building a Continuous Integration and Continuous Deployment pipeline, commonly known as “CI/CD”. A good CI/CD pipeline will help you automate the painful areas of building, testing, and deploying your code, as well as help to enforce best practices like pull requests and build verification.
There are many great options to choose from when selecting a CI/CD tool. There are self-hosted options like Jenkins and TeamCity. There are also providers like GitHub and Azure DevOps, which offer CI/CD alongside cloud-hosted source control. All of these options have pros and cons, but if you’re looking for a large feature set, flexibility, and in particular good support for .NET solutions, you should consider Azure DevOps.
In this post, I’ll show you how to set up an Azure CI/CD pipeline for a self-hosted .NET MVC web solution targeting two different environments.
Creating Environments
The first step is to sign up for a free account at Azure DevOps. Once you have your account created, you can then create your Environments. The Environments are the places where you want your app to be deployed.
In the case of a recent project here at End Point Dev, we had three different environments—UAT, Stage, and Production—all running as IIS websites on self-hosted Windows VMs. The UAT environment was on the UAT server, and the Stage and Production environments were on the Production server. So you’ll want to plan out your environments accordingly.
Once you do so, head to Azure DevOps and then click on Environments under the Pipelines section, then click Create Environment.

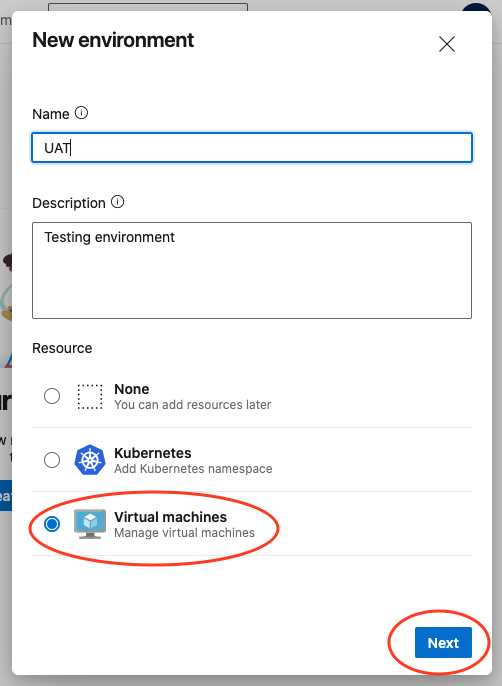
Then enter a name from the environment and select Virtual Machines and click Next.
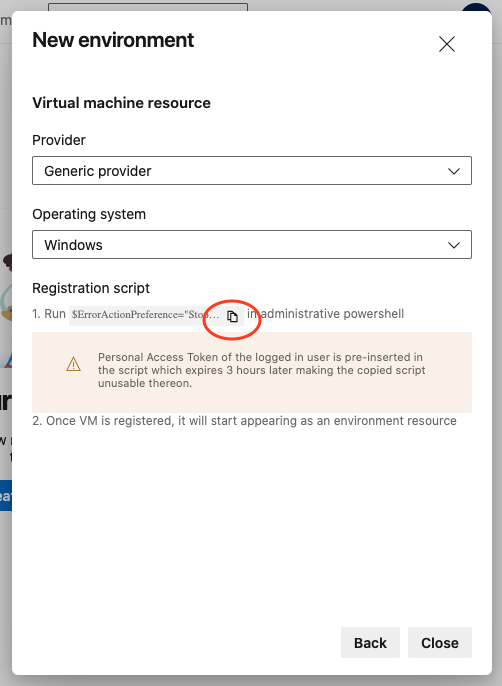
In the following window, select Generic Provider, and then select your OS, which in our case is Windows. You will see a registration script with a copy icon next to it. Click the icon to copy the (rather lengthy) PowerShell registration script to the clipboard, and then paste it into a text file.
Next, connect to the target environment. Open a PowerShell window as Administrator, copy and paste the registration script, and then press Enter. The PowerShell script will then do its magic and register the environment with Azure. It may take a minute to run, but afterwards you should see a success message.
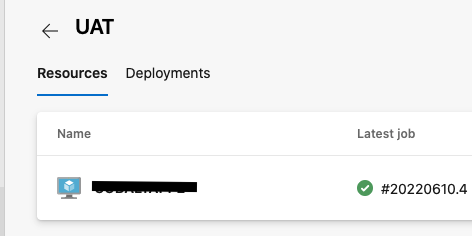
Now, if you head back to Azure DevOps and click on the Environment, you should see the server name of the machine that you ran the PowerShell script on. The server name is referred to as a Resource in Azure.
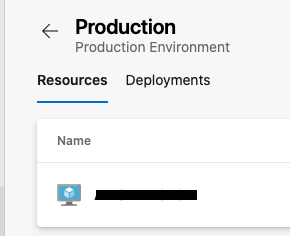
You will then want to complete the above steps for each of your additional target environments, for example, Staging and Production. In our case, Staging and Production are hosted on the same web server, so we only need to create one additional environment (Production) in Azure.
Creating the Pipelines
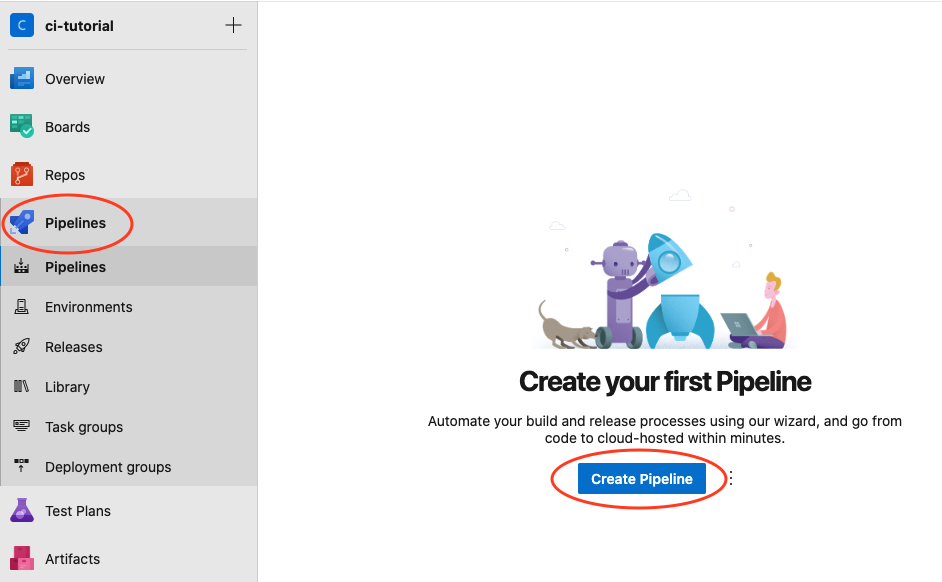
Now it’s time to create the actual Pipeline. The Pipeline will be responsible for building and deploying your app to the Environments that you created in the previous step. To start, Click on Pipelines in Azure DevOps, and then click the Create Pipeline button.
You’ll then be asked where your source code lives. In our case, the source code exists in a repo in Azure DevOps. The nice thing about Azure is that you can also target source code that exists on another provider, for example, GitHub, Bitbucket, or even a self-hosted Git repo (Other Git). Click on your hosting provider and follow the instructions.
Once you’re connected to your source provider, then you can configure the Pipeline. The “Pipeline” is actually just a YAML file within your target repo. You can read all about the Azure YAML syntax here. We’ll choose a Starter Pipeline, which opens up a text editor and enables you to create your YAML file.

Delete the sample text that appears in the editor, and then enter the following YAML. This is a pre-baked YAML pipeline that restores and builds a .NET web project, and then publishes the build assets to your three different target environments. In the next section, we will take a deep dive into how the YAML works so that you can edit it to fit your needs.
trigger:
- uat
- staging
- main

pool:
  vmImage: 'windows-latest'

variables:
  projectPath: 'ci_tutorial/ci_tutorial_web.csproj'
  packageName: 'ci_tutorial_web.zip'
  solution: '**/*.sln'
  buildPlatform: 'AnyCPU'
  artifactName: 'AzureDrop'
  ${{ if eq(variables['Build.SourceBranchName'], 'uat') }}:
    websiteName: 'ci_tutorial_uat'
    buildConfiguration: 'UAT'
    environmentName: 'UAT'
    targetVM: 'UATWEBAPP1'
  ${{ if eq(variables['Build.SourceBranchName'], 'staging') }}:
    websiteName: 'ci_tutorial_staging'
    buildConfiguration: 'Staging'
    environmentName: 'Production'
    targetVM: 'WEBAPP1'
  ${{ if eq(variables['Build.SourceBranchName'], 'main') }}:
    websiteName: 'ci_tutorial_prod'
    buildConfiguration: 'Release'
    environmentName: 'Production'
    targetVM: 'WEBAPP1'

stages:
- stage: build
  jobs:
  - job: RestoreAndBuild
    steps:
    - task: NuGetToolInstaller@1
    - task: NuGetCommand@2
      inputs:
        restoreSolution: '$(solution)'
    - task: VSBuild@1
      inputs:
        solution: '$(projectPath)'
        msbuildArgs: '/p:DeployOnBuild=true /p:WebPublishMethod=Package /p:PackageAsSingleFile=true /p:SkipInvalidConfigurations=true /p:PackageLocation="$(build.artifactStagingDirectory)"'
        platform: '$(buildPlatform)'
        configuration: '$(buildConfiguration)'
    #- task: VSTest@2
    #  inputs:
    #    platform: '$(buildPlatform)'
    #    configuration: '$(buildConfiguration)'
    - task: PublishBuildArtifacts@1
      inputs:
        PathtoPublish: '$(Build.ArtifactStagingDirectory)'
        ArtifactName: '$(artifactName)'
        publishLocation: 'Container'

- stage: Deploy
  displayName: Deploy to IIS
  dependsOn: Build
  jobs:
  - deployment: DeploytoIIS
    displayName: Deploy the web application to dev environment
    environment:
      name: ${{ variables.environmentName }}
      resourceName: ${{ variables.targetVM }}
      resourceType: VirtualMachine
    strategy:
      runOnce:
        deploy:
          steps:
          - task: DownloadBuildArtifacts@0
            inputs:
              buildType: 'current'
              downloadType: 'specific'
              downloadPath: '$(System.ArtifactsDirectory)'
          - task: IISWebAppManagementOnMachineGroup@0
            displayName: 'Create App Pool and Website'
            inputs:
              WebsiteName: '$(websiteName)'
              WebsitePhysicalPath: '%SystemDrive%\inetpub\wwwroot\$(websiteName)'
              CreateOrUpdateAppPoolForWebsite: true
              AppPoolNameForWebsite: '$(websiteName)'
          # For testing, to confirm target website
          - task: PowerShell@2
            displayName: Display target websitename
            inputs:
              targetType: 'inline'
              script: 'Write-Host "Target Website Name: $(websiteName)"'
          - task: IISWebAppDeploymentOnMachineGroup@0
            displayName: 'Deploy IIS Website'
            inputs:
              WebSiteName: '$(websiteName)'
              Package: '$(System.ArtifactsDirectory)\$(artifactName)\$(packageName)'
Understanding the YAML
The first section of the YAML, trigger, determines which branches will trigger the pipeline when they receive a push. In our case, we have three branches: uat, staging, and main.
trigger:
- uat
- staging
- main
The variables section defines variables that are used later in the pipeline YAML. An important part of this section is the use of if statements to assign values to certain variables (i.e., environmentName) based on the source branch for the build. This mechanism allows the pipeline to deploy to several different environments using a single YAML file.
Note that the if statements also switch the build configuration. If you have config transforms, this will be crucial for ensuring that the correct config files are deployed to each environment.
${{ if eq(variables['Build.SourceBranchName'], 'uat') }}:
  websiteName: 'ci_tutorial_uat'
  buildConfiguration: 'UAT'
  environmentName: 'UAT'
  targetVM: 'UATWEBAPP1'
${{ if eq(variables['Build.SourceBranchName'], 'staging') }}:
  websiteName: 'ci_tutorial_staging'
  buildConfiguration: 'Staging'
  environmentName: 'Production'
  targetVM: 'WEBAPP1'
${{ if eq(variables['Build.SourceBranchName'], 'main') }}:
  websiteName: 'ci_tutorial_prod'
  buildConfiguration: 'Release'
  environmentName: 'Production'
  targetVM: 'WEBAPP1'
Next, we get into the actual actions, or stages, of the pipeline. This pipeline has two stages: build and deploy. The build stage runs a NuGet restore and then a VS build, and then publishes the build output/artifacts to an Azure cloud storage location. The last bit is something that took me a while to wrap my head around: The build does not occur on the target environment via the runner—it actually occurs up in “Azure land”, on a Windows cloud VM.
The VM on which the build occurs can be defined using the pool: vmImage section. In our case, we are running the build on windows-latest, which currently translates to the brand new Windows Server 2022.
The deploy stage then downloads the build artifacts from Azure and deploys them to IIS on the target machine, using the runner that you installed as part of the environment setup above. Note that the variables defined in the if statements come into play here—this is how the pipeline knows which environment/VM to target.
environment:
  name: ${{ variables.environmentName }}
  resourceName: ${{ variables.targetVM }}
  resourceType: VirtualMachine
The IISWebAppManagementOnMachineGroup task will automatically create an app pool and website in IIS for the application. This feature can be toggled using the CreateOrUpdateAppPoolForWebsite setting. If a website already exists based on the WebsiteName, Azure will simply deploy to that existing app pool and website.
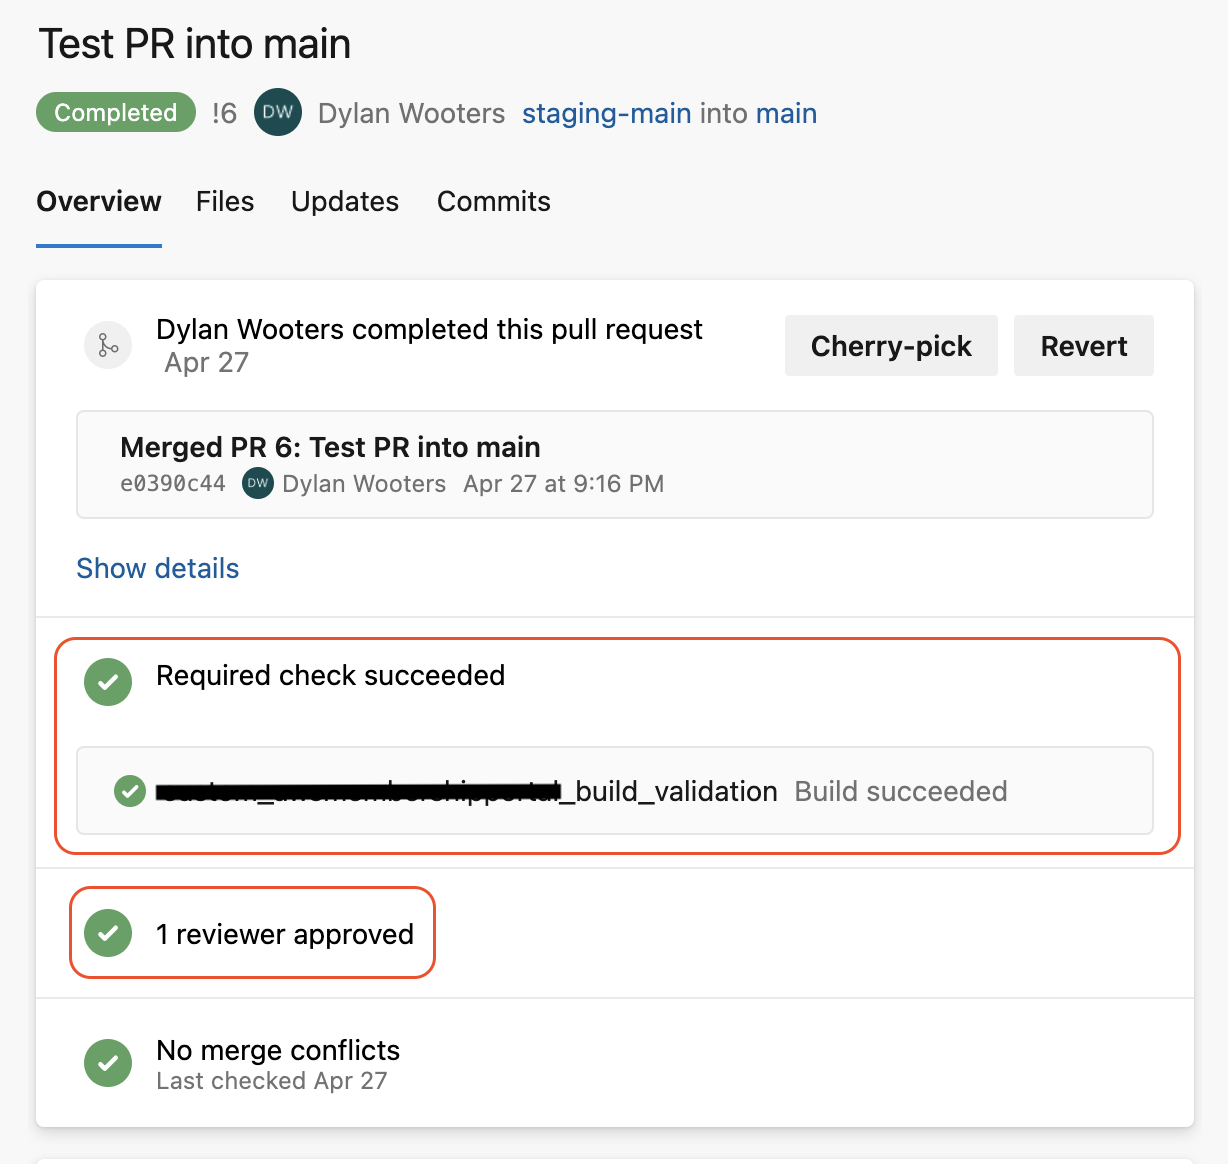
Adding Branch Protection and Build Validation
In order to ensure successful deployments to Production, you will likely want to add in branch protection for your main or master branch, and also consider build validation.
Branch protection allows you to enforce reviews for pull requests into certain branches. Build validation is a feature that pre-compiles your .NET code to ensure that it builds prior to merging a pull request. Both features help to improve code quality and prevent broken deployments.
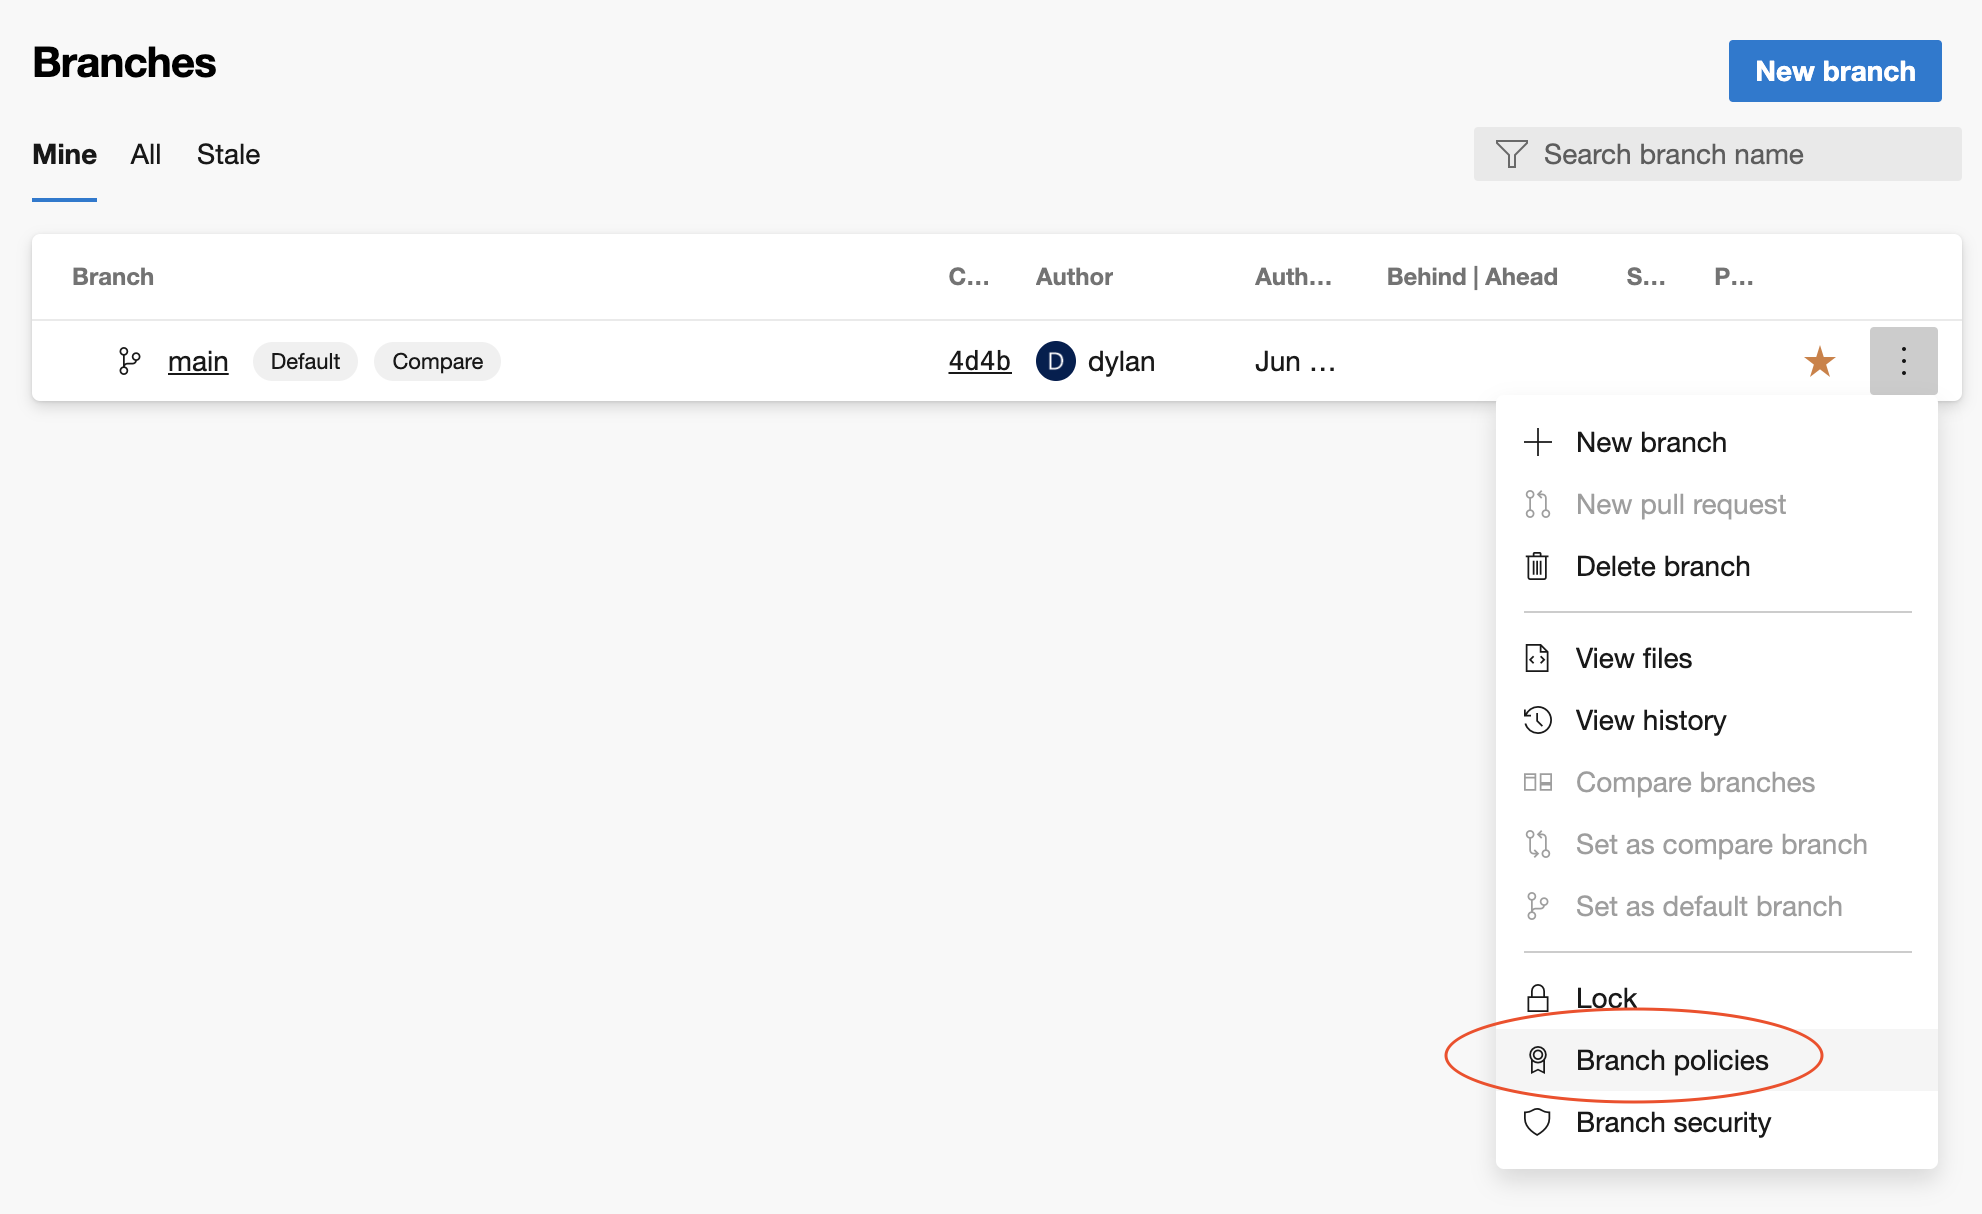
To add branch protection, go to Repo → Branches → your target branch → right side menu, then select Branch Policies.
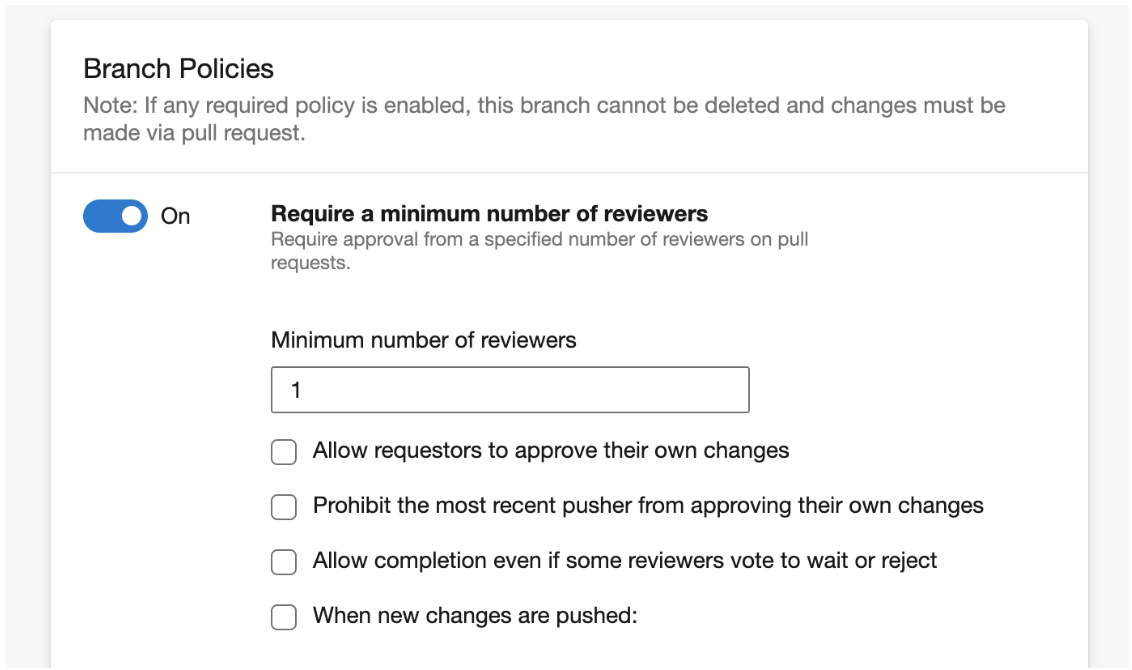
To enforce reviews, turn on “Require a minimum number of reviewers”, and adjust the number of reviewers and settings as required.
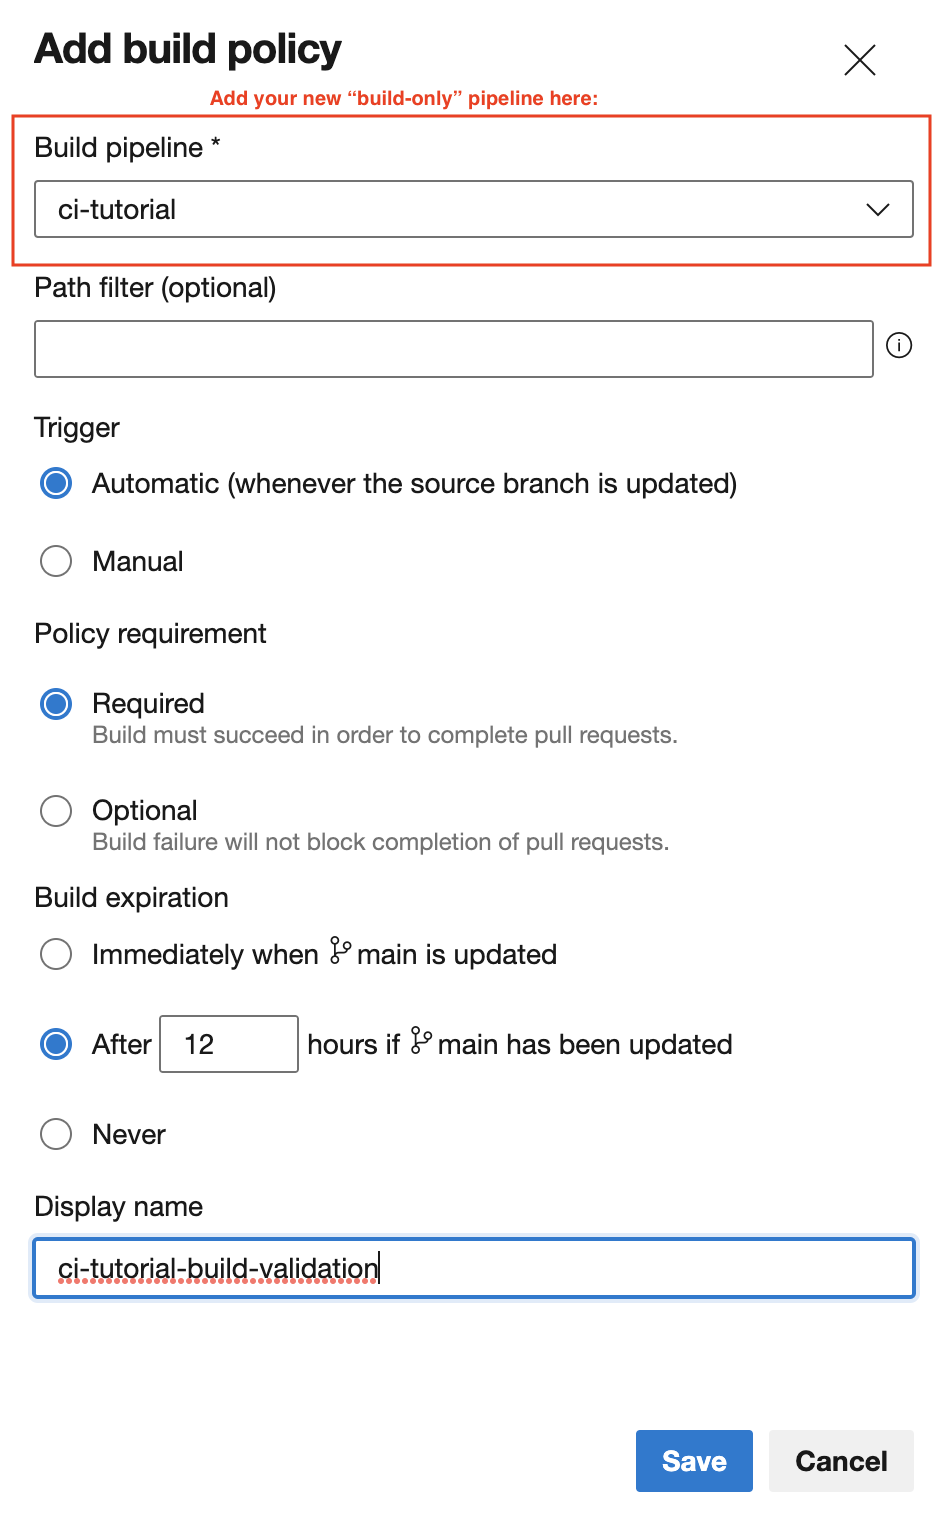
For build validation, scroll down to the Build Validation section, and click the plus button to add a new policy. Select the target build pipeline, adjust the policy settings as necessary (see below), and then give it a display name. Click save, and the build validation policy will be applied to the branch.
An important note here is that the build validation essentially runs the CI pipeline. In our case, that means it will run the build and the deployment. This is not ideal; we only want it to run the build (NuGet restore and VS build). So, it’s advisable to create a separate pipeline with only the build stage. This can be done easily by copying our example YAML and removing the “Deploy” stage, then saving it as a new pipeline. Then, choose that new pipeline as the target build pipeline in the validation policy.
Now when you open up a PR, it can only be merged once a review has been applied, and the build validation has run successfully.
Monitoring and Troubleshooting the Pipeline
You can see the overall status of your pipeline by clicking on the Pipelines section in the left-side navigation. Green means good!
To dive into more details, click on the pipeline name. This will show all the recent pipeline runs. Then click on a particular run. This will bring up the run details, including a flowchart for each stage.
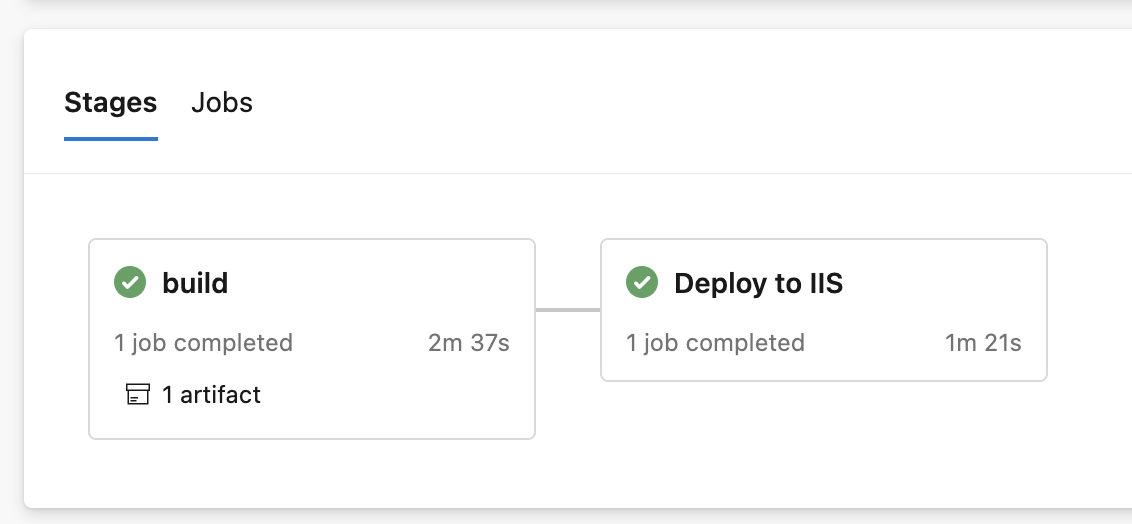
To dive further, click on a specific stage. You’ll then see all of the tasks in the stage, with actual output details on the right, similar to what you would see in the output window in Visual Studio.
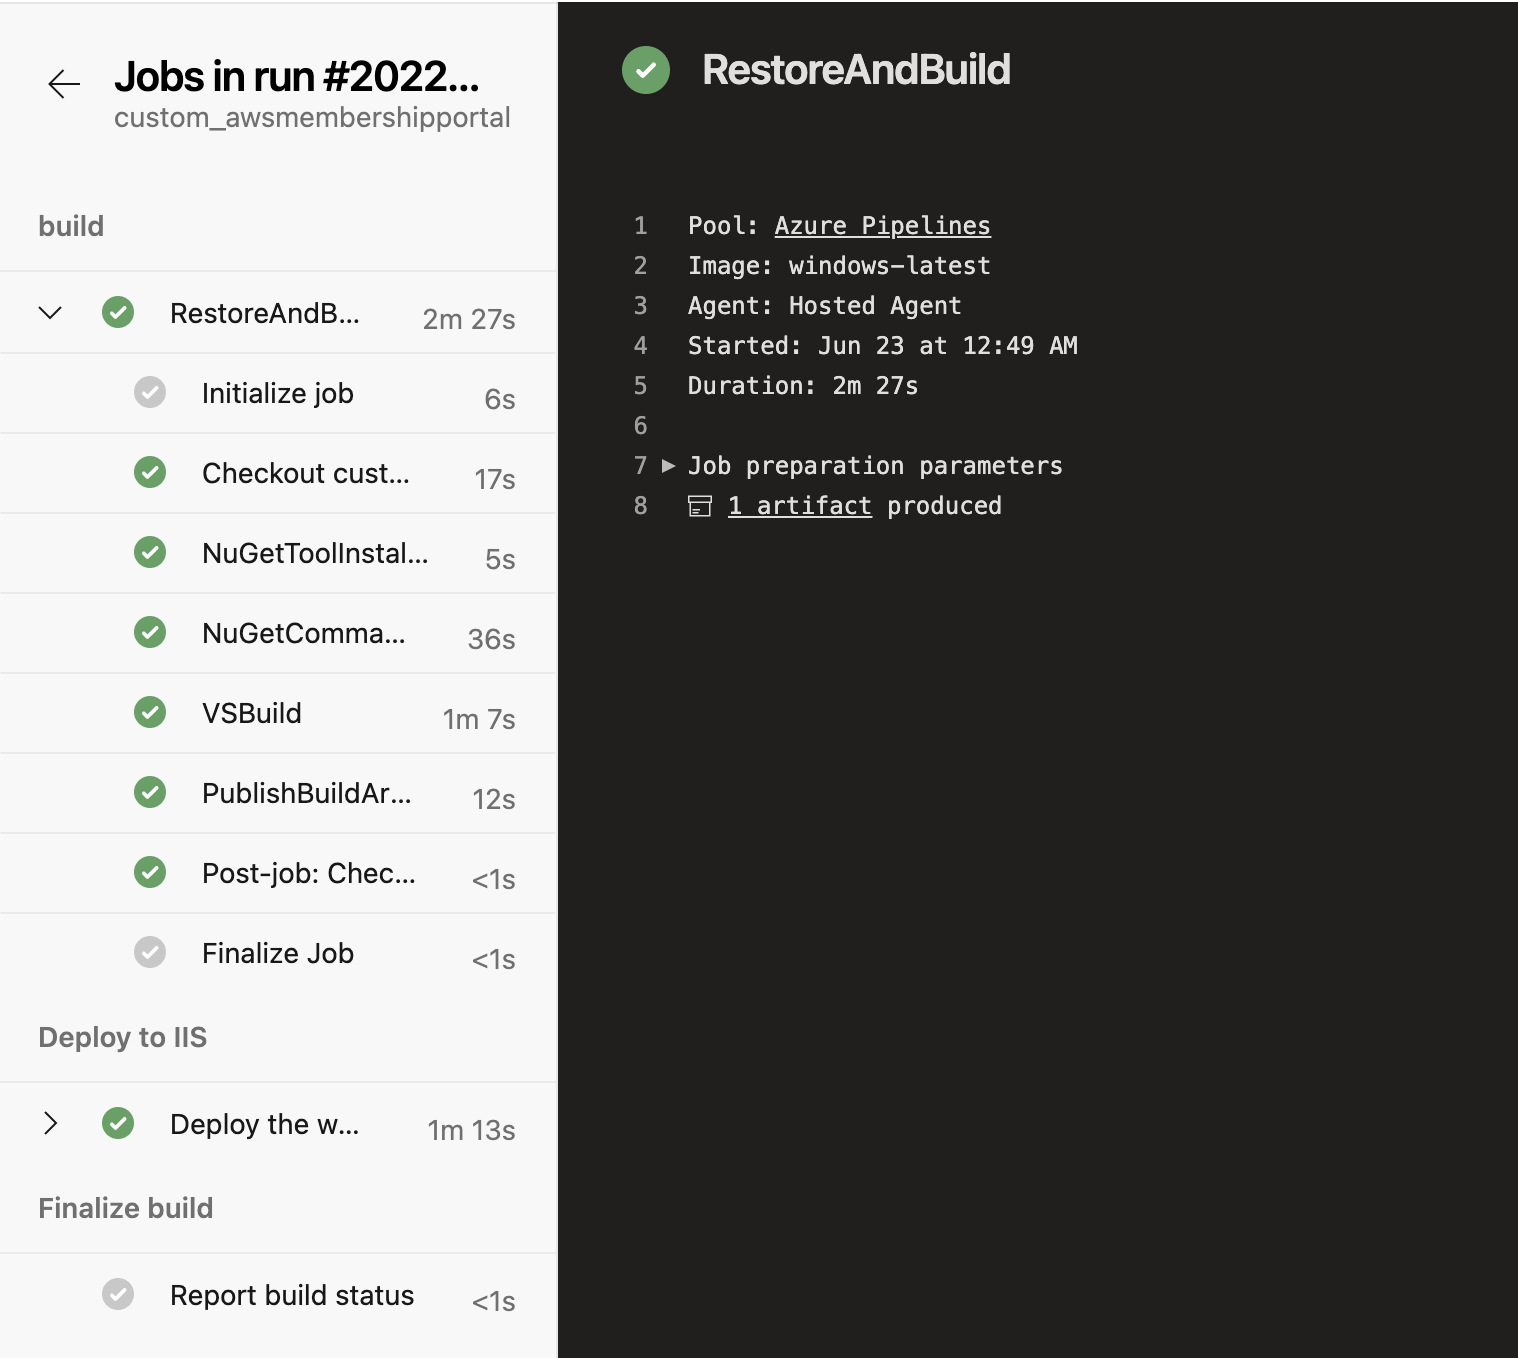
If you encounter an error in your pipeline, the stage details page is a great place to troubleshoot. Azure will show you the task that generated the error by displaying a red error icon next to the task. You can then click on the task and trace the output on the right to determine the exact error message.
Wrapping Up
Hopefully, this post gives you a good overview of CI/CD options for a self-hosted .NET application. Azure is almost infinitely configurable, so there are many other options to explore that are not covered in this post, whether it be within the pipeline YAML, or through other settings like branch policies/protection. If you have any questions, please feel free to leave a comment. Happy automating!
Comments