Deploying a .NET 5 app on IIS

By Juan Pablo Ventoso
September 27, 2021
 Photo by Christian Cable, CC BY 2.0
.NET 5 has been around for a few years now, after being released at .NET Conf 2020, containing the best of both worlds: .NET Core, including multi-platform support and several performance improvements, and .NET Framework, including Windows desktop development support with WPF and Windows Forms (UWP is also supported, but not officially yet).
A .NET Core-based project can be published into any platform (as long as we’re not depending on libraries targeted to .NET Framework), allowing us to save costs by hosting on Linux servers and increasing performance by having cheaper scalability options. But most developers are still using Windows with Internet Information Services (IIS) as the publishing target, likely due to the almost 20 years of history of .NET Framework, compared to the relatively short history of .NET Core, launched in 2016.
Our .NET project
We won’t review the steps needed to set up a new .NET 5 project, since this time we are only focusing on publishing what we already have developed. But to understand how our application will integrate with IIS and the framework, it’s important to note a fundamental change any .NET 5 project has in comparison with a .NET Framework one:
Since .NET 5 is .NET Core in its foundation, our project output will actually be a console application. If we create a new .NET Core project, no matter which version we are using, we will find a Program.cs file in the root with an application entry point in it, that will look somewhat similar to the one below:
public class Program
{
	public static void Main(string[] args)
	{
		BuildWebHost(args).Run();
	}

	public static IWebHost BuildWebHost(string[] args) =>
		WebHost.CreateDefaultBuilder(args)
			.UseStartup<Startup>()
			.Build();
}
The
WebHostobject will be the one processing requests to the app, as well as setting configuration like the content root, accessing environment variables, and logging.
This application needs to be executed by the dotnet process, which comes with any .NET 5 runtime.
Installing a .NET 5 runtime
The first step we need to do in our destination server, is to prepare the environment to run .NET 5 apps by installing the .NET 5 Hosting Bundle, a 65 MB setup file which has all the basic stuff needed to run .NET 5 on Windows. Since .NET can also run on Linux and macOS, installer executables are available for these operating systems as well.
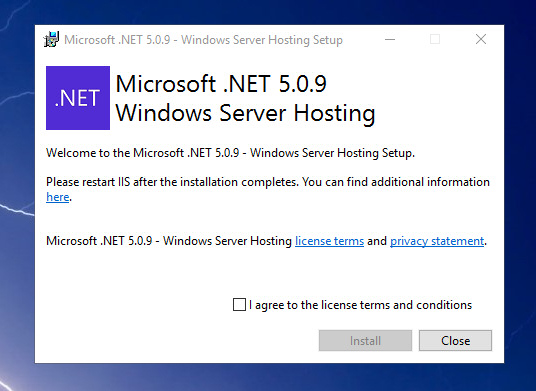
Once the installation finishes, we will need to restart IIS by typing iisreset on an elevated command prompt.
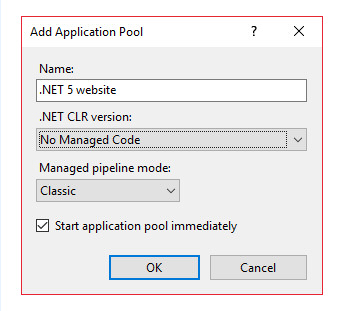
Creating the application pool
It’s always recommended to create a new application pool for a new website that will be published. That allows us to run the website in a separate IIS process, which is safer and prevents other websites from crashing if an application throws an unhandled exception. To create a new application pool, right-click on the “Application pools” section on the IIS Manager sidebar and choose the option “Add application pool”.
Since .NET 5 is based on .NET Core, the application pool we create will not be loaded inside the .NET Framework runtime environment. All .NET 5 applications will run by calling the external dotnet process, which is the reason why we need to install a separate hosting bundle in the first place.
That means that, when we are creating our application pool, we will need to set the .NET CLR version to “No managed code” before saving changes, as shown below:
Creating the new website
With the bundle installed and a new application pool created, it’s time to add the new website where our application will be published to. Right-click on the “Sites” section on the IIS Manager sidebar and choose the “Add Website” option.
We can choose any name to identify the new website. The important thing is to point the website to the newly created application pool, and bind it to the correct IP address and domain/host name, as shown below:

Once we accept the changes, the new website will be automatically started, which means we should be able to reach the IP address/hostname we entered. We will get a default page or a 404 response, depending on how our IIS instance is configured, since we haven’t published our application yet.
Publishing our project
Finally, it’s time to publish our .NET application into the new website. If we have Visual Studio, we can have the IDE automatically upload our content to IIS and publish it by right-clicking on our project and choosing “Publish”. Or we can use the dotnet command with the publish parameter to do it ourselves.
I usually prefer to do a manual publish into a local folder, and then decide which content I need to copy into the destination. Sometimes we only update a portion of the backend logic, in which case copying the output DLLs is all we need to do.
If we choose to let Visual Studio handle the publishing process, we need to choose “Web Server (IIS) / Web deploy” as our publish destination and enter the information needed for Visual Studio to connect to the server and copy the files:
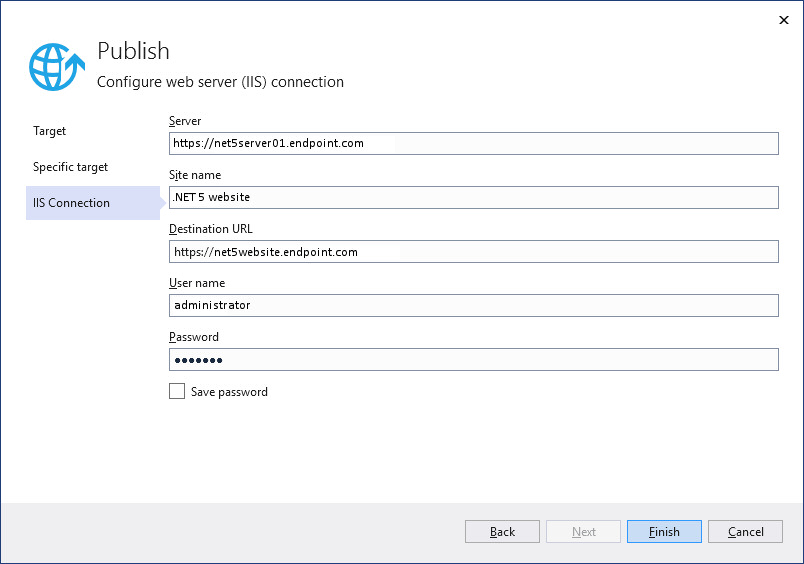
We need to make sure that the “site name” we enter here corresponds to the site name we entered when we created the new website on the server.
If you prefer to manually copy the files like me, on the destination screen choose “Folder” instead of “Web Server (IIS)”. That option will copy the project’s output into the specified folder, so it can be manually copied into our website’s root later.
And that’s it! Our project is now published into the website we created. We can hit our IP address/hostname again and we should now get our website’s default response.
To sum it up, the main difference between publishing a .NET Framework app and a .NET 5 app is that we need to install a runtime and do a couple of tweaks when setting up the new application pool. But in general, it’s a pretty straightforward process.
Comments