An Introduction to webpack 4: Setting Up a Modern, Modular JavaScript Front-End Application

By Kevin Campusano
March 26, 2020
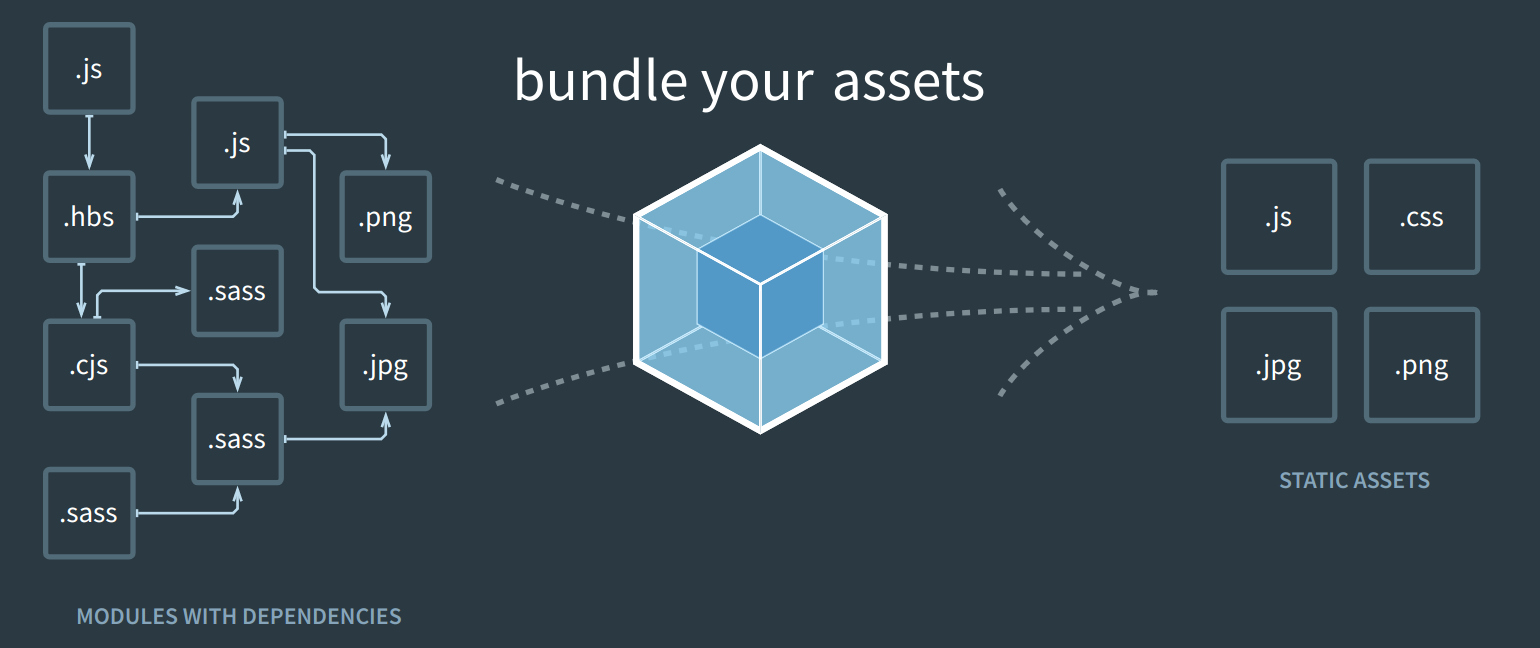
Image taken from webpack.js.org
I’ve got a confession to make: Even though I’ve developed many JavaScript-heavy, client side projects with complex build pipelines, I’ve always been somewhat confused by the engine that drives these pipelines under the hood: webpack.
Up until now, when it came to setting up a build system for front-end development, I always deferred to some framework’s default setup or some recipes discovered after some Googling or StackOverflow-ing. I never really understood webpack at a level where I felt comfortable reading, understanding and modifying a config file.
This “learn enough to be effective” approach has served me well so far and it works great for being able to get something working, while also spending time efficiently. When everything works as it should, that is. This approach starts to fall apart when weird, more obscure issues pop up and you don’t know enough about the underlying system concepts to get a good idea of what could’ve gone wrong. Which can sometimes lead to frustrating Googling sessions accompanied with a healthy dose of trial and error. Ask me how I know…
Well, all that ends today. I’ve decided to go back to basics with webpack and learn about the underlying concepts, components and basic configuration. Spoiler alert: it’s all super simple stuff.
Let’s dive in.
The problem that webpack solves
webpack is a module bundler. That means that its main purpose is taking a bunch of disparate files and “bundling” them together into single, aggregated files. Why would we want to do this? Well, for one, to be able to write code that’s modular.
Writing modular code is not as easy in JavaScript that runs in a browser as it is in other languages or environments. Traditionally, the way to achieve good modularity in the web front-end has been via including separate scripts via multiple <script> tags within HTML files. This approach comes with its own host of problems. Things like the order in which the scripts are included suddenly matter, because the browser executes them top to bottom, which means that you have to be very careful to include them in an order where dependencies of the later files are included first. Also, this approach encourages the pollution of the global scope, where every script declares some global variables which are then used by other scripts. This is problematic because it is not clear which scripts depend on which ones. In other words, dependencies become implicit and hard to track. Unit testing becomes harder as well, since you need to mock these dependencies at a global scope. You also run the risk of some scripts overriding these global resources anytime. It’s just not very clean.
Over the years, solutions have been devised by the community to tackle this issue, which have taken the form of module loaders like CommonJS and AMD. Finally, ES2015 introduced a native module loading system into the language itself via the import and export statements. The life of JavaScript in the browser is not so easy though, as these new specifications take time to implement by the various browser vendors. This is where webpack comes in. Part of its offerings is the ability to use this standard, modern module loading mechanism without having to worry about browser compatibility. This unlocks the potential for front-end developers to write modern, beautiful, modularized JavaScript. This is huge.
Concepts: Entry points and output
Now, what does that look like in webpack terms? Well, we define an entry point, an output specification, and let webpack do its thing.
This is a good time to formally introduce two of webpack’s core concepts. First, we have entry points.
Entry points represent the starting point of execution for your app or page, and as such, serve as the starting file for webpack to begin building up your bundle. These are normally JavaScript files that bootstrap the execution of whatever application or page that you are developing. From a software design perspective, they tend to import many other modules and start up the scripts and instantiate the objects that actually run the application logic.
So, for example, say you have a file named index.js, which has some front-end logic and uses some utility classes living in separate files like SomeServiceClass.js or ApiClient.js. This index.js is a great candidate for being an entry point for your application or page because it is the one singular file that calls upon all of the other dependencies/modules.
We also have output. Output is the result of a webpack bundling operation. When webpack takes our entry points, it builds and compiles their corresponding dependencies and produces a single JavaScript file that can be directly included into our page or app via a <script> tag. This file is our output. This is the only file that needs to be included in the final page, because webpack took all the separate dependencies and bundled them together in one single package.
Introducing our demo app and its problems
But let me show rather than tell. Consider a simple calculator application, whose source code file structure looks like this:
.
├── index.html
└── js
    ├── calculator
    │   ├── calculator.js
    │   └── operations
    │       ├── addition.js
    │       ├── division.js
    │       ├── multiplication.js
    │       ├── operation.js
    │       └── subtraction.js
    └── index.js
You can explore the source code for this small application here. Feel free to go ahead and download it if you want to work along with me.
I’ve called the app the “Automatic Calculator” (not to be confused with its much less powerful alternative, the “manual” calculator!) and you will be able to figure out its general architecture pretty quickly.
In the root directory, we’ve got index.html which contains the GUI for our app. Then, all the behavior is inside the js directory.
index.html is pretty straightforward. It’s got a simple form with two fields for typing in numbers, and a button that will automatically run a few arithmetic operations on those numbers. The results are presented right there in the page just a few pixels below the form.
For the purposes of this post, the interesting part of that file comes near the bottom, where we include all of our JavaScript logic. It looks like this:
<script src="js/calculator/operations/operation.js"></script>
<script src="js/calculator/operations/addition.js"></script>
<script src="js/calculator/operations/subtraction.js"></script>
<script src="js/calculator/operations/multiplication.js"></script>
<script src="js/calculator/operations/division.js"></script>
<script src="js/calculator/calculator.js"></script>
<script src="js/index.js"></script>
As you can see, our little Automatic Calculator logic is separated into a series of files. And right now we start seeing some of the drawbacks of not using any sort of module loading for our app. This page has to include all of the script files that it needs separately. What’s worse, the order in which they are included matters. For example, since the js/calculator/calculator.js file depends on the js/calculator/operations/multiplication.js file to work, multiplication.js needs to be included first. Otherwise, the page will break. From this page’s perspective, it would be much easier and cleaner if it could just include one file, one “bundle” that has everything it needs.
If we look at our script files, we see more related problems. Consider js/index.js, for example. This is the file that starts up the app. It defines an App class which it then instantiates and runs. Here’s what it looks like (explore the source code in the git repo if you want to see the whole thing):
class App {
    constructor() {
        this.calculator = new Calculator();

        /* Omitted */
    }

    run() {
        /* Omitted */
    }
}

console.log("Starting application");

let app = new App();
app.run();

console.log("Application started");
The App class’ constructor is creating a new instance of the Calculator class. The problem is that, from the point of view of the reader of this file, it’s doing so out of thin air. There’s no indication whatsoever that this file depends on and uses the Calculator class. It is available here only because the file that contains that class happens to be included in a <script> tag in the same page that is using js/index.js. That’s hard to read and maintain as the dependency is implicit in a place where it should be explicit. Imagine if js/index.js was a couple hundred lines bigger and had a few dozen more dependencies. That’d be very hard to manage. You would have to read the entire file to get an idea of how the code is structured. To be able to reason about the code from a higher level, you would have to go to the really low level. Too much cognitive overhead.
The same thing happens in the js/calculator/calculator.js file. It defines the Calculator class and that class depends on other classes (Addition, Subtraction, etc). Which are also defined in other JavaScript files but the js/calculator/calculator.js does not explicitly say that those are dependencies that it needs. They are called up out of thin air. Everyone is trusting in index.html to include all the separate script files where these classes are defined and that it does so in the proper order. Too much responsibility for little old index.html. And also, what would happen if somebody wanted to reuse the Calculator class in another page for instance? That developer would have to know all of the dependencies for that class and include them manually in the new page. What if the file were much bigger, with more dependencies? That can get really ugly really quickly.
Luckily for us, those are exactly the kinds of problems that webpack helps us deal with. So let’s start refactoring this little app so that it can take advantage of a webpack-based build process.
Installing webpack into our project
If you are following along and downloaded the source code from the GitHub repo, note that whenever I say “root”, I mean that repo’s
originaldirectory. That’s where the original version of the Automatic Calculator app’s source code lives as it is before introducing webpack. You can work directly from there or take the contents of that directory and put them wherever it is most comfortable to you. Thefinaldirectory contains the source code as it will be by the end of this post.
The first thing we need to do is install webpack into our project. That’s super easy if you already have Node.js and NPM installed. How to install Node.js and NPM is out of the scope of this discussion, so I would recommend following Node.js’s documentation to get them installed.
Once you have that, go to our project’s root and run npm init -y. This will create a package.json file with some default configuration. This effectively makes our code a proper Node.js project.
After that, installing webpack is as easy as going to our project’s root and running:
npm install webpack webpack-cli --save-devThat will create a new node_modules directory and install both the webpack and webpack-cli packages as development dependencies. They are installed as dev dependencies because, in production, our app won’t actually need webpack to run properly. webpack will only help us build the deployment assets for our app, and that happens at development time.
The webpack configuration file
Now, we need to create a webpack.config.js file which tells webpack how to take our files and produce said deployment assets, i.e. the compiled bundle. Here’s what a simple config file tailored to our app would look like.
const path = require('path');

module.exports = {
    mode: "development",
    entry: "./src/index.js",
    output: {
        filename: "index.js",
        path: path.resolve(__dirname, "dist"),
    },
};
Let’s discuss it line by line.
First, there’s const path = require('path'); which is just including the Node.js native path package that the config file uses further down below.
Then there’s the module.exports definition. Conveniently, webpack’s configuration values are organized within a JavaScript object. Setting module.exports equal to that object makes it available to other JavaScript files that import this file.
Now we have the actual webpack build settings. The mode field can be either development, production, or none. Not super important for us right now, but depending on what you set here, webpack will apply different optimizations to the bundles.
The entry field defines the entry point for the build process. As discussed before, this is the file that webpack will start from when figuring out the entire dependency graph. That is, all of the files that specify that they need one another to work via import and export statements (more on that later). In our app, the dependency graph looks like this:
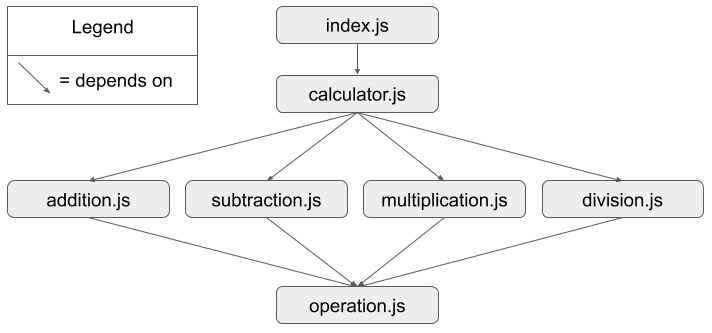
In other words, index.js depends on calculator.js. calculator.js in turn depends on addition.js, subtraction.js, multiplication.js, and division.js. Finally, all of the latter four depend on operation.js. Here, we have specified ./src/index.js as our entry point. But wait, our index.js file lives inside our js dir. What gives? We’ll change that soon, when we prepare our files to use ES2015 modules and have an overall more conventional organization, as far as webpack is concerned.
Finally, with the output field, we tell webpack what we want it to produce after bundling together all those files. In this case, we’ve configured it to produce a file called index.js inside the dist directory.
Refactoring our project to use ES2015 modules
Like I discussed before, webpack allows us to express our dependencies using the now-standard import and export statements, which are natively supported as of JavaScript’s language level ES2015. Let’s do that. This is super easy, and you will understand it immediately if you have used any other language that supports modules like C#, Java, Python, PHP… Yeah, pretty much any other language out there BUT JavaScript.
Anyway, we have to add this line at the beginning of index.js:
import Calculator from "./calculator/calculator.js";Nice, this is an explicit dependency declaration for our index.js file. Now webpack (and readers of our code!) can know that this file uses the Calculator class. And like that, we go file by file adding dependencies. In calculator.js, we add:
import Addition from "./operations/addition.js";
import Subtraction from "./operations/subtraction.js";
import Multiplication from "./operations/multiplication.js";
import Division from "./operations/division.js";
In all of those four files, we add:
import Operation from "./operation.js";It’s all pretty self-explanatory. The syntax is import <CLASS_NAME> from "<RELATIVE_FILE_PATH>"; where the path is relative to the location of the file in which we’re adding the import statement.
Now, import statements are for specifying which other files a given file needs to work. To allow the code elements that are defined within a file to be imported by others though, they need to be exported. We do that by annotating the code elements that we want to make available with the export statement. export basically specifies what parts of a module are available for others to use.
Our code is factored in a very simple way, where the only thing defined in a given file is a class. So, in order for all the import statements that we added to work, we just need to go file by file making changes like this:
-class Calculator {
+export default class Calculator {
All we did was add the export and default keywords to the definition of the Calculator class in calculator.js. export makes it so we are allowed to import that class elsewhere, and default allows us to use the style of import that we used before: the import Calculator from "./calculator/calculator.js"; one.
By the way, yes, there are other styles of
importand thedefaultkeyword is optional. To learn more aboutimportandexportstatements and JavaScript modules in general, I’d recommend a few resources from MDN: modules, import, and export.
Alright, so after adding export default to all of our class definitions (except for the App class defined in index.js, we don’t need to export it because we don’t import it anywhere) we have almost all the pieces of the puzzle ready for our webpack build to work.
The only thing left is to rename our js directory to src to match our webpack configuration. There’s no particular reason for using src instead of js, other than it being a good way to clearly separate the location of the source code versus the location of the compiled assets, Which will live in dist.
Anyway, with that rename done, you can go ahead and run
npx webpack --config webpack.config.jsAs a result of that command, you should see a new dist directory with a single index.js file in it. Just like we specified as the output in our webpack configuration file.
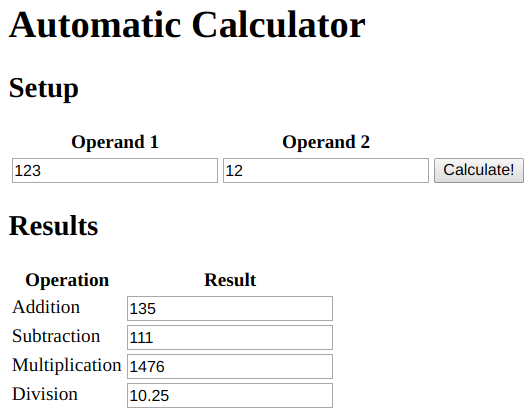
And that’s it! We have set up a webpack build process for our app. Don’t forget to change the index.html page so that it only includes this new compiled asset. That should look something like this, at the end of the <body>:
<script src="dist/index.js"></script>You should be able to open up the page in your browser and marvel at what we’ve accomplished:
The other problem that webpack solves
Ok, we’ve made a great accomplishment here. We’ve managed to leverage webpack to write modular JavaScript. The importance of this should not be understated. However, webpack offers us much more. Another problem that has historically plagued front-end web development is compatibility across multiple browsers. webpack helps us with that as well via loaders.
Concept: Loaders
In a nutshell, loaders are components that webpack uses to transform source code files during its bundling process, in order to make them available to the app. They basically allow webpack to turn things other than JavaScript into modules that can be used by the application via import. By itself, webpack only knows how to process JavaScript and JSON files. Using loaders, however, webpack can also process other types of files like CSS and its various flavors like LESS or SASS, or even JavaScript derived languages like TypeScript or CoffeeScript.
Writing modern JavaScript with Babel
Here’s where the browser compatibility solution that I alluded to earlier comes into play: babel-loader. This loader makes it so we can write bleeding edge JavaScript, with all the newest features of the language, without having to worry if our target browsers support them.
Babel is a compiler that takes code written with later versions of the language and turns it into backwards-compatible JavaScript that can run in older browsers. babel-loader is how Babel integrates with webpack. I like being able to take advantage of JavaScript’s latest features, so, for me, setting up Babel in any new project is a must. Luckily for us, with webpack, setting it up is easy.
You can learn more about Babel and the latest JavaScript features here and here.
Like most JavaScript packages, Babel is distributed as an NPM package. So let’s go ahead and install it with
npm install --save-dev babel-loader @babel/core @babel/preset-envThis will install the core Babel package as well as the loader for webpack, and the env preset.
The concept of a “preset” is actually a Babel-related one, not really having anything to do with webpack. You can learn more about them here, but, for our purposes, suffice it to say that Babel presets are a specification of which features are available to use. There are many presets (i.e. feature sets) against which you can configure Babel to compile.
envis just a very convenient one that provides support for all the latest language features.
Again, we’re installing these as dev-only dependencies because they are not needed for the app at runtime, only at build time.
Now, we go to our webpack.config.js file and add these lines:
module.exports = {
    // ...
    module: {
        rules: [
            { test: /\.js$/, exclude: /node_modules/, loader: "babel-loader" },
        ]
    }
};
This is how we specify that we want babel-loader to transform our JavaScript files before webpack bundles them together. Inside module.rules, there’s an array of objects. Each of the elements of that array is a rule specifying on one hand which files it applies to, via the regular expression in the test field, and on the other hand which loader will be used to process them via the loader field. The exclude field makes sure that files under our node_modules directory are not affected by babel-loader. We don’t want to be transforming the packages we downloaded from NPM after all, those are ready to use as they are. We only want to transform our own code.
In summary, this rule tells webpack to “run all .js files by babel-loader except for those inside node_modules”. babel-loader will make sure to transform them into plain old JavaScript before giving them back to webpack for bundling.
Finally, Babel itself requires a little bit of configuration. So let’s give it what it needs by creating a .babelrc file in our project’s root with these contents:
{
    "presets": ["@babel/preset-env"]
}
Pretty self-explanatory. This configuration tells Babel to use the env preset when processing our files.
Now run npx webpack --config webpack.config.js and hope for the best. Just kidding! Everything should work like a charm and with that, we have just unlocked JavaScript’s full potential for our project. Open the page again and you will see nothing has changed. What we have gained is the ability to write modern JavaScript without having to worry about compatibility.
Bonus: Multiple entry points
When building an SPA, a single entry point is appropriate. However, we often have apps with several pages, each one of which is a sort of advanced front-end application in its own right. From a webpack perspective, apps like that will have multiple entry points, one for each page. This is because each page has its own set of client side code that runs independently from the other pages. They may share common parts under the hood (via class or library reuse, for example) but the main, initial script is different.
Let’s consider our calculator. So far, that app has only one page. Imagine we want to add a new one. Let’s say, an admin control panel. To make that happen, let’s add new admin.html and src/admin.js files to the project. Their contents don’t matter. All I need is for them to exist in order to illustrate the multiple entry points capability.
As far as webpack is concerned, we can configure the build process to support that style of application by updating our webpack.config.js like so:
 module.exports = {
     mode: "development",
-    entry: "./src/index.js",
+    entry : {
+        index: "./src/index.js",
+        admin: "./src/admin.js"
+    },
     output: {
-        filename: "index.js",
+        filename: "[name].js",
         path: path.resolve(__dirname, "dist"),
     },
 }
As you can see, we’ve changed our config object’s entry field to include two separate entry points, one for our existing index.js entry point and another for the new admin.js one. We’ve also tweaked the output configuration; instead of a static name for the resulting output bundle, we use a pattern to describe them. In this case, [name].js makes it so we end up with two bundle files named after their corresponding entry points. The [name] part is where the magic happens. When creating the compiled bundle files, webpack knows to substitute that variable with the corresponding value from the entry point configuration.
Go ahead and run npx webpack --config webpack.config.js again and inspect the dist directory. You will see that we now have two bundles: index.js and admin.js.
dist/
├── admin.js
└── index.js
The new admin.js file can be added to the new admin.html page like usual via a <script> tag, just like we did with index.html.
Bonus: CSS can also be a module
When discussing loaders, I mentioned the possibility of making things other than JavaScript behave like modules and be available to the application. Let’s demonstrate how we can make that happen.
First, let’s install the loaders that we need with:
npm install --save-dev css-loader style-loaderThen, create a new CSS file under /css/index.css with some fabulous styling:
body {
    background-color: aquamarine;
}

button, input {
    border: grey solid 1px;
    background-color: white;
    padding: 5px;
}

input:hover, button:hover {
    background-color: teal;
}
Now import it into our index.js file with a line like this near the top of the file:
import "../css/index.css";And finally, let’s configure webpack so that it knows what to do when it finds this weird import css line. We do so by updating our module.rules config:
 module: {
     rules: [
         { test: /\.js$/, exclude: /node_modules/, loader: "babel-loader" },
+        { test: /\.css$/, use: ['style-loader', 'css-loader'] }
     ]
 }
What we did here was add the new loaders to the webpack build pipeline. With this, it now knows how to handle CSS files and apply whatever styling rules are defined in that CSS to the page in question. Pretty neat trick, huh?
These two particular loaders are doing more than meets the eye. You can learn more about them here and here.
Further reading: Plugins
There’s one core concept that we haven’t discussed yet: plugins. Plugins offer yet another avenue for customizing webpack’s behavior. I won’t go into too much detail on them here because I think that with the understanding we have gained on entry points, outputs, and loaders, we’ve added really powerful tools into our toolboxes. These tools will be enough in most cases, or at least allow us to get new projects up and running, but with more insight into what’s actually happening under webpack’s hood. If you are so inclined, you can learn more about them here. In a nutshell, plugins are for “doing anything else that a loader cannot do”, as webpack’s own documentation puts it.
~
And that’s it for now. Thanks for joining me in exploring webpack, a pretty neat piece of software that makes many a front-end developer’s life easier, mine included.
development javascript webpack
Comments