JavaScript-driven Interactive Highlighting

By Steph Skardal
January 25, 2013
An example of highlighted text, by sergis on Flickr
One project I’ve been involved in for almost two years here at End Point is the H2O project. The Ruby on Rails web application behind H2O serves as a platform for creating, editing, organizing, consuming and sharing course materials that is used by professors and their students.
One of the most interesting UI elements of this project is the requirement to allow highlighting and annotating text interactively. For example, when one reads a physical textbook for a college course, they may highlight and mark it up in various ways with different colors and add annotated text. They may also highlight a section that is particularly important for an upcoming exam, or they may highlight another section with a different color and notes that may be needed for a paper.
The H2O project has required support for digitizing interactive highlighting and annotating. Since individual text is not selectable as a DOM element, each word is wrapped into an individual DOM element that is selectable, hoverable, and has DOM properties that we can assign it. For example, we have the following text:
The cow jumped over the moon.
Which is manipulated to create individual DOM elements by word:
<span>The </span>

<span>cow </span>

<span>jumped </span>

<span>over </span>

<span>the </span>

<span>moon.</span>
And an id is assigned to each element:
<span id="e1">The </span>

<span id="e2">cow </span>

<span id="e3">jumped </span>

<span id="e4">over </span>

<span id="e5">the </span>

<span id="e6">moon.</span>
This markup is the foundation of digitizing highlighting behavior: it allows the starting and ending boundaries of a highlighted section to be selected. It also allows additional highlighting boundary elements to be created before and after highlighted text, as well as provide the ability to interactively toggle highlighting. Without this, we can’t easily parse or identify starting and ending points other than trying to determine it by other methods such as substring-ing text or using positioning details to identify the current word.
How do we Highlight?
With our example, I’ll describe the history of highlighting functionality that I’ve been involved in on the project. For this post, let’s say our desired emulated highlighted behavior is the following, where “cow jumped over” is highlighted in pink, and “over the” is highlighted in blue:
The cow jumped over the moon.
And our HTML markup may look like this to indicate the highlighted layers:
<span id="e1">The </span>

<span id="e2" class="pink">cow </span>

<span id="e3" class="pink">jumped </span>

<span id="e4" class="pink blue">over </span>

<span id="e5" class="blue">the </span>

<span id="e6">moon.</span>
Highlighting Iteration 1
One of the challenges with emulating highlighting is that a DOM element can only have one background color. We can’t easily layer pink and blue highlights over a specific word to give a layered highlighted effect. So in our example, the pink and blue highlighted words will show up fine, but no color combinations will show up because a node cannot have multiple background colors. During my first iteration on this functionality, I implemented behavior to track the history of our highlights per textual node. The following steps are an example of a use case that demonstrates the highlight overlap:
- Starting from unhighlighted text, first a user highlights pink:
The cow jumped over the moon.
- Next, a user highlights blue:
The cow jumped over the moon.
- Next, a user unhighlights blue:
The cow jumped over the moon.
- Finally, a user unhighlights pink:
The cow jumped over the moon.
Or another simple use case:
- Starting from unhighlighted text, first a user highlights pink:
The cow jumped over the moon.
- Next, a user highlights blue:
The cow jumped over the moon.
- Next, a user unhighlights pink:
The cow jumped over the moon.
- Finally, a user unhighlights pink:
The cow jumped over the moon.
Programmatically, this method required that a history of highlights be stored to each text node in the form of an array. When something was highlighted or unhighlighted, the array was manipulated to remove or add highlights and the last highlight applied to the text node. While this method was fairly simply to implement, it did not allow users to visualize the overlapping highlighted sections. This iteration was in place for over a year, but ultimately it did not appropriately demonstrate overlapped highlights.
Highlighting Iteration 2
In the next iteration, I attempted to implement a method that added opaque, absolute and fixed positioned elements underneath the text, similar to how one might see layers in Photoshop:
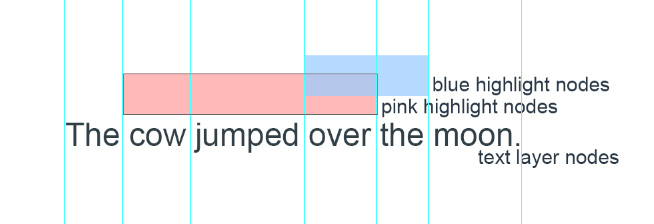
In the second iteration, additional colored & opaque nodes were created under the text to provide a layered highlighting effect.
Unhighlighted markup looked like this:
<span id="e1">
    <span class="highlights"></span>
    The
</span>
<span id="e2" class="pink">
  <span class="highlights"></span>
    cow
</span>
<span id="e3" class="pink">
    <span class="highlights"></span>
    jumped
</span>
<span id="e4" class="pink blue">
    <span class="highlights"></span>
    over
</span>
<span id="e5" class="blue">
    <span class="highlights"></span>
    the
</span>
<span id="e6">
    <span class="highlights"></span>
    moon.
</span>
And highlighted markup looked like this:
<span id="e1">
    <span class="highlights"></span>
    The
</span>
<span id="e2" class="pink">
    <span class="highlights">
        <span class="highlight_pink"></span>
    </span>
    cow
</span>
<span id="e3" class="pink">
    <span class="highlights">
        <span class="highlight_pink"></span>
    </span>
    jumped
</span>
<span id="e4" class="pink blue">
    <span class="highlights">
        <span class="highlight_pink"></span>
        <span class="highlight_blue"></span>
    </span>
    over
</span>
<span id="e5" class="blue">
    <span class="highlights">
        <span class="highlight_blue"></span>
    </span>
    the
</span>
<span id="e6">
    <span class="highlights"></span>
    moon.
</span>
In the above markup, the following should be noted:
- Each
span.highlightsnode is absolutely positioned with a width and height matching the text node. - Each
span.highlightsspan node (e.g. a node with thehighlight_pinkclass) has a width and height of 100%, a background color defined in CSS, and an opacity that is scaled based on the number of highlights. - Whenever highlights are toggled in the text, the children nodes of span.highlights are manipulated (added or removed), as well as the opacity.
While this functionality provides a nice highlighted layering effect, absolute positioning is probably my least favorite thing to work with in cross browser development, and it did not always behave as expected. Specifically, IE and Chrome behaved somewhat as expected, but Firefox did not. This absolute positioning also caused problems with other absolutely positioned elements on the page.
Additionally, this markup was subject to cause significant performance issues. In one case, content with 44,000 words (and text nodes) alone caused performance implications, but additional highlighting layering caused extreme performance pain, to the point that Chrome would not load the content and the content would take more than 30 seconds to load in Firefox, so I went searching for a better solution.
Highlighting Iteration 3
Finally, in the most recent iteration, after identifying that Iteration 2 produced significant performance issues, after more research, I came across the jQuery xColor plugin. This plugin allows you to do mathematical operations on colors, such as combining colors. While the plugin itself only lets you combine 2 colors at one time, I created a method to combine multiple opaque layers:
$.each($('span.' + highlighted_class), function(i, el) {
    var current = $(el);
    var highlight_colors = current.data('highlight_colors');
    if(highlight_colors) {
      highlight_colors.push(hex);
    } else {
       highlight_colors = new Array(hex);
    }
    var current_hex = '#FFFFFF';
    var opacity = 0.4 / highlight_colors.length;
    $.each(highlight_colors, function(i, color) {
        var new_color = $.xcolor.opacity(current_hex, color, opacity);
        current_hex = new_color.getHex();
     });
     current.css('background', current_hex);
     current.data('highlight_colors', highlight_colors);
});
Step by step, the above code does, for each span node with a specific highlight:
- Retrieve the array of highlights applied to that node, or create a new array with the new highlight color.
- For each highlight, layer an opaque version of that highlight on top of the summation of colors.
- Set the background to the final combination of layered highlights.
- Store the new array of highlights applied to that node.
The markup is back to the original markup with no additional children elements per text node. Each highlighting interaction triggers a recalculation of the background color per text node based on the data stored to that node.
Conclusion
Significant limitations during this work have included the described performance limitations, as well as the inability to set multiple background images on a DOM element. Absolutely positioning, while valuable at times, proved to be quite challenging because of other absolute and fixed positioned elements on the page. In addition to emulating this highlighting behavior, there are additional interactive requirements included with the interactive highlighting.
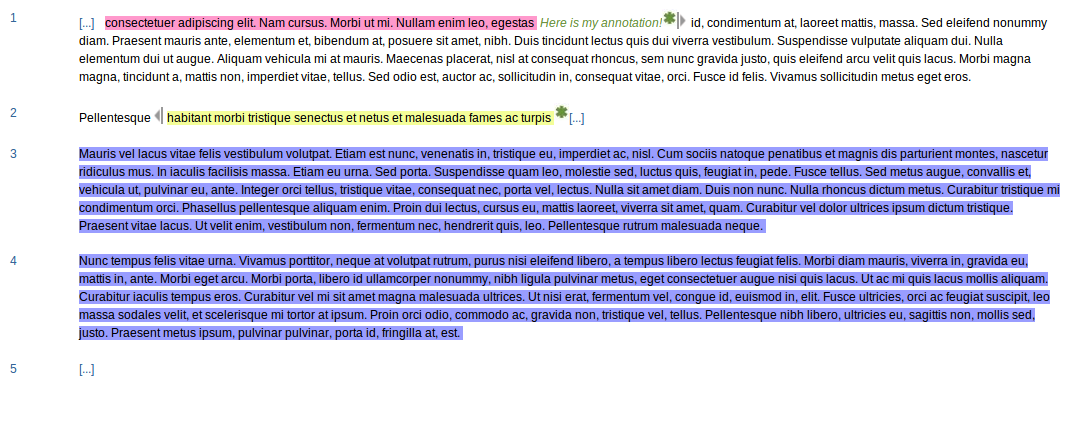
Example of additional features needed in interactive highlighting tool.
Additional UI functional requirements include:
- Functionality to show paragraph numbers, and hide all paragraph numbers when they have no visible children (Hint: advanced jQuery selectors are used here).
- Ability to toggle display of unhighlighted text. The […] in the above image trigger the unhighlighted text in that section to display, while the left and right arrows trigger the unhighlighted text in that section to be hidden.
- Ability to toggle display of highlighted text, similar to the toggle of unhighlighted text.
- Ability to toggle between a “read” and “edit” mode for owners of the text, which allows for these users to interactively add additional highlights and dynamically modify the markup. In the edit mode, additional markup is added to identify these highlighted layers.
- Ability to toggle display of the annotation. In the above image, clicking on the green asterisk toggles this display. No asterisk is shown if there is no annotation.
- Ability for highlights to encompass HTML nodes that are not individual span elements. For example, highlighted sections may encompass multiple paragraphs and headers of
<span>nodes, which is why simply adding a wrapping element to highlights will not work.
One might suggest we go to a better tool to manage content markup, but ultimately these types of markup tools do not provide the interactivity we seek, and they require that the end user have knowledge of HTML markup, which is not always the case.
Comments