Building a real-time application with SignalR, .NET, and three.js

By Bimal Gharti Magar
January 13, 2024

Image by Pixabay on Pexels
When data in a web application is changing in real time, users want to see those updates reflected in real time without refreshing the application. Adding real-time functionality to a .NET application is easy with the SignalR library.
Depending on the capabilities of the client and server, SignalR can use WebSockets, server-sent events, or long polling to establish a persistent connection between the client and the server. From the server side, SignalR pushes code to connected clients. SignalR is good for applications that require high-frequency updates from the server, such as real-time gaming.
C# code can be used to write SignalR hubs, which easily integrate with other ASP.NET features like dependency injection, authentication, authorization, and scalability.
What we’ll build
We will learn how to use SignalR for real-time communication to send the camera position of a cube, built using three.js, to all users on the page.
You can see the demo here.
Here is the description of our testing app:
- A user can request control of a cube for 2 minutes
- Control can be released manually, or it will be automatically released after 2 minutes
- A user can control the camera position of cube, which will be seen by all users viewing the page
- When one user is controlling the cube, other users requesting control will be added to a queue
- Queued users will be granted control automatically when the controlling user’s time is over
First we will create a web application and create a SignalR communication between the client and server. After that, we can implement the above features.
Creating the web application
Create a new .NET application.
> dotnet new webapp -o EPSignalRControlI edited the app using VS Code:
> code .\EPSignalRControl\Installing and configuring SignalR
The SignalR server library is included in the ASP.NET Core shared framework. However, the JavaScript client library isn’t automatically included in the project. You can use Library Manager (LibMan) to get the client library from unpkg. unpkg is a fast global content delivery network for everything on npm.
> dotnet tool install -g Microsoft.Web.LibraryManager.Cli
> libman install @microsoft/signalr@latest -p unpkg -d wwwroot/js/signalr --files dist/browser/signalr.js
Creating a SignalR hub
We’ll create a CameraData model class for passing data between the SignalR server and client.
public class CameraData
{
    public double x { get; set; } = 0;
    public double y { get; set; } = 0;
    public double z { get; set; } = 5;
}
We’ll also create a ControlHub class which inherits from Hub.
using Microsoft.AspNetCore.SignalR;

namespace EPSignalRControl.Hubs;

public class ControlHub : Hub
{
    public async Task SendData(CameraData data)
    {
        // Broadcast the data to all clients
        await Clients.All.SendAsync("ReceiveData", data);
    }
}
The Hub class has Clients, Context, and Groups properties:
- Clients can be used to invoke methods on the clients connected to this hub.
- Context is the hub caller context for accessing information about the hub caller connection.
- Groups is the group manager to manage connections in groups.
One thing to note is that hubs are transient, so we cannot store state in a property of the Hub class. Each hub method call is executed on a new Hub instance.
Clients.All calls a method on all connected clients. As a result, the control hub sends the data received from one client back to all connected clients. Similarly, we can use Clients.Caller to send back data to the client that invoked the hub method.
Then, we need to register the services using AddSignalR() and configure the endpoints using MapHub() required by SignalR in Program.cs
using EPSignalRControl.Hubs;

var builder = WebApplication.CreateBuilder(args);

builder.Services.AddRazorPages(); // Add services to the container
builder.Services.AddSignalR(); // Register SignalR service

var app = builder.Build();
if (!app.Environment.IsDevelopment())
{
    app.UseExceptionHandler("/Error");
    app.UseHsts();
}
app.UseHttpsRedirection();
app.UseStaticFiles();
app.UseRouting();
app.UseAuthorization();
app.MapRazorPages();

app.MapHub<ControlHub>("/controlHub"); // Map ControlHub to the '/controlHub' endpoint

app.Run();
Connecting to SignalR Hub using the SignalR JavaScript client library
We’ll reference the SignalR JavaScript library as well as create a site.js file and reference it in Index.cshtml.
<script src="~/js/signalr/dist/browser/signalr.js"></script>
<script type="module" src="~/js/site.js" asp-append-version="true"></script>
In the site.js file, we will:
- Connect to the control hub using the endpoint
/connecthub - Start the connection with our control hub
- Send data to the server by invoking the
SendDatamethod of ControlHub - Add a listener for
ReceiveDatato receive the data sent from SignalR Hub
const controlHubConnection = new signalR.HubConnectionBuilder()
    .withUrl("/controlhub")
    .build();

controlHubConnection.on("ReceiveData", function (cameraData) {
    console.log(`position.x = ${cameraData.x}`);
    console.log(`position.y = ${cameraData.y}`);
    console.log(`position.z = ${cameraData.z}`);
});

controlHubConnection.start()
    .then(function () {
        console.log("Connected to ControlHub");
        console.log("Invoking SendData");
        controlHubConnection.invoke("SendData", {
            x: 100,
            y: 100,
            z: 100
    })
    .catch(function (err) {
        return console.error(err.toString());
    });
}).catch(function (err) {
    console.error("Error connecting to ControlHub: ", err);
});
At this point if we run the web application, open the browser, and look at the developer tools console, we will see:
Connected to ControlHub
Invoking SendData
position.x = 100
position.y = 100
position.z = 100
If we open the web application in a different tab, then in the first tab’s dev tools console we will see the position values are appended. This is because the new tab invoked SendData and the server received and sent back data to all connected clients.
Connected to ControlHub
Invoking SendData
position.x = 100
position.y = 100
position.z = 100
position.x = 100
position.y = 100
position.z = 100
This is the basic way of implementing SignalR in the project to achieve real-time functionality. Now, we’ll dive deep into creating more features to extend the app to more practical usage.
Adding features
Backend
Add a ControlRequest.cs model to hold the SignalR connection ID and the time of the request.
public class ControlRequest
{
    public string ConnectionId { get; set; } = string.Empty;
    public DateTime RequestTime { get; set; }
}
Add two variables in ControlHub.cs: currentControl to hold the details of the current active request, and controlQueue to hold the requests in queue.
private static ControlRequest? currentControl;
private static Queue<ControlRequest> controlQueue = new Queue<ControlRequest>();
Add a ControlTimer.cs class with properties for a ConcurrentDictionary mapping of the connection ID, the ControlHub clients, the ControlHub context, and the ControlTimer object.
using System.Collections.Concurrent;
using Microsoft.AspNetCore.SignalR;

public class ControlTimer : System.Timers.Timer
{
    public static ConcurrentDictionary<string, ControlTimer> ControlTimers = new();
    public HubCallerContext hubContext { get; set; }
    public IHubCallerClients hubCallerClients { get; set; }
    public ControlTimer(double interval) : base(interval) { }
}
Add two more variables in ControlHub.cs:
controlTimerto store control timer dictionary, control hub context, and control hub clients that can be accessed during the interval of the timer that runs for the active request.CONTROL_TIMEholds the time in seconds for which the active request has control.
private ControlTimer? controlTimer;
private const int CONTROL_TIME = 120; //seconds
Add a RequestControl method to ControlHub that is invoked by the client to request the control. The method adds the connection ID of the invoked request to the queue, and creates and adds the control timer for the currently invoked request. If the queue has only one request, it gives control to the current request, starts the timer and sends a message to the requesting client notifying that access is granted. If the queue has more than one request, the requesting client is notified that their request is queued.
public async Task RequestControl()
{
    var controlRequest = new ControlRequest
    {
        ConnectionId = Context.ConnectionId,
        RequestTime = DateTime.Now
    };

    // Add the control request to the queue
    controlQueue.Enqueue(controlRequest);

    // Add timer to dictionary for request
    controlTimer = new ControlTimer(500)
    {
        hubContext = Context,
        hubCallerClients = Clients
    };
    controlTimer = ControlTimer.ControlTimers.GetOrAdd(controlRequest.ConnectionId, controlTimer);

    // Grant control if the queue is empty or it's the first request
    if (controlQueue.Count == 1 || controlQueue.Peek() == controlRequest)
    {
        currentControl = controlRequest;

        SetupTimerForRelease(controlRequest);

        await Clients.Client(controlRequest.ConnectionId).SendAsync("ControlGranted");
    }
    else
    {
        await Clients.Client(controlRequest.ConnectionId).SendAsync("ControlQueued");
    }
}
Add a SetupTimerForRelease method to add calls to the ReleaseControlMiddleware method on a regular interval from the running timer.
public void SetupTimerForRelease(ControlRequest controlRequest)
{
    if (controlRequest != null && controlTimer == null)
    {
        controlTimer = ControlTimer.ControlTimers.GetOrAdd(controlRequest.ConnectionId, controlTimer);
    }
    controlTimer.Elapsed += new ElapsedEventHandler(ReleaseControlMiddleware);
    controlTimer.Enabled = true;
}

public void ReleaseControlMiddleware(object source, ElapsedEventArgs e)
{
    _ = AutoReleaseControl(source, e);
}
Add an AutoReleaseControl method, to be called by a running timer, which checks if the time for the current control has elapsed. The method sends the time remaining message to the user with control. If the time has elapsed, it calls ClearTimerAndControl to clear the timer and release control.
public async Task AutoReleaseControl(object source, ElapsedEventArgs e)
{
    var controlTimer = (ControlTimer)source;
    HubCallerContext hcallerContext = controlTimer.hubContext;
    IHubCallerClients hubClients = controlTimer.hubCallerClients;

    if (currentControl != null)
    {
        var elapsedSeconds = Math.Ceiling(DateTime.Now.Subtract(currentControl.RequestTime).TotalSeconds);
        await hubClients.Client(currentControl.ConnectionId).SendAsync("ControlRemaining", CONTROL_TIME - elapsedSeconds);
        if (elapsedSeconds >= CONTROL_TIME)
        {
            await ClearTimerAndControl(hubClients, hcallerContext);
        }
    }
}
Add ClearTimerAndControl method which:
- Clears the timer for a given connection ID
- Sends a message to the controlling client informing that their control time is released
- Sends default camera position data to all the clients to reset the cube camera position
- Dequeues the current control from the queue, which is the first item
- Gives control to the next request in the queue
- Sends a message to the client who is granted the control
private async Task ClearTimerAndControl(IHubCallerClients hubClients, HubCallerContext context)
{
    try
    {
        // Clear the timer when control is explicitly released
        ClearControlTimer(context.ConnectionId);

        await hubClients.Client(context.ConnectionId).SendAsync("ControlReleased");
        await hubClients.All.SendAsync("ReceiveData", new CameraData());
        // Release control
        currentControl = null;

        // Remove the first request from the queue
        if (controlQueue.Count > 0)
            controlQueue.Dequeue();

        // Grant control to the next in the queue
        if (controlQueue.Count > 0)
        {
            currentControl = controlQueue.Peek();
            currentControl.RequestTime = DateTime.Now;
            SetupTimerForRelease(currentControl);
            await hubClients.Client(currentControl.ConnectionId).SendAsync("ControlGranted", currentControl.RequestTime.ToString());
        }
    }
    catch (Exception ex)
    {
        await Clients.All.SendAsync(ex.ToString());
    }
}
Add a ClearControlTimer method which gets the control timer of the given connection ID. Removes the ReleaseControlMiddleware from the control timer and disables the control timer.
private void ClearControlTimer(string connectionId)
{
    controlTimer = ControlTimer.ControlTimers.GetOrAdd(connectionId, new ControlTimer(500));
    if (controlTimer != null)
    {
        controlTimer.Elapsed -= new ElapsedEventHandler(ReleaseControlMiddleware);
        controlTimer.Enabled = false;
        controlTimer = null;
    }
}
Add a ReleaseControl method to ControlHub, that is invoked manually by the controlling client to release the control. It checks if the requesting client has the current control access and calls the method to clear timer.
public async Task ReleaseControl()
{
    if (currentControl != null && currentControl.ConnectionId == Context.ConnectionId)
    {
        await ClearTimerAndControl(Clients, Context);
    }
}
Add a SendData method, which receives the data from the controlling user and then sends the received data to all the clients.
public async Task SendData(CameraData cameraData)
{
    controlTimer = ControlTimer.ControlTimers.GetOrAdd(Context.ConnectionId, new ControlTimer(500));
    if (controlTimer != null && controlTimer.hubContext != null && Context.ConnectionId == controlTimer.hubContext.ConnectionId)
    {
        // Broadcast the received sensor data to all clients
        await controlTimer.hubCallerClients.All.SendAsync("ReceiveData", cameraData);
    }
}
That’s all the code required for the backend. Now let’s add to the frontend.
Frontend
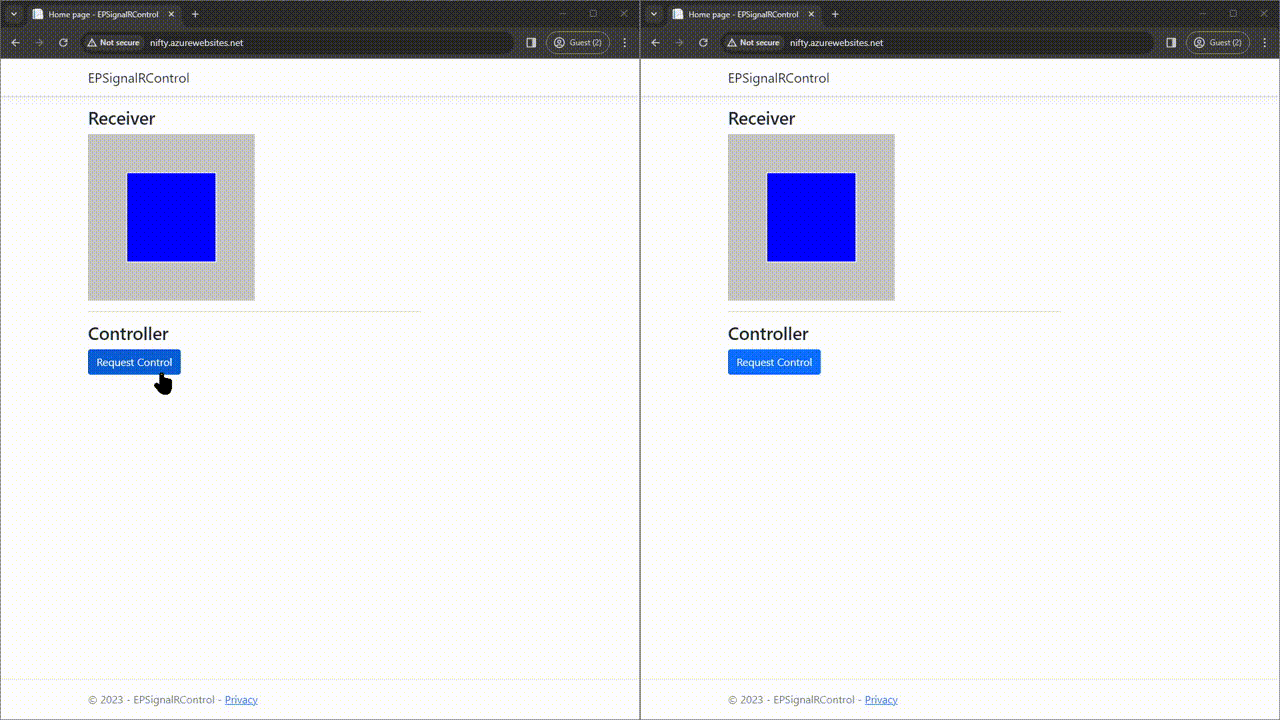
In Index.cshtml, we’ll include:
- A receiver section to show the three.js cube and update the camera position using the received data from SignalR connection.
- A section to show the message from backend.
- A controller section with button to request the control using SignalR connection and show the three.js cube. The cube can be rotated with the mouse which sends the data to the backend using the SignalR connection. The backend then sends the data back to all the clients to update the cube camera position in receiver section.
@page
@model IndexModel
@{
    ViewData["Title"] = "Home page";
}

<div id="wrapper">
    <h3>Receiver</h3>
    <div id="receiver-wrapper"></div>

    <hr />
    <h3>Controller</h3>

    <button class="btn btn-primary" id="requestCtrlBtn" disabled></button>
    <div class="alert alert-info d-none" role="alert" id="message"></div>

    <div id="controller-wrapper"></div>
</div>

<script src="~/js/signalr/dist/browser/signalr.js"></script>
<script type="module" src="~/js/site.js" asp-append-version="true"></script>
Then we can add JavaScript code to implement the app functionality in the template. We’ll add:
- A click handler to invoke the
RequestControlmethod using the SignalR connection. - Listeners for the
ControlGranted,ControlQueued,ControlReleased, andControlRemainingevents to update the UI based on the message included in the corresponding event.
let controlRequested = false;
let controlGranted = false;
let destroyController = false;

const requestCtrlBtn = document.getElementById('requestCtrlBtn')
requestCtrlBtn.disabled = true;
requestCtrlBtn.innerText = "Request Control";

const messageCtrl = document.getElementById('message')

requestCtrlBtn.addEventListener('click', () => {
    let action = 'RequestControl';
    if (controlGranted) {
        action = 'ReleaseControl';
    }
    controlHubConnection.invoke(action).catch(function (err) {
        return console.error(err.toString());
    });
})

controlHubConnection.on("ControlGranted", function () {
    controlGranted = true;
    controlRequested = false;
    requestCtrlBtn.disabled = false;
    requestCtrlBtn.classList.remove(...['btn-primary', 'btn-warning']);
    requestCtrlBtn.classList.add('btn-success');
    requestCtrlBtn.innerText = "Release Control";
    destroyController = createController();
});

controlHubConnection.on("ControlQueued", function () {
    controlRequested = true;
    controlGranted = false;
    requestCtrlBtn.disabled = true;
    requestCtrlBtn.classList.remove('btn-primary');
    requestCtrlBtn.classList.add('btn-warning');
    requestCtrlBtn.innerText = "Waiting in Queue";
});

controlHubConnection.on("ControlReleased", function () {
    controlRequested = false;
    controlGranted = false;
    requestCtrlBtn.disabled = false;
    requestCtrlBtn.innerText = "Request Control";
    requestCtrlBtn.classList.remove(...['btn-success', 'btn-warning']);
    requestCtrlBtn.classList.add('btn-primary');
    messageCtrl.innerText = '';
    messageCtrl.classList.add('d-none');

    if (destroyController != null) {
        destroyController();
        destroyController = null;
    }
});

controlHubConnection.on("ControlRemaining", function (seconds) {
    messageCtrl.classList.remove('d-none');
    messageCtrl.innerText = `Control Granted: ${seconds} seconds remaining`;
});
At the top of the file, import the three.js library along with the OrbitalControl add-on to control the cube camera position.
import * as THREE from 'three';
import { OrbitControls } from 'three/addons/controls/OrbitControls.js';
Add createRenderer, createScene, createCamera, and createCube helper methods that are required for creating cube and attaching it to the receiver as well as the controller section to show a cube.
function createRenderer(canvasDOMId) {
    // Load a Renderer
    let renderer = new THREE.WebGLRenderer({ alpha: false, antialias: true });
    renderer.setClearColor(0xC5C5C3);
    renderer.setPixelRatio(window.devicePixelRatio);
    renderer.setSize(250, 250);
    document.getElementById(canvasDOMId).appendChild(renderer.domElement);

    return renderer;
}

function createScene() {
    // Load 3D Scene
    let scene = new THREE.Scene();

    // Load Light
    var ambientLight = new THREE.AmbientLight(0xcccccc);
    scene.add(ambientLight);

    var directionalLight = new THREE.DirectionalLight(0xffffff);
    directionalLight.position.set(0, 0, 1).normalize();
    scene.add(directionalLight);

    return scene;
}

function createCamera(cameraZPosition = 10) {

    // Load Camera Perspective
    let camera = new THREE.PerspectiveCamera(50, 250 / 250, 1, 200);
    camera.position.z = 5;

    return camera;
}

function createCube() {
    const geometry = new THREE.BoxGeometry(2, 2, 2).toNonIndexed();;

    const positionAttribute = geometry.getAttribute('position');
    const colors = [];
    const color = new THREE.Color();
    for (let i = 0; i < positionAttribute.count; i += 3) {

        if (i >= 0 && i <= 11) {
            color.set(0xffff00); // x facing yellow
        }
        else if (i >= 12 && i <= 23) {
            color.set(0xff0000); // y facing red
        }
        else {
            color.set(0x0000ff); // z facing blue
        }

        // define the same color for each vertex of a triangle
        colors.push(color.r, color.g, color.b);
        colors.push(color.r, color.g, color.b);
        colors.push(color.r, color.g, color.b);

    }
    geometry.setAttribute('color', new THREE.Float32BufferAttribute(colors, 3));
    const material = new THREE.MeshBasicMaterial({ vertexColors: true });
    let cube = new THREE.Mesh(geometry, material);

    // wireframe
    var geo = new THREE.EdgesGeometry(cube.geometry); // or WireframeGeometry
    var mat = new THREE.LineBasicMaterial({ color: 0xffffff });
    var wireframe = new THREE.LineSegments(geo, mat);
    cube.add(wireframe);

    return cube;
}
Use the helper methods in the receiver section to create the cube and display it.
// Define variables
const receiverRenderer = createRenderer('receiver-wrapper');
const receiverScene = createScene();
const receiverCamera = createCamera();
const receiverCube = createCube();
receiverScene.add(receiverCube);

let receiverControls = new OrbitControls(receiverCamera, receiverRenderer.domElement);
receiverControls.enabled = false;
function animate() {
    requestAnimationFrame(animate);
    receiverControls.update();
    receiverRenderer.render(receiverScene, receiverCamera);
}
animate();
Listen to the ReceiveData event to update the receiver section cube with updated camera position data.
controlHubConnection.on("ReceiveData", function (cameraData) {
    receiverCamera.position.x = cameraData.x;
    receiverCamera.position.y = cameraData.y;
    receiverCamera.position.z = cameraData.z;
});
Add a createController method which is called when a user is granted control of the cube. It creates a cube and renders on the controller section and listens to the camera position change.
When the cube is rotated, it calls the server method SendData using the SignalR connection. It also returns a method that cancels the cube renderer and removes the listener from the controller cube. This returned method is called when the ControlReleased event is called from server.
function createController() {
    const controllerRenderer = createRenderer('controller-wrapper');
    const controllerScene = createScene();
    const controllerCamera = createCamera();
    const controllerCube = createCube();
    controllerScene.add(controllerCube);

    let controls = new OrbitControls(controllerCamera, controllerRenderer.domElement);
    function onPositionChange(o) {
        controlHubConnection.invoke("SendData", controllerCamera.position).catch(function (err) {
            return console.error(err.toString());
        });
    }
    controls.addEventListener('change', onPositionChange);

    let request;
    function controllerAnimate() {
        request = requestAnimationFrame(controllerAnimate);
        controls.update();
        controllerRenderer.render(controllerScene, controllerCamera);
    }

    controllerAnimate();

    return function () {
        document.getElementById('controller-wrapper').innerHTML = '';
        cancelAnimationFrame(request);
        controls.removeEventListener('change', onPositionChange);
    }
}
Wrapping Up
We learned the basics of SignalR and how to build a simple application to communicate between the backend and frontend using a SignalR connection. We also looked into a practical implementation on how can we use SignalR to control a graphical object built with three.js. We can extend the application to build apps like a multi-player game, or to send messages to the frontend from long-running backend background jobs.
You can get the code at GitHub.
Comments