Creating a Messaging App Using Spring for Apache Kafka, Part 5

By Kürşat Kutlu Aydemir
October 31, 2022

I guess this is the longest break between posts in this series. But finally I had a chance to prepare a working example to finalize this series. So, up-to-date code is available in the GitHub repository.
Activation and Login
This was already implemented in the previous parts. However, we haven’t shown it in action yet. There are some code fixes and small changes within the workflow of activation and login steps, so you can refer to the GitHub repository for the latest code.
Authentication and activation are managed through the AuthController class where these activation and login requests are handled. Let’s take a look at the REST endpoints handling these requests and explain the steps.
Activation
Our activation step uses a dummy mobile phone number. You can think of it similarly to activating a messaging application (like WhatsApp) using a phone number. I didn’t introduce any restrictions on the phone number for this application, so the phone number activation is just a pseudo-step and you can supply any number. In real life, the phone number activation would use SMS or other activation services to activate your chat application against the user’s phone number.
The activation endpoint is /api/auth/getcode, and takes the mobile number as payload. A sample POST request is below:
curl -H "Content-Type: application/json" -X POST localhost:8080/api/auth/getcode -d '{ "mobile": "01234" }'The response of this endpoint is of the class ActivationResponse which, in return, gives an activation code along with the provided mobile number. This activationCode will later be used to login and retrieve an access token for further loginless connections. Here is an example output of this response:
{
  "mobile": "01234",
  "activationCode": "309652"
}
We provide a random activationCode and the client now needs to use this activation code to move one step further towards getting an access token for further authentication.
Login
The login step is supposed to be a one-time login after getting the activation code (phone number) which is used for login credentials. Our application returns an access token in return. The login endpoint is /api/auth/login. Request and response examples are below.
curl -H "Content-Type: application/json" -X POST localhost:8080/api/auth/login -d '{ "mobile": "01234", "activationCode": "309652" }'POSTing to the login endpoint returns an access token. The access token is needed to make message-sending requests so that the client can be authenticated. Storing locally and reusing this access token is the responsibility of the client.
{
  "accessToken": "5eab27f8-8748-4fdc-a4de-ac782ce17a74"
}
Chat Application
The chat application is the final part of this series, and will show the messaging in action. The chat application is designed as a simple proof of concept and simulates a chatting session.
To add a web UI to our Spring application I’ve added two static files, app.js and index.html, in the resources directory. index.html serves as the chat application’s UI and app.js is responsible for making AJAX calls and WebSocket connections from the client browser.
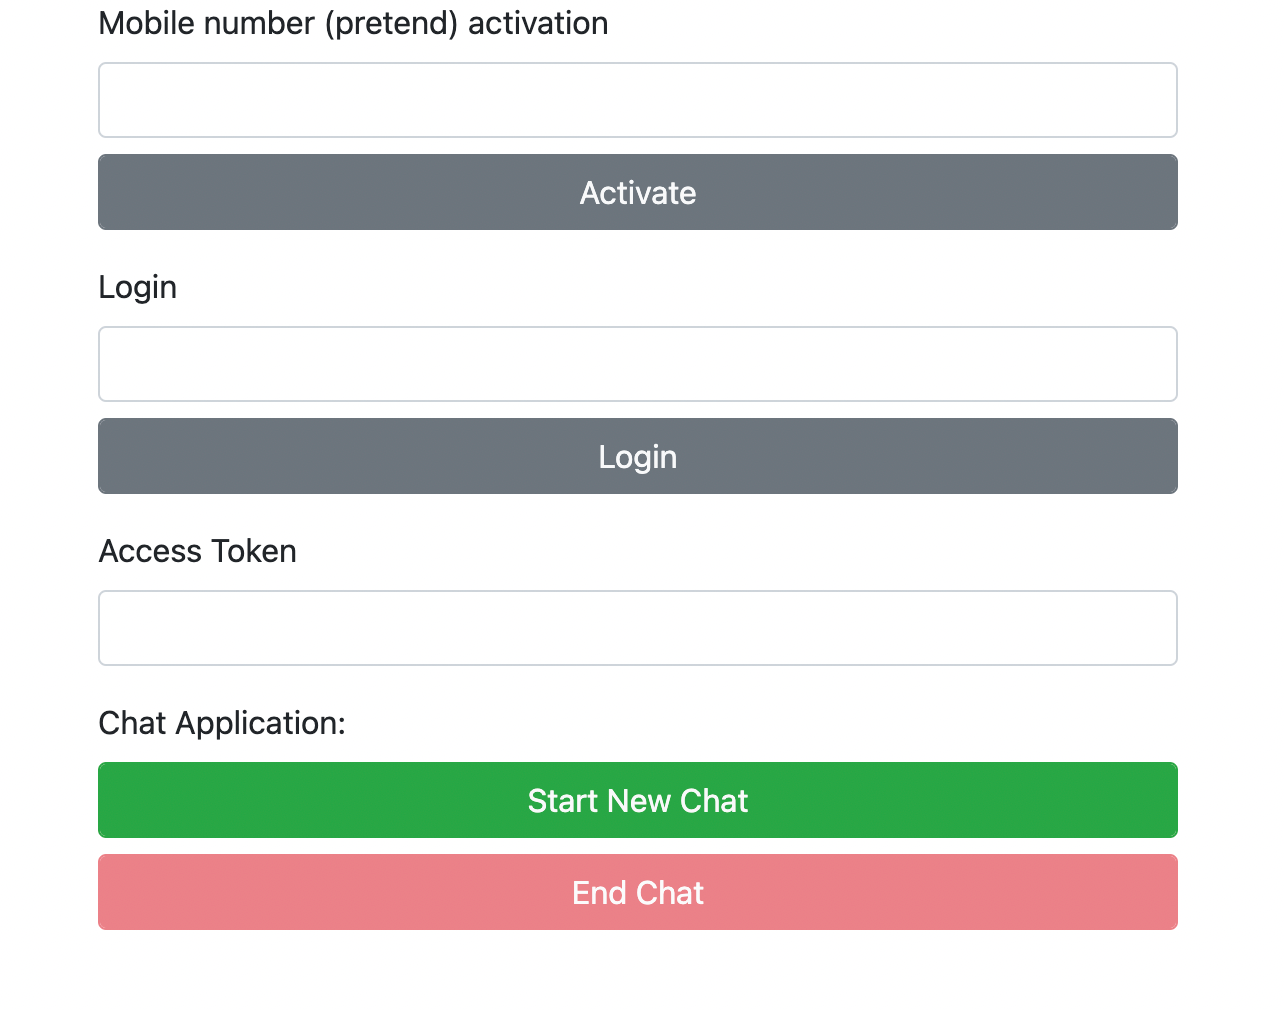
I added all three steps to the chat application UI to make the workflow clearer. As you see in the chat screen above, these three steps are activation, login, and starting a new chat. Let’s walk through these steps.
Activation and login through the chat application
Activation simply requires a pretend mobile phone number. When you click on Activate it sends a POST request to the /api/auth/getcode end point we mentioned above.
function activate() {
  var mobileFormData = JSON.stringify({
    'mobile': $("#mobile").val(),
  });

  $.ajax({
    type: "POST",
    url: "http://localhost:8080/api/auth/getcode",
    data: mobileFormData,
    contentType: "application/json; charset=utf-8",
    success: function(result) {
      $("#activationCode").val(result.activationCode);
    },
  });
}
The resulting activationCode is automatically inputted into the login field. We already know what this activationCode is and where it is stored in the backend, so now our chat client can use this along with the mobile number to log in and get the access token. When you click on Login it POSTs to /api/auth/login and puts the access token into the Access Token input box this time.
function login() {
  var loginFormData = JSON.stringify({
    'mobile': $("#mobile").val(),
    'activationCode': $("#activationCode").val(),
  });

  $.ajax({
    type: "POST",
    url: "http://localhost:8080/api/auth/login",
    data: loginFormData,
    contentType: "application/json; charset=utf-8",
    success: function(result) {
      $("#accessToken").val(result.accessToken);
    },
  });
}
Now finally our web client can connect to our WebSocket URI. Without a login step we could let our application accept WebSocket connections as well. However, we simulated an authentication step and we want to know who is connecting to the WebSocket handler.
function connect() {
  ws = new WebSocket('ws://localhost:8080/messaging?accessToken=' + $("#accessToken").val());
    ws.addEventListener('error', (error) => {
    console.log("Error: ", error.message);
    setConnected(false);
    });
    ws.addEventListener('close', (event) => {
    console.log("Close: ", event.code + " - " + event.reason);
      setConnected(false);
    })
  ws.onmessage = function(event) {
    helloWorld(event.data);
    console.log("Connected to WebSocket " + event.data);
  }
  setConnected(true);
}
WebSocket Handshake
In our WebSocketConfig class I added an WebSocket handshake interceptor WSHandshakeInterceptor to authenticate the connecting user by checking the accessToken. So, the accessToken is necessary at the first step while connecting to the WebSocket registry. If the client doesn’t provide an accessToken or provides an invalid one then the handshake will fail.
@Override
public boolean beforeHandshake(ServerHttpRequest serverHttpRequest, ServerHttpResponse serverHttpResponse, org.springframework.web.socket.WebSocketHandler webSocketHandler, Map<String, Object> map) throws Exception {

    LOG.info("hand shaking for ws session url  " + serverHttpRequest.getURI().getPath() + " ? " + serverHttpRequest.getURI().getQuery());
    String parameters[] = serverHttpRequest.getURI().getQuery().split("=");

    if (parameters.length == 2 && parameters[0].equals("accessToken")) {
        String accessToken = parameters[1];

        Long senderUserId = 0L;
        String senderId = cacheRepository.getUserIdByAccessToken(accessToken);

        if (senderId == null) {
            User sender = userRepository.findByToken(accessToken);
            if(sender != null) {
                senderUserId = sender.getUserId();
            }
        } else {
            senderUserId = Long.valueOf(senderId);
        }

        LOG.info("Handshake found userId: " + senderUserId);

        if (senderUserId == 0L) {
            LOG.info("Handshake failed: user not found for given accessToken");
            map.put("CUSTOM-HEADER", "Handshake failed: user not found for given accessToken");
            return false;
        }

        map.put("CUSTOM-HEADER", "Handshake successful");
        LOG.info("Handshake successful");
        return true;
    }

    map.put("CUSTOM-HEADER", "Handshake failed: accessToken not found");
    LOG.info("Handshake failed: accessToken not found");
    return false;

}
If everything goes well and our web client is connected to WebSocket then the client can start sending messages to the other WebSocket sessions. We don’t manage offline messaging or other capabilities in this application. As you’ll see a WebSocket session will be able to send messages to only corresponding active WebSocket sessions. In real life examples you would manage offline messaging and deliver to the destination users whenever they become online.
Chat in action
When I open the chat application in two different browsers and login with different mobile numbers I am able to make them have a chat. I assume mobile number 01234 has two contacts 12345 and 23456 in their contact list.
On this screen I chose the 12345 contact to start messaging. I entered my message and clicked on Send button. Since both clients connected to the WebSocket I was able to send the message to 12345, as you can see on the second client’s window.
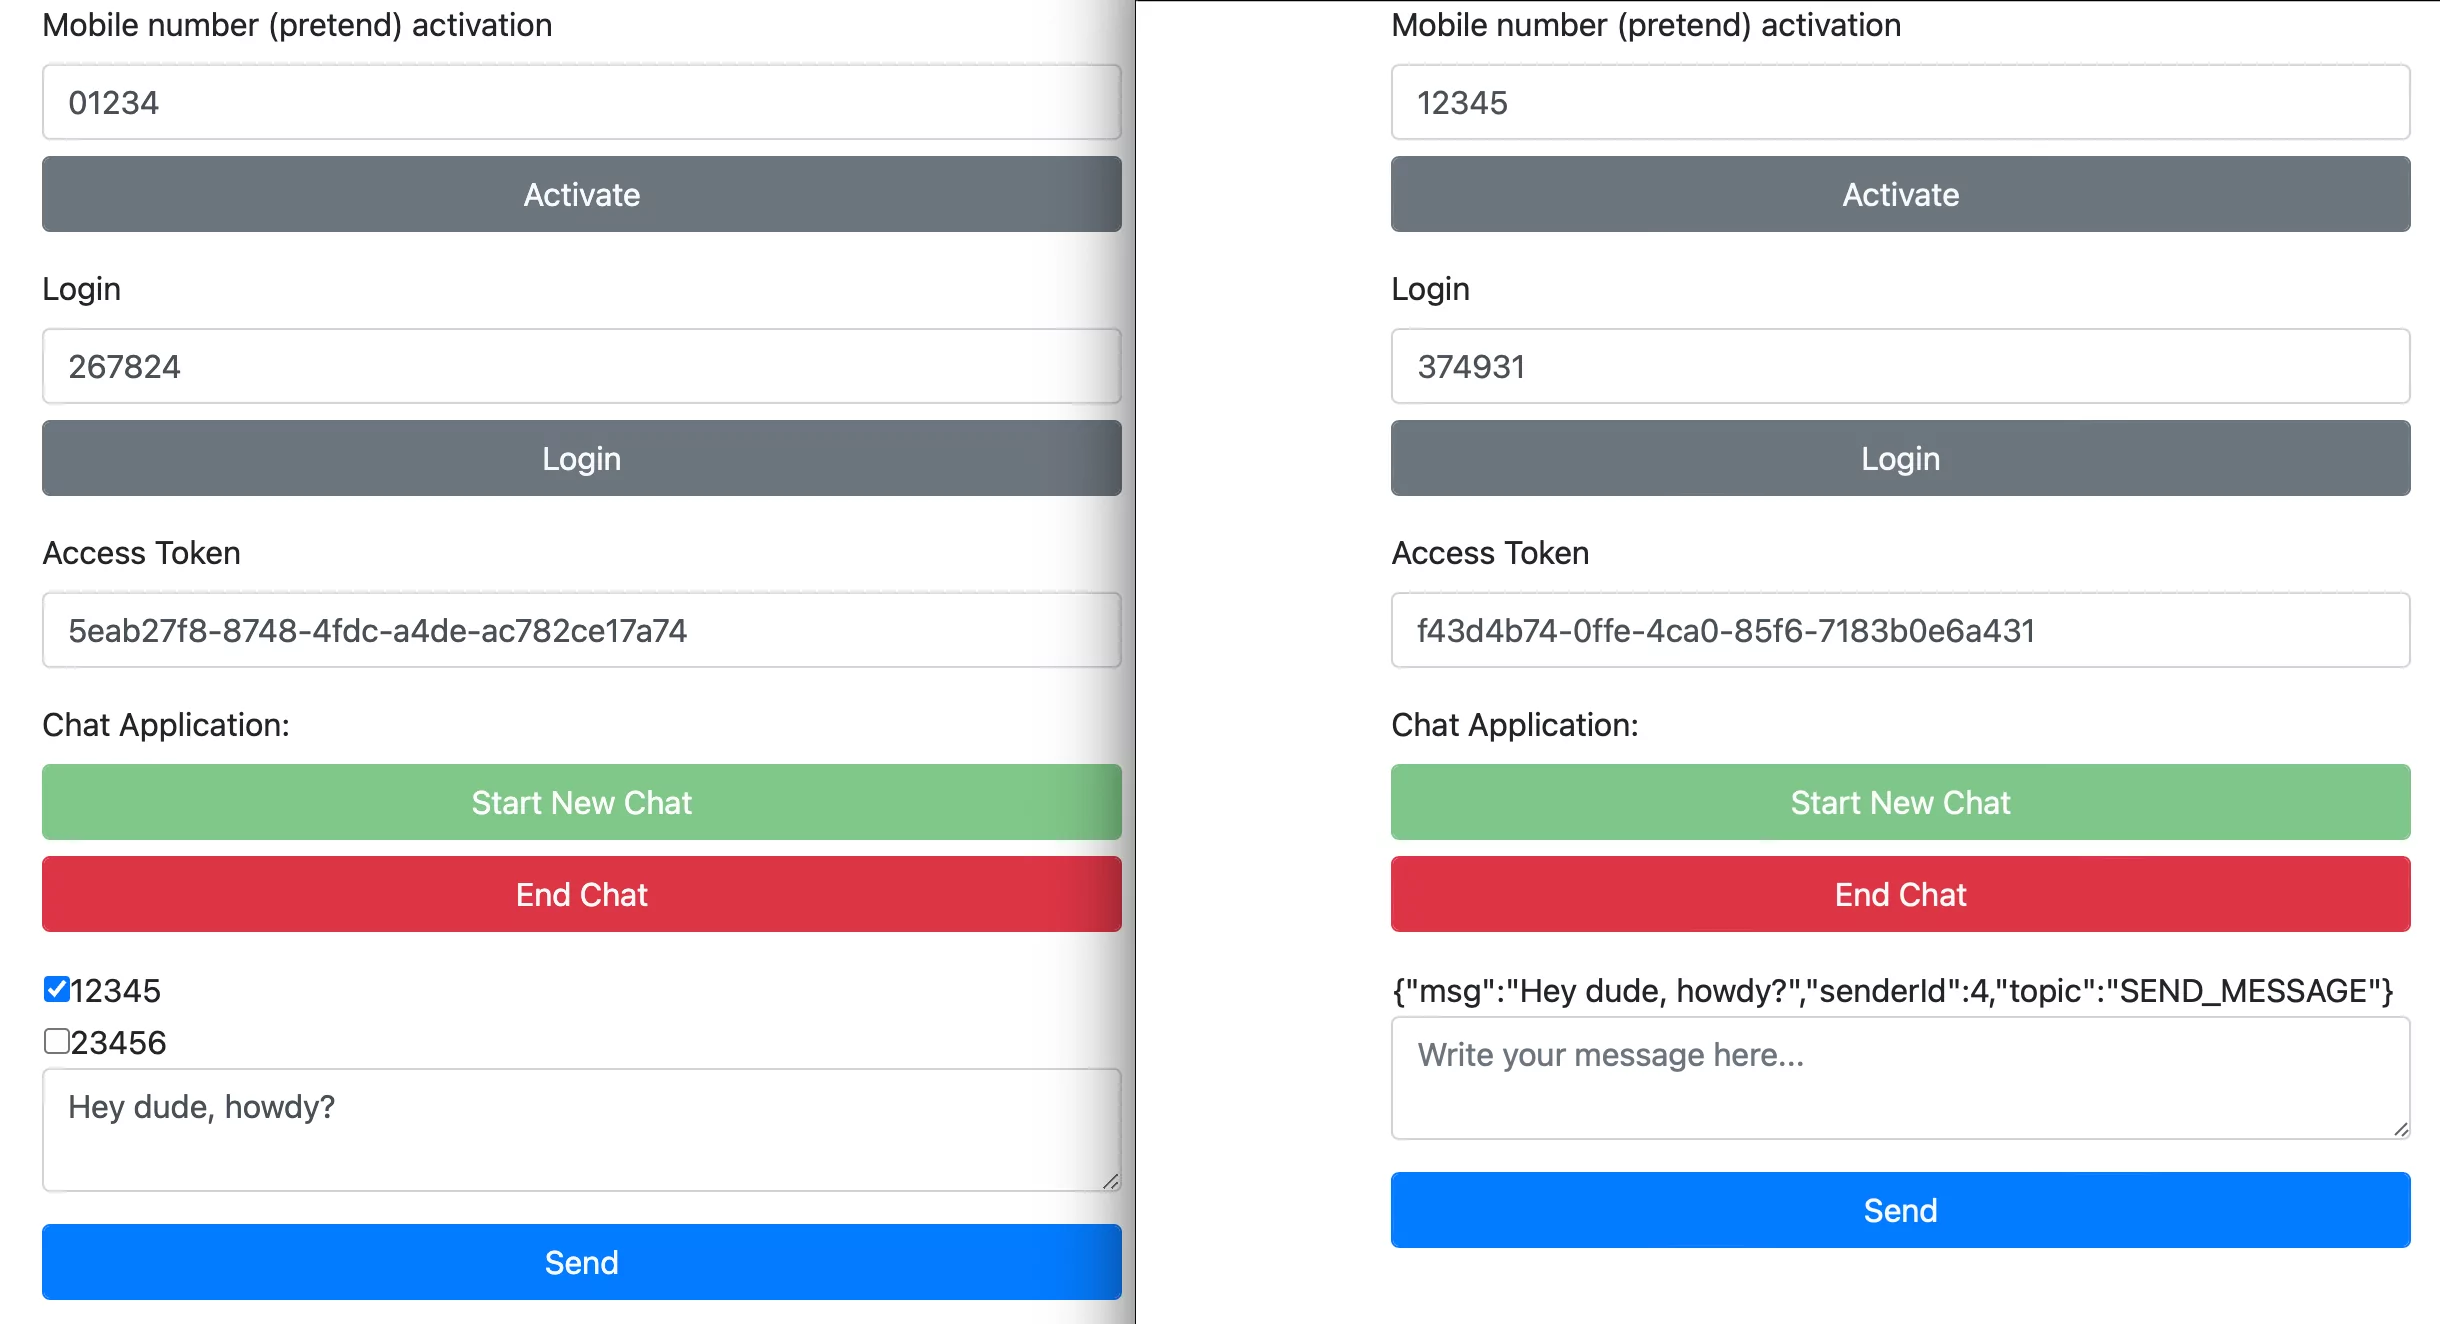
The messages are not tidied here; I made the WebSocket message list the message on the client where it connected to its WebSocket session.
Here is the JavaScript code sending the message to WebSocket session when you click on the Send button:
function sendData() {
  var data = JSON.stringify({
    'topic': 'SEND_MESSAGE',
    'message': {
      'accessToken': $("#accessToken").val(),
      'sendTo': $("#sendTo").val(),
      'msg': $("#messageArea").val(),
    },
  })
  ws.send(data);
}
When we send the message to WebSocket, our WebSocketHandler handles the received message through WebSocket session. However, it doesn’t directly send the message to the corresponding WebSocket session. We send our message to the Kafka topic SEND_MESSAGE using MessageSender.send() method at this point and Kafka manages the streaming messages.
On the Kafka listener side of our application MessageReceiver.messagesSendToUser() is receiving the messages and it redirects the messages to the corresponding WebSocket session. So we took this workload from the WebSocket handler to the Kafka listener so it would be busy only with the messages sent by the clients. Another approach would be sending the messages directly to Kafka topics instead of WebSocket handler so we would give all the workload to Kafka services.
@KafkaListener(topics = "SEND_MESSAGE", groupId = "foo")
public void messagesSendToUser(@Payload String message, @Headers MessageHeaders headers) {

    JSONObject jsonObject = new JSONObject(message);

    LOG.info("Websocket message will be sent if corresponding destination websocket session is found");
    if (jsonObject.get("sendTo") != null
            && WebSocketPool.websockets.get(jsonObject.getLong("sendTo")) != null
            && WebSocketPool.websockets.get(jsonObject.getLong("sendTo")).size() > 0) {

        String accessToken = jsonObject.getString("accessToken");
        Long sendTo = jsonObject.getLong("sendTo");
        String msg = jsonObject.getString("msg");

        LOG.info("Websocket message is sent to " + sendTo);

        String topic = "SEND_MESSAGE";

        messageService.sendMessage(accessToken, sendTo, msg, topic);

    } else {
        LOG.info("Websocket session not found for given sendTo");
    }
}
Here is our logging for the message sent through the chat application.
2022-10-07 16:36:41.371  INFO 37554 --- [nio-8080-exec-1] c.e.S.websocket.WebSocketHandler         : {"topic":"SEND_MESSAGE","message":{"accessToken":"5eab27f8-8748-4fdc-a4de-ac782ce17a74","sendTo":"5","msg":"Hey dude, howdy?"}}
2022-10-07 16:36:41.411  INFO 37554 --- [ntainer#0-0-C-1] c.e.S.message.broker.MessageReceiver     : Websocket message will be sent if corresponding destination websocket session is found
2022-10-07 16:36:41.411  INFO 37554 --- [ntainer#0-0-C-1] c.e.S.message.broker.MessageReceiver     : Websocket message is sent to 5
2022-10-07 16:36:41.412  INFO 37554 --- [ntainer#0-0-C-1] c.e.S.message.broker.MessageReceiver     : Sending websocket message {"msg":"Hey dude, howdy?","senderId":4,"topic":"SEND_MESSAGE"}
What is the point of using Kafka and WebSocket?
Let’s go back to the question of why we used Kafka and WebSockets for a messaging app. We questioned this paradigm in part 1 of this series while discussing the design and architecture. It all depends on what you aim to do with a messaging application.
There are times when WebSocket has the advantage over HTTP or XMPP, and we can compare these protocols on a case-by-case basis. However, those debates won’t be had in this post. WebSocket is simply a fast relaying and simple protocol which enables a web server app to communicate with a web browser, or more broadly, WebSocket clients, easily. So you can use WebSocket to create chat applications over the web and let the same user’s multiple sessions run concurrently on multiple clients.
Kafka, on the other hand, acts as a message orchestrator, highly aware of what is coming in and going out and upwardly scalable. You are guaranteed to be able to process each message which arrives at Kafka without worrying about concurrency and delay issues which you often face with traditional threads or services. Kafka is not essentially a chat application backend but can handle the millions and even billions of messages easily. The main purpose of this example application is not creating a chat application, but as the title says, a messaging application.
So, while chatting would designate a narrow scope, messaging covers a broad range of applications handling high loads of data streaming environments.
Conclusion
Kafka is used in several environments by lots of giants of industry and startups. A few industry examples would be financial services, telecom, manufacturing, and healthcare. You can make data streaming seamless and real-time using Kafka.
Please share with us in the comments your experiences using Kafka and related technologies, even including ML and model training streams.
spring kafka spring-kafka-series java
Comments