How to set up your Ruby on Rails development environment in Windows 10 Pro with Visual Studio Code and Windows Subsystem for Linux

By Kevin Campusano
April 4, 2019
There’s one truth that I quickly discovered as I went into my first real foray into Ruby and Rails development: Working with Rails in Windows sucks.
In my experience, there are two main roadblocks when trying to do this. First: RubyInstaller, the most mainstream method for getting Ruby on Windows, is not available for every version of the interpreter. Second: I’ve run into issues while compiling native extensions for certain gems. One of these gems is, surprisingly, sqlite3, a gem that’s needed to even complete the official Getting Started tutorial over on guides.rubyonrails.org.
In this post, I’m going to be talking about how to avoid these pitfalls by setting up your development environment using the Windows Subsystem for Linux on Windows 10 Pro. You can jump to the summary at the bottom of the article to get a quick idea of what we’re going to do over the next few minutes.
Anyway, I’ve since learned that the vast majority of the Ruby and Rails community uses either macOS or some flavor of Linux as their operating system of choice.
Great, but what is a Windows guy like me to do under these circumstances? Well, there are a few options. Assuming they would like/need to keep using Windows as their main OS, they could virtualize some version of Linux using something like Hyper-V or VitrualBox, or go dual boot with a native Linux installation on their current hardware. Provided you can set something like these up, these solutions can work beautifully, but they can have drawbacks.
Virtual machines, depending on how you set them up and for graphical interfaces specially, can take a bit of a performance hit when compared to running the OS natively. So, having your entire development environment in one can get annoying after a while. The dual boot scenario gets rid of any performance degradation but then you have to go through the hassle of restarting anytime you want to work in a different OS. This can become a problem if you need to actively work on Windows-based projects as well.
There’s also the option of using something like Cygwin to create an environment very close to what you’d see in a Linux distribution.
Luckily for me, it turns out that Microsoft’s own Windows Subsystem for Linux is up to the task of providing a drama-free solution for working in a Linux environment within Windows. That’s why I thought I’d give it a shot in setting up my Ruby/Rails development environment. I can happily say that this exercise ended up being a resounding success.
When all was said and done, I could install, run and interactively debug Ruby and Rails apps from my editor of choice running on Windows (Visual Studio Code) and have all the editor amenities like syntax highlighting, code completion, automatic linting, etc. I could also run the app in WSL and access it via the browser on windows. Pretty much the whole shebang.
So, how did I do that? Let’s go into the detail of it with a step-by-step guide. It’s important to note though, that WSL is currently available only for Windows 10 Pro. Now let’s get started.
1. Install WSL
First of all, if you don’t already have it, we need to install a Linux distribution via the Windows Subsystem for Linux. This is as easy as firing up the Microsoft Store and searching for “WSL”. Here’s what the store greets you with:

There are multiple options here but I decided to go with Ubuntu 18.04 LTS. Ok, click it and follow the screens until you are downloading and installing it. Everything there is pretty straightforward. After the store says that the Linux distribution has been installed, it’s actually not fully installed yet. When you launch it for the first time, it’ll do some final installing that was still pending, ask you for a new UNIX username and password, and then you’ll be ready to use your newly installed Linux distribution.
Your console should look something like this now:
Installing, this may take a few minutes...
Please create a default UNIX user account. The username does not need to match your Windows username.
For more information visit: https://aka.ms/wslusers
Enter new UNIX username: kevin
Enter new UNIX password:
Retype new UNIX password:
passwd: password updated successfully
Installation successful!
To run a command as administrator (user "root"), use "sudo <command>".
See "man sudo_root" for details.

kevin@KEVIN-SATELLITE:~$
Let’s look at our freshly installed distribution’s version:
kevin@KEVIN-SATELLITE:~$ lsb_release -a
No LSB modules are available.
Distributor ID: Ubuntu
Description:    Ubuntu 18.04.1 LTS
Release:        18.04
Codename:       bionic
kevin@KEVIN-SATELLITE:~$
Cool, we now have Linux running on Windows without too much hassle.
2. Install Ruby
2.1 Install RVM
Now that we have Linux, let’s go ahead and install all the stuff we need for developing Rails apps. The first thing we need as far as Ruby goes, is RVM, or Ruby Version Manager. It allows us to easily install multiple Ruby versions at the same time. A quick glance over their official web site reveals that installing RVM is pretty easy. We just have to run these two commands in our WSL Ubuntu console:
gpg --keyserver hkp://keys.gnupg.net --recv-keys 409B6B1796C275462A1703113804BB82D39DC0E3 7D2BAF1CF37B13E2069D6956105BD0E739499BDB\curl -sSL https://get.rvm.io | bash -s stableAfter running the second command, among other things, we get something like this in the console:
...

Installing RVM to /home/kevin/.rvm/
    Adding rvm PATH line to /home/kevin/.profile /home/kevin/.mkshrc /home/kevin/.bashrc /home/kevin/.zshrc.
    Adding rvm loading line to /home/kevin/.profile /home/kevin/.bash_profile /home/kevin/.zlogin.
Installation of RVM in /home/kevin/.rvm/ is almost complete:

  * To start using RVM you need to run `source /home/kevin/.rvm/scripts/rvm`
    in all your open shell windows, in rare cases you need to reopen all shell windows.
kevin@KEVIN-SATELLITE:~$
It tells us to run one additional command in order to start using RVM so let’s do that:
source /home/kevin/.rvm/scripts/rvmAnd, finally, to confirm that our RVM has installed correctly:
kevin@KEVIN-SATELLITE:~$ rvm -v
rvm 1.29.4 (latest) by Michal Papis, Piotr Kuczynski, Wayne E. Seguin [https://rvm.io]
2.2 Install a Ruby via RVM
All right, nice. Now that we have RVM installed, we are ready to install any version of Ruby that we want. Let’s see what’s available by running this:
rvm list knownRVM responds with something like this:
# MRI Rubies
[ruby-]1.8.6[-p420]
[ruby-]1.8.7[-head] # security released on head
[ruby-]1.9.1[-p431]
[ruby-]1.9.2[-p330]
[ruby-]1.9.3[-p551]
[ruby-]2.0.0[-p648]
[ruby-]2.1[.10]
[ruby-]2.2[.10]
[ruby-]2.3[.7]
[ruby-]2.4[.4]
[ruby-]2.5[.1]
[ruby-]2.6[.0-preview2]
ruby-head

...
RVM’s list known command shows us all the available Rubies that can be installed via RVM. There are a bunch of different Ruby implementations available like MRI, JRuby, IronRuby, etc. The MRI ones, listed first, stand for “Matz’s Ruby Interpreter” and represent the standard for Ruby implementations. Nowadays, it would be more accurate to call them “YARV”, but that’s a story for another day. For our purposes, let’s think of the MRI Rubies as the default Rubies. Anyway, let’s install one of the most recent ones with:
rvm install 2.5.1With this, RVM will take its time downloading and installing Ruby 2.5.1 and all the required packages. After a while, Ruby would have been installed and we can test it with our usual:
ruby -vWhich responds with:
ruby 2.5.1p57 (2018-03-29 revision 63029) [x86_64-linux]For those of you out there that are more on the curious side, we can run which ruby and see that the Ruby that we’re running is actually installed inside the RVM installation directory. Take a look:
kevin@KEVIN-SATELLITE:~$ which ruby
/home/kevin/.rvm/rubies/ruby-2.5.1/bin/ruby
Nice. This Ruby, since it’s the only one we have installed so far (remember that RVM allows us to have multiple versions of Ruby at the same time), will be set as our default one by RVM. You can go to RVM’s own documentation for more info on running multiple Rubies.
At this point, it’s the usual Ruby process of installing the Bundler gem and creating our skeleton Rails app. Let’s breeze through it.
3. Create a new Rails app
3.1. Set up Rails skeleton app
Now we need to install the Bundler gem by doing:
gem install bundlerWe also need Rails, so…
gem install railsContext: The problem with Windows
Installing Rails can take a while so, while the RubyGems package manager works its magic, I’d like to take the opportunity to point out one of the major pain points that we’re avoiding by not doing all this on plain Windows. When installing some gems like Rails, the package manager will not only have to download the packages, but also build some native extensions that are required for them to work.
This is where I ran into problems with Windows. Namely, these build steps would fail because, for some reason, the Windows environment does not have (at least not by default or in a way that’s easy to get) the required build and compilation tools for these to succeed.
…
Ok, now that Rails has finished installing, we can create a new app. I’ve chosen to create it inside a new railsdemo directory. So, if you’ve done the same, cd to it and create a new app with:
rails new my-rails-app --skip-spring --skip-listenNote: File system notifications in WSL
We need to pass in the --skip-spring and --skip-listen options because, according to Rails’ official documentation, there are currently some limitations on file system notifications in the Windows Subsystem for Linux.
Ok then, let’s cd into our brand-new app’s directory and try running it with the included development web server:
kevin@KEVIN-SATELLITE:~/railsdemo$ cd my-rails-app/
Using /home/kevin/.rvm/gems/ruby-2.5.1
kevin@KEVIN-SATELLITE:~/railsdemo/my-rails-app$ rails server
Oops! Unfortunately, that doesn’t work. We get a bunch of stuff in the console ending in this:
Could not find a JavaScript runtime. See https://github.com/rails/execjs for a list of available runtimes. (ExecJS::RuntimeUnavailable)This is no biggie. All it means is that we need to install a JavaScript runtime. Let’s install Node.js to appease Rails.
sudo apt-get install nodejsUbuntu will ask you for your sudo password by prompting you with [sudo] password for kevin: (Obviously, instead of kevin, your username will show up there.) This is the password that you put in at the very beginning when we installed Ubuntu for the WSL. So, type it in there and let apt-get do its job. Once that’s done, let’s try running our app again with:
rails server webrickNote: Using WEBrick instead of Puma
We’re explicitly telling Rails to use the WEBrick development server here because, currently, there’s an issue with Puma (another web server shipped with Rails) that prevents it from working in a WSL environment.
You should now see something like this in the prompt:
=> Booting WEBrick
=> Rails 5.2.1.1 application starting in development on http://localhost:3000
=> Run `rails server -h` for more startup options
[2018-12-04 16:21:10] INFO  WEBrick 1.4.2
[2018-12-04 16:21:10] INFO  ruby 2.5.1 (2018-03-29) [x86_64-linux]
[2018-12-04 16:21:10] INFO  WEBrick::HTTPServer#start: pid=132 port=3000
Well, this looks much better than our last try. Ok, now that the app is running, simply open up your browser of choice and navigate to localhost:3000
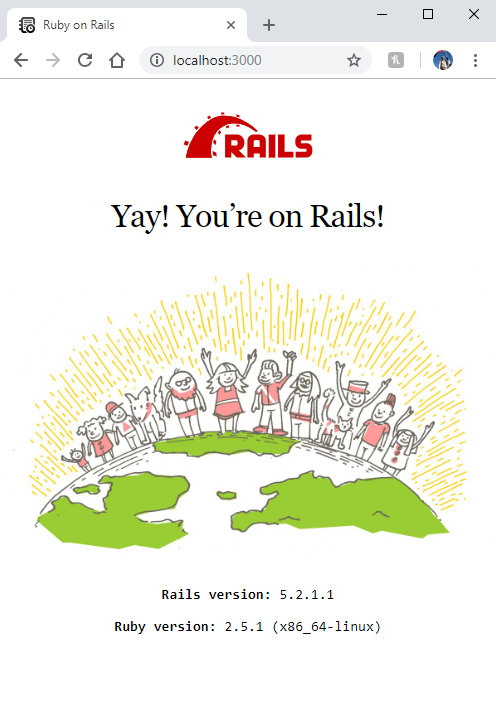
How cool is that? We’re running a Rails app in our WSL Linux distribution and accessing it via a browser running in Windows.
3.2. Where are my files?
So far, we’ve fired up a WSL console, created our app and served it from there. We created folders and files as part of Rails’ initialization command (rails new my-rails-app ...). Those files are definitely somewhere in our disk, but where exactly? Well that would be in our distribution’s folder within Windows. It’s hidden pretty deep within the file system but it is there. To find it, navigate to your local AppData folder in C:\Users\[YOUR_USER]\AppData\Local.
Once there, go to the Packages folder and, in there, look for a folder whose name corresponds to your installed Linux distribution. Mine shows up as a folder named CanonicalGroupLimited.Ubuntu18.04onWindows_79rhkp1fndgsc because I installed Ubuntu 18.04. It may vary slightly for different systems and distributions but, given how it’s named, it should be easily identifiable nonetheless.
All right, enter that folder and continue navigating to LocalState and then rootfs. And now, we’re finally there. This is the root of our distribution’s file system. If you navigate further through home, then a folder named after your user, you’ll find our railsdemo/my-rails-app directory. Inside it, that’s where the code of our app lives.
So, after all that spelunking, we’ve learned a few things:
-
Should you have multiple WSL distributions installed, they will each have a folder in the local AppData directory. That’s
C:\Users\[YOUR_USER]\AppData\Local\Packages\. -
Inside this folder, the folders corresponding to the installed distributions are named using their name and version, among other things. For Ubuntu 18.04, the folder is named
CanonicalGroupLimited.Ubuntu16.04onWindows_79rhkp1fndgscin my case. -
The actual root of the distribution’s file system is further down that path in
C:\Users\[YOUR_USER]\AppData\Local\Packages\CanonicalGroupLimited.Ubuntu16.04onWindows_79rhkp1fndgsc\LocalState\rootfs. Once there, it’s just your usual Linux directory structure. With directories likehomeand the like.
Bonus: To access your local Windows file system from inside a WSL distribution, you can use the /mnt/c directory. That directory is linked to your Windows C:\ drive.
4. Using Visual Studio Code
4.1. Using VS Code to develop our Rails app
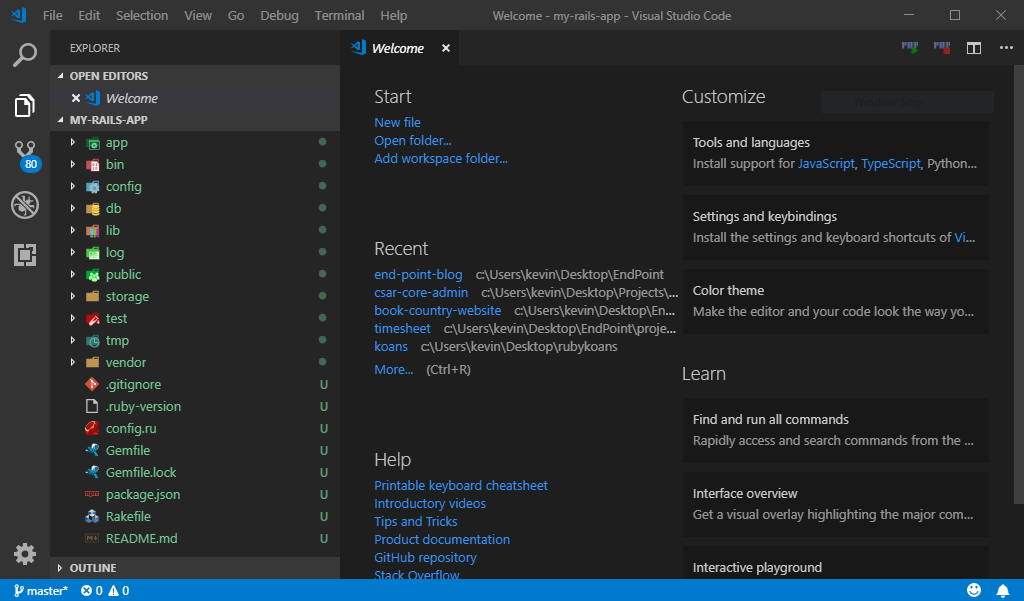
Ok, now that we managed to get all the way into the directory inside our WSL distribution where the code for our Rails app actually lives, let’s try to open it with Visual Studio Code. There’s nothing special to this, just open it like you would open any other folder in VS Code, either right click > “Open with Code” from the Windows Explorer context menu, or via the “File” > “Open Folder…” option within VS Code itself.
However you choose to do it, we end up with our app’s source code ready for editing in VS Code.
All right, that looks good. But let’s start setting up VS Code for Rails development.
VS Code has an integrated console. You can set it up so that it can use any console that’s currently installed in the system. Since we’re using WSL, let’s set that one up as the default. Press Ctrl + Shift + P to bring up the Command Palette and type in “default shell” to search for the Terminal: Select Default Shell option:

Hit Enter and select the WSL Bash from the options that pop up:
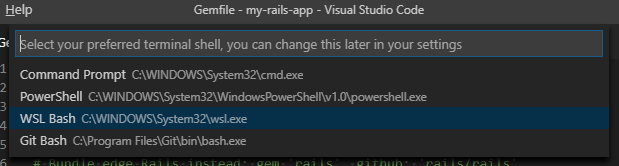
Hit Enter to make the selection. Then, press Ctrl + ` to bring up the Terminal. Our WSL console should show up and we can play around with it. As you will see, the terminal opens up in the root directory so don’t forget to navigate to where our code actually lives.

This is the same full-featured bash that we ran earlier to install Ruby and Rails and run our app in the development server. So, you can do all of that through the VS Code terminal as well. Go ahead, give it a go.
4.2. Improving the developer experience
By now, we have access to our console and a way of editing our code all within an integrated environment. At this point we’re ready to start writing some Rails code. This is, however, the bare minimum, so let’s dive into VS Code’s rich extension ecosystem in order to turn it into a powerful Rails development environment.
Press Ctrl + Shift + X and the Extensions window should show up in the sidebar. Search for “ruby” and you’ll get a bunch of results.
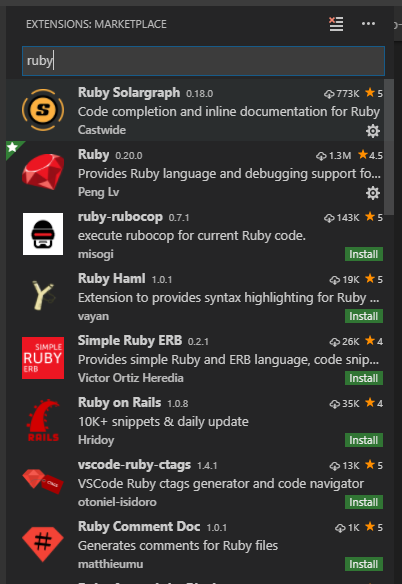
Indeed, there are many extensions available that aid in Ruby/Rails development but there are three in particular that I’ve found most useful:
The Ruby Extension
This is the main extension that provides support for the Ruby language in VS Code. It includes debugging, autocomplete, IntelliSense, formatting, linters, etc. To install it, just click the green install button in VS Code’s Extensions window. VS Code will then proceed to download and install the extension. It’ll then ask you to reload VS Code. After that, the extension should be installed and ready to go.
The best way to learn how to harness the full power of this tool is by reading up on their documentation. You can do this either from inside VS Code itself (in the window that opens up when you select the extension from the Extensions window) or in their official project page on GitHub.
Anyway, for this post, we’re particularly interested in interactive debugging so, as instructed by their docs, let’s install some additional gems that we’ll need for that. Run these in your terminal:
gem install ruby-debug-ide
gem install debase
With that, we’re ready as far as this extension goes. We’re going to be using it later.
The Rails Extension
This one is specific for Rails development. It includes features like code snippets, syntax highlighting support for .erb files, improvements to code navigation, among others. Install it just like any other extension, the same as we did with the Ruby extension. The only difference here is that we don’t need to install any other gems for this one to work.
The Ruby Solargraph Extension:
This extension provides a better IntelliSense and code completion experience over the base Ruby extension. Another nice thing about Solargraph is that it also includes documentation in the code completion popups. Again, you can read all about it in this extension’s page in VS Code.
We do need to install an additional gem for this one to work though, so running this is required:
gem install solargraph4.3. Interactive debugging with VS Code
4.3.1. Adding some new code to debug
All right, once we have the Ruby extension installed and ready, setting up our project to support interactive debugging via VS Code is actually pretty straightforward, albeit with some gotchas.
Before that though, let’s actually add some code that we can debug. With Rails, this is pretty easy to do using generators. Here, run this command in your terminal:
bin/rails generate controller Greetings helloThe terminal will display something like this:
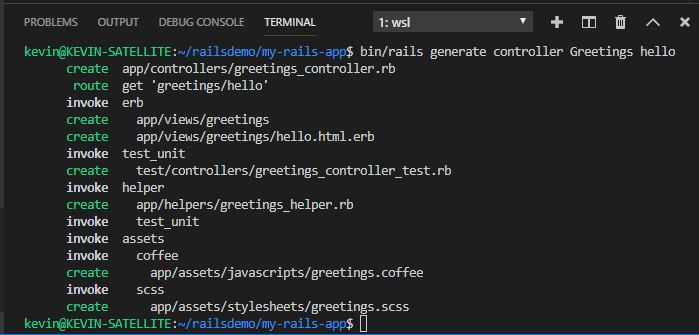
Among other things that we right now don’t care too much about, Rails has created a new Greetings controller for us with a hello action and even added a route so that we can access it via the browser.
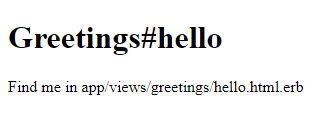
Make sure that your dev server is running (run bin/rails server webrick if not) and let’s see what’s in there by navigating to http://localhost:3000/greetings/hello. You should see something like this:
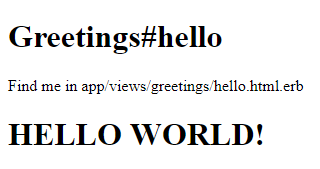
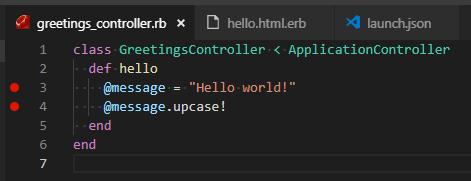
Ok, now let’s do some trivial changes. It could be something like a simple “hello world” message getting sent from the controller to the view. It could look something like this:
# app\controllers\greetings_controller.rb
class GreetingsController < ApplicationController
  def hello
    @message = "Hello world!"
    @message.upcase!
  end
end
and…
<!-- app\views\greetings\hello.html.erb -->
<h1>Greetings#hello</h1>
<p>Find me in app/views/greetings/hello.html.erb</p>
<h1><%= @message %></h1>
Now restart your server, and navigate to http://localhost:3000/greetings/hello again. You should see something like this now:
4.3.2. Creating a launch configuration for VS Code
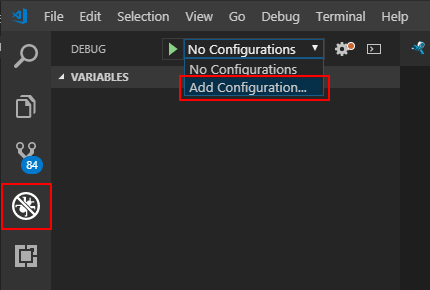
Now, to debug our code, we need to create a new launch configuration for VS Code. With the help of the Ruby extension, that’s pretty easy: Press Ctrl + Shift + D to bring up the Debugger window in the sidebar, then, near the top of the screen, expand the “No Configurations” drop down and select “Add Configuration…”. It looks like this:
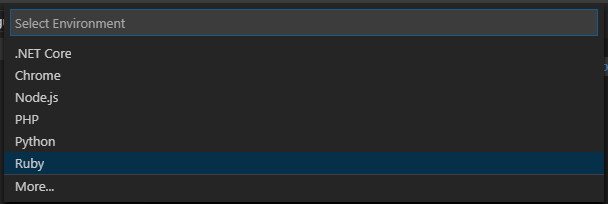
After clicking that option, VS Code will ask you to select an environment from a list. The items that show up in this list will depend on your setup but Ruby will most definitely be there, so select that:
Once that’s done, VS Code will open a new launch.json file that it has just created under a new .vscode folder in the root directory of your project. This file’s purpose is to store all the possible launch configurations for the project that will allow them to be executed from within VS Code. You’re supposed to put things like “start up the dev server” or “run all the unit tests”, etc.
For our Rails project however, the Ruby extension has created a bunch of configurations. Feel free to take a look but right now we only care about this one:
{
    "version": "0.2.0",
    "configurations": [
        // ...
        {
            "name": "Listen for rdebug-ide",
            "type": "Ruby",
            "request": "attach",
            "cwd": "${workspaceRoot}",
            "remoteHost": "127.0.0.1",
            "remotePort": "1234",
            "remoteWorkspaceRoot": "${workspaceRoot}"
        },
        // ...
    ]
}
We can’t use it just like that though. We need to tell VS Code where the source code is located in the “remote machine” (i.e. our WSL Linux distribution). Let’s then change the remoteWorkspaceRoot field’s value to our project’s root in WSL. In my case that’s /home/kevin/railsdemo/my-rails-app.
So, the whole entry now looks like this:
{
    "name": "Listen for rdebug-ide",
    "type": "Ruby",
    "request": "attach",
    "cwd": "${workspaceRoot}",
    "remoteHost": "127.0.0.1",
    "remotePort": "1234",
    "remoteWorkspaceRoot": "/home/kevin/railsdemo/my-rails-app"
},
This configuration allows VS Code to, with the click of a button, attach to a debugger that’s already running in some other machine and inspect the code. This is essentially a configuration for debugging remotely. We need to use such a configuration because we will not be running our Rails app in the same place where VS Code is running. That is, our Rails app will be running within WSL and VS Code will be running in the good-old Windows host.
If we were working with VS Code on Linux or if we were running Ruby directly on our Windows machine, we would be able to use a simpler configuration. In fact, of the ones that were created for us just now, the one named Rails server would just do the trick.
For our case though, since we’re running the Rails app and VS Code in separate “machines” (not really, but kind of, from the perspective of the debugger), we need to use this. We need to attach to a remote debugger.
Again, feel free to look around the launch.json file that the Ruby extension has kindly provided for us as well as their docs to get further insight into how all of this works and the extent of what you can do with it.
Gotcha: Ruby versions 2.5.0 and 2.5.1 have some issues
At this point there’s one big gotcha. Ruby versions 2.5.0 and 2.5.1 have some issues that prevent doing this kind of debugging in Rails apps. You can read more about that here. Thankfully, there’s a quick workaround: Replace the require 'bootsnap/setup' line in the config\boot.rb file with something like this:
unless ( (('2.5.0'..'2.5.1').include? RUBY_VERSION) && defined?>(Debugger) )
    require 'bootsnap/setup' # Speed up boot time by caching expensive operations.
end
Basically, we’re preventing the inclusion of the bootsnap/setup gem for versions of Ruby between 2.5.0 and 2.5.1.
4.4.4. Setting code breakpoints
Ok, with all of that taken care of, let’s add a few breakpoints to our code by clicking close to the left of the line number where we want the code’s execution to stop. Red dots should show up. It could be something like this:
4.4.5. Debugging with VS Code
Now, we need to run our dev server in a way that allows for a debugger to inspect it while it executes. We can do that using the ruby-debug-ide gem that we installed earlier. The command would look like this:
rdebug-ide ./bin/rails server webrickRun this in your WSL terminal and it should respond with something like this:
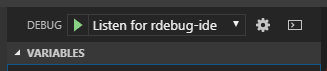
Fast Debugger (ruby-debug-ide 0.6.1, debase 0.2.2, file filtering is supported) listens on 127.0.0.1:1234Now, back in VS Code, go back to the Debug sidebar (remember you can press Ctrl + Shift + D to get it to show up) and, in the configurations drop down that we used before, select the “Listen to rdebug-ide” option. Finally, press the green “Play” button right next to it. This one:
After doing this, a few things happen:
- VS Code shows this new tool bar:
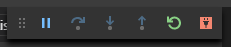
-
VS Code’s bottom bar turns from blue to orange to indicate that it’s in debug mode.
-
The previous prompt that we had in our terminal about
Fast Debuggerand whatnot, continues and shows the rest of the usual WEBrick output:
=> Booting WEBrick
=> Rails 5.2.2 application starting in development on http://localhost:3000
=> Run `rails server -h` for more startup options
[2018-12-05 13:18:17] INFO  WEBrick 1.4.2
[2018-12-05 13:18:17] INFO  ruby 2.5.1 (2018-03-29) [x86_64-linux]
[2018-12-05 13:18:17] INFO  WEBrick::HTTPServer#start: pid=931 port=3000

...
Now that the app is running and the VS Code debugger is attached to it, let’s navigate to http://localhost:3000/greetings/hello and behold…
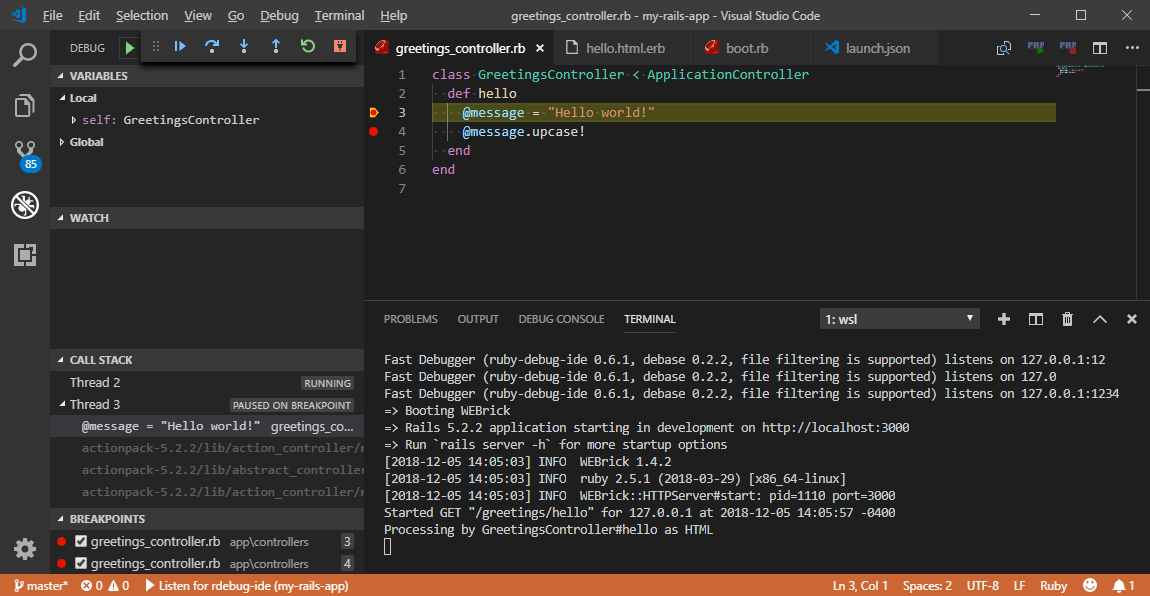
If you take a look at VS Code now, you’ll see that code execution has stopped in the first breakpoint that we set and is waiting for us to continue. How cool is that?
VS Code’s debug mode GUI is pretty complete with a console for evaluating any expression in context, watches, listings of variables in scope, call stacks… Pretty much anything you would want or need in your debugging session.
Summary
So, in summary, here’s what we just did:
- Installed a WSL distribution.
- Installed RVM.
- Installed a Ruby via RVM.
- Created a new Rails app in the WSL distribution’s file system.
- Ran the Rails app in WSL and accessed it via the browser from Windows.
- Learned where the WSL file system lives within Windows.
- Opened the Rails app’s source code in VS Code.
- Set VS Code’s Terminal’s default shell as WSL’s bash.
- Installed and set up key VS Code extensions for Ruby/Rails development like “Ruby”, “Rails” and “Solargraph”.
- Created a demo controller with a simple hello world action.
- Added a suite of Ruby/Rails launch configurations to VS Code via the launch.json file.
- Set up an “attach” launch configuration for our Rails app.
- Learned how to deal with Ruby versions 2.5.0 and 2.5.1 for debugging.
- Set breakpoints in VS Code.
- Launched the Rails app’s dev server from WSL in remote debug mode.
- Attached our debugger from VS Code running on Windows to the Rails app running in WSL.
- Had our minds blown because we accomplished all of this and now developing Ruby/Rails on Windows will be much easier and fun.
Yeah, we’ve accomplished quite a lot! We should feel pretty proud.
Few bugs will withstand the power of this combo for too long. Also, if there’s a big code base that you need to understand in order to add some features, interactive debuggers are incredibly useful for that as well.
And now, if you’re on Windows (10 Pro) and your project is written in Rails, you know how to set it all up.
Comments