Running Magento 2 in Windows with XAMPP

By Juan Pablo Ventoso
March 22, 2019

Photo by Nicole De Khors · Burst, Some Rights Reserved
Magento is an open source ecommerce platform, written in PHP and relying on MySQL/MariaDB for persistence. According to BuiltWith, Magento is the third most used platform in ecommerce websites. It began its life in 2008 with its first general release, and a major update (Magento 2) was released in 2015.
And now, more than three years after, Magento 1 is slowly dying: There won’t be any more quality fixes or security updates from June 2020, and there won’t be extended support for fixes or new payment methods. So the obvious choice will be Magento 2 from now on.
But is it fully tested yet? Is it stable enough? If we already have a website running with Magento 1, what should we do? Migrating to Magento 2 is not just hitting an “Update” button: Themes are incompatible, most extensions won’t work, and of course, there’s a big set of changes to get familiar with.
So a good approach might be to get a clean Magento 2 version deployed locally, to look what we need to do to get our website updated and running, test the backend, find where the configuration sections are located, and so on. And many business users, and even some developers like myself, have Microsoft Windows installed on our computers.
Environment setup
The environment I used for this testing installation was Windows 10 Professional. As a first step, we’ll need to make sure that localhost is published in our local hosts file:
- Navigate to the folder
%SystemRoot%\system32\drivers\etc - Backup the existing hosts file
- Open a text editor with administrator rights
- Open the hosts file
- Make sure the first line after the commented (#) lines is
127.0.0.1 localhostand the second is::1 localhost - Open a cmd window with administrator rights and run the command
ipconfig /flushdns
Now we’re ready to install the environment needed to run Magento. I recommend using XAMPP, a free Apache distribution for Windows that includes MariaDB, PHP, and Perl in a single package. Magento 2 currently runs with PHP 7.2 and it will not work with newer versions.
- Install XAMPP 7.2 with default settings: apachefriends.org/xampp-files/7.2.15/xampp-win32-7.2.15-0-VC15-installer.exe
- Download Magento 2. You will need to register on the website first: magento.com/tech-resources/download
- Create a new “magento” subfolder (or whatever name you prefer) inside the htdocs folder in the XAMPP installation (usually
C:\xampp) and uncompress the Magento 2 archive there. - Start the XAMPP Control Panel from the Windows start menu. In the “Apache” section, click the “Config” button and, on the menu that appears, select “PHP (php.ini)”. Remove the semicolon before the
extension=intl,extension=soap, andextension=xsltexts to enable the intl, soap and xsl extensions.
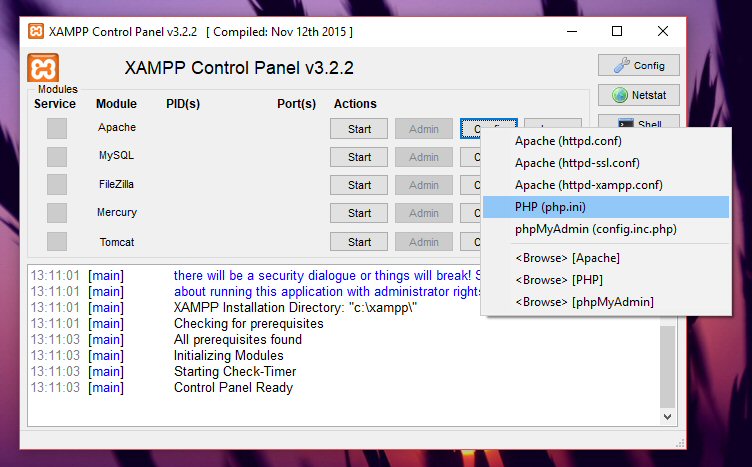
Screenshot of the XAMPP Control Panel with the PHP config menu displayed.
MySQL and Magento setup
We have all the files in place and the environment ready to start configuring the database and install Magento 2.
-
Start the Apache and MySQL services from the XAMPP Control Panel. Wait for the green status texts to appear.
-
Create a “magento” (or whatever name you prefer) database in MySQL from phpMyAdmin, installed already on XAMPP: localhost/phpmyadmin
-
Run the Magento 2 setup from localhost/magento (replace the “magento” part of the URL with whatever name you have chosen to host Magento). If the setup program requires to do any additional configuration change, do it as instructed. Do a screenshot or save the final page contents for later use.

Example of the page that will be displayed when the Magento 2 installation finishes.
Fixing known issues
When we finish the installation process, we will have a Magento 2 instance running on our host. But we’re not ready yet! There are a couple known bugs with Magento 2 and XAMPP at the moment I’m writing this post:
-
The Magento admin page may not work (it shows a blank page): Fix this issue by updating the “isPathInDirectories” function inside the
Validator.phpfile as instructed in this article. -
We might not be able to upload images (like a custom logo or product pictures): Fix this issue by updating the
design_config_form.xmlfile as shown here.
After we finish making these changes, we will need to restart the Apache service from the XAMPP control panel. And that’s it! We should be ready to open the Magento front page, and login into the backend.
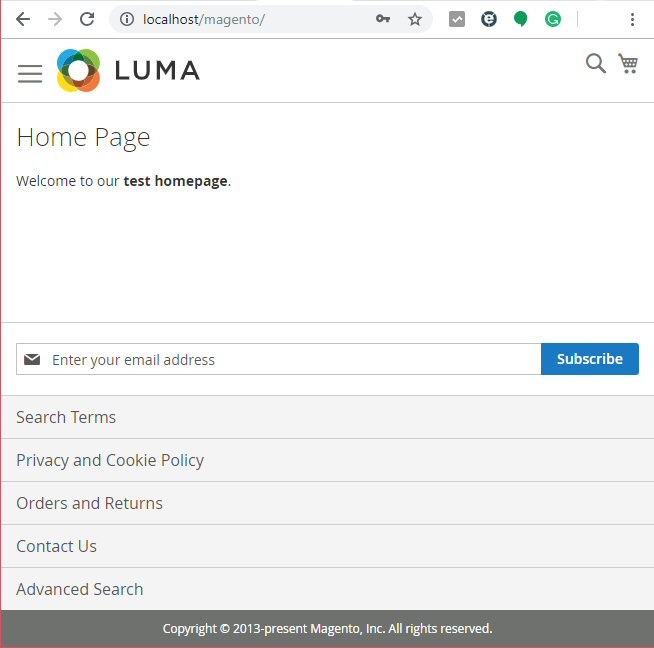
An empty home page with the default theme enabled in Magento 2.
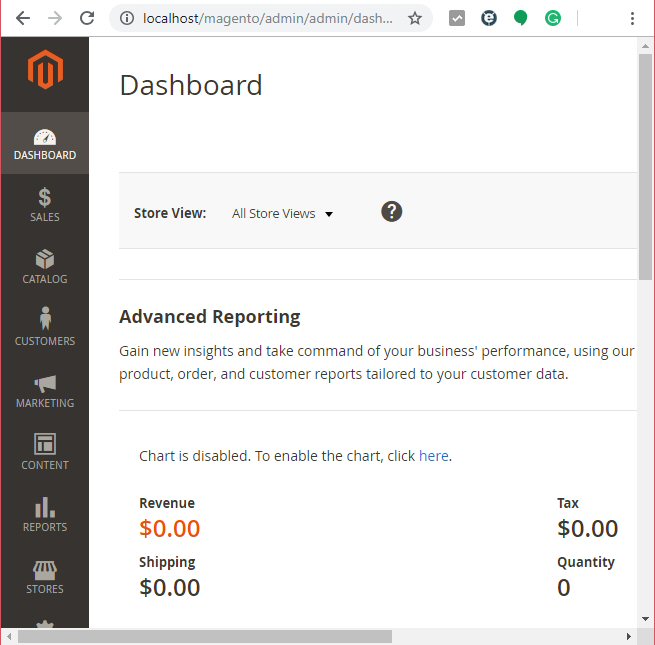
This is how the Magento 2 back-end dashboard looks like once we login.
Setting up the store: A roadmap
The purpose of this article is to get Magento 2 up and running on Windows computer, and that’s what I hope we’ve achieved so far. But just to point in a direction on what to do next, below is my usual roadmap to set up the store, add a few products and publish the catalog on the home page.
- Change the default store name and logo from the section Content > Design > Configuration and choose “Edit” in the “Default store view”.
- Set up the default store configuration from the section Stores > Configuration.
- Create the product categories from the section Catalog > Categories. Set up a category name and its dependency from another category, or from the default master category.
- Create/edit the product attributes from the section Stores > Attributes (check the option “visible in storefront” to show the products in the product page). For example, custom attributes for book products would be Author, Publisher…
- Add the attributes to the default attribute set from the section Stores > Attribute. This is required for the attributes to show up when adding a new product by default.
- Create a set of products from the section Catalog > Products. Set the custom variations for each product from the “Customizable options” section. Set up a short and long description, a custom SKU for each customizable option, and a tax mode.
- Add a widget to the homepage to show the product catalog from the section Content > Homepage > Edit > Show/Hide Editor > Add widget > Products list. Here we can also add any content we like, including HTML tags, images, and third-party content.
Conclusion
It’s possible—and pretty straightforward—to run a Magento 2 instance in Windows with XAMPP. But this is just a kick-off, a simple overview: there’s a lot more to do if we want to get a full ecommerce website that is ready to scale up and support enterprise-level traffic, like caching optimization, load balancing, and advanced server-side monitoring.
At End Point, we have professionals with a strong background in deploying powerful, reliable, fully responsive, fast, and SEO-optimized ecommerce websites. We have experience in migrating Magento to newer versions, and even creating full Magento 2 websites from scratch. Drop us a line if you want to hear more.
magento ecommerce mysql windows php
Comments