IPv6 Tunnels with Debian/Ubuntu behind NAT

By Brian Buchalter
March 1, 2012
As part of End Point’s preparation for World IPv6 Launch Day, I was asked to get my IPv6 certification from Hurricane Electric. It’s a fun little game-based learning program which had me setup a IPv6 tunnel. IPv6 tunnels are used to provide IPv6 for those whose folks whose ISP or hosting provider don’t currently support IPv6, by “tunneling” it over IPv4. The process for creating a tunnel is straight forward enough, but there were a few configuration steps I felt could be better explained.
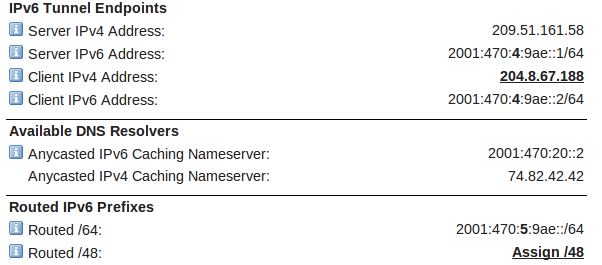
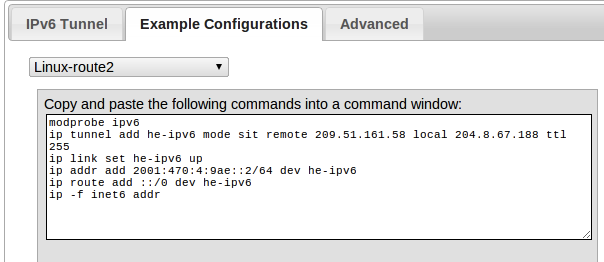
After creating a tunnel, Hurricane Electric kindly provides a summary of your configuration and offers example configurations for several different operating systems and routers. Below is my configuration summary and the example generated by Hurricane Electric.
However, entering these commands change won’t survive a restart. For Debian/Ubuntu users an update in /etc/network/interfaces does the trick.
#/etc/network/interfaces
auto he-ipv6
iface he-ipv6 inet6 v4tunnel
  address 2001:470:4:9ae::2
  netmask 64
  endpoint 209.51.161.58
  local 204.8.67.188
  ttl 225
  gateway 2001:470:4:9ae::1
Firewall Configuration
If you’re running UFW the updates to /etc/default/ufw are very straightforward. Simply change the IPV6 directive to yes. Restart the firewall and your network interfaces and you should be able to ping6 ipv6.google.com. I also recommend hitting http://test-ipv6.com/ for a detailed configuration test.
Behind NAT
If you’re behind a NAT, the configuration needs to be tweaked a bit. First, you’ll want to setup a static IP address behind your router. If you’re router supports configuration of forwarding more than just TCP/UDP, you’ll want to forward protocol 41 (aka IPv6) (NOT PORT 41), which is responsible for IPv6 tunneling over IPv4, to your static address. If you’ve got a consumer grade router that doesn’t support this, you’ll just have to put your machine in the DMZ, thus putting your computer “in front” of your router’s firewall. Please make sure you are running a local software firewall if you chose this option.
After handling the routing of protocol 41, there is one small configuration change to /etc/network/interfaces. You must change your tunnel’s local address from your public IP address, to your private NATed address. Here is an example configuration including both the static IP configuration and the updated tunnel configuration.
#/etc/network/interfaces
auto eth0
iface eth0 inet static
  address 192.168.0.50
  netmask 255.255.255.0
  gateway 192.168.0.1

auto he-ipv6
iface he-ipv6 inet6 v4tunnel
  address 2001:470:4:9ae::2
  netmask 64
  endpoint 209.51.161.58
  <b>local 192.168.0.50</b>
  ttl 225
  gateway 2001:470:4:9ae::1
Don’t forget to restart your networking interfaces after these changes. I found a good ol’ restart was helpful as well, but of course, we don’t have this luxury in production, so be careful!
Checking IPv6
If you’re reading this article, you’re probably responsible for several hosts. For a gentle reminder which of your sites you’ve not yet setup IPv6, I recommend checking out IPvFoo for Chrome or 4or6 for Firefox. These tools make it easy for you to see which of your sites are ready for World IPv6 Launch Day!

Getting Help
Hurricane Electric provides really great support for their IPv6 tunnel services (which is completely free). Simply email ipv6@he.net and provide them with some useful information such as:
cat /etc/network/interfaces
cat netstat -nrA inet6  (these are your IPv6 routing tables)
cat /etc/default/ufw
relevant router configurations
I was very impressed to get a response from a competent person in 15 minutes! Sadly, there is one downside to using this tunnel; IRC is not an allowed.
Due to an increase in IRC abuse, new non-BGP tunnels now have IRC blocked by default. If you are a Sage, you can re-enable IRC by visiting the tunnel details page for that specific tunnel and selecting the ‘Unblock IRC’ option. Existing tunnels have not been filtered.
I guess ya gotta earn it to use IRC over your tunnel. Good luck!
debian hosting linux Networking sysadmin
Comments