Sass at RailsConf 2011

By Steph Skardal
May 18, 2011
With the inclusion of the Scss gem in Rails 3.1, RailsConf is a nice time to get a refresher on Sass/Scss functionality. Sass defines itself as syntactically awesome stylesheets, or a CSS meta language built to provide more powerful functionality to manipulate website appearances with efficiency and elegance. Note that Sass has two syntaxes and the examples presented in this article use the newer Scss syntax. Around the time of RailsConf two years ago, Sass was a included in Spree, an open-source Ruby on Rails ecommerce framework that End Point supports. At the time, I was skeptical about Sass inclusion in Spree because it wasn’t being leveraged to it’s full potential and had hopes of taking advantage of Sass, but a few months later it was removed from the core. Since then, I haven’t worked with Sass on other projects but hope to do so moving forward after being reminded of it’s features and of the fact that it will be included in Rails 3.1 as a default. I attended Chris Eppstein’s talk on Sass and explain a few features related to real-life use cases of CSS manipulation.
Variables
While working on a new feature, your client says, “I want this to be the same red that we use all over the site.” This is exactly what I experienced while working on Paper Source to build out new Quickview/popup functionality shown in the image below.

Sass variables can be defined and then included in various selectors. Need to change the styling for all those selectors that use this variable? Just change the variable instead of grepping through the code for the color and different variations of the color. Here’s an example of what variable definition and use might look like:
$red_error: #33FF00;
.error {
    color: $red_error;
}
.qty_alert {
    color: $red_error;
}
Nesting
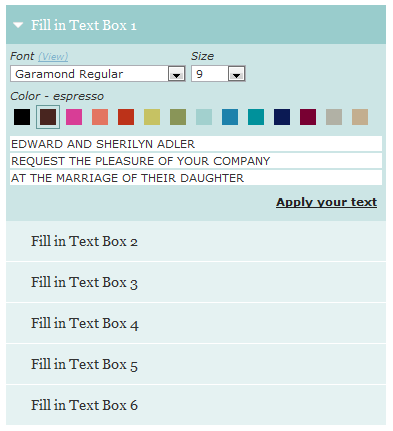
Instead of writing code with repeated selectors, take full advantage of nesting in Sass. Below is a good example of a repeated styling selector I use for Paper Source’s custom wedding invitation feature:
.editor_box {}
  .editor_box label { font-size: 11px; display: block; padding: 2px 0px; font-style: italic; }
  .editor_box label a { font-size: 9px; color: #82B3CC; }
  .editor_box .fonts { float: left; width: 176px; margin: 0px 5px 5px 0px; }
    .editor_box fonts select { width: 176px; margin: 0px; }
In Sass, this might would look like:
.editor_box {
    label {
        font-size: 11px;
        display: block;
        padding: 2px 0px;
        font-style: italic;
        a {
            font-size: 9px;
            color: #82B3CC;
        }
    }
    .fonts {
        float: left;
        width: 176px;
        margin: 0px 5px 5px 0px;
        select {
            width: 176px; margin: 0px;
        }
    }
}
While the nested functionality doesn’t produce less lines of code, it does do a better job of following the DRY principle and is more readable in Sass form.
Mixins
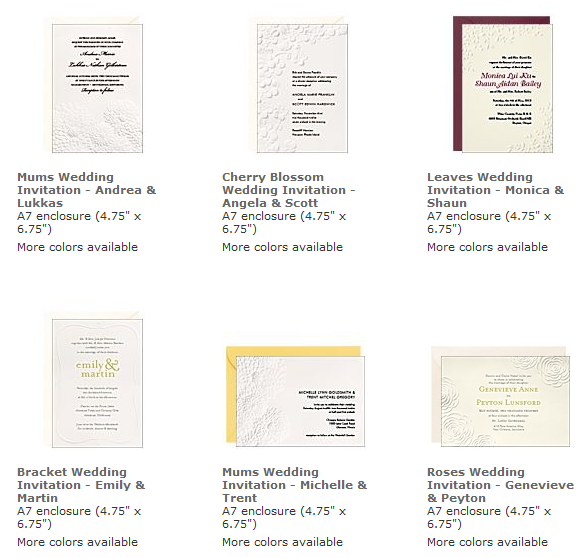
Next, while building out a new feature, a client says, “I want you to build a product thumbnail page that has equivalent styling to our other thumbnail pages.” See the thumbnails in the image below that share similar styling on multiple product navigation pages through Paper Source’s site.
Mixins are reusable sections of CSS that can be included in other selectors to reduce duplicate property and value definitions. A simple example, shown below, includes the product thumbnail mixin in two distinct classes.
@mixin product_thumbnail {
    a {
        color: $blue;
        text-decoration: none;
        &:hover {
            color: $red;
        }
    }
    img { padding-top: 10px; }
}
.category_products {
    @include product_thumbnail;
}
.special_products {
    @include product_thumbnail;
}
Transformations
Next, while building out another(!) new feature, the client comments, “I want this to be a color close to the other one, but a little different. Can you try what you think looks good?” The image below is a screen snippet with a jQuery-based accordion with different colors representing open and closed sections.
Transformations are calculations that can be applied to values such as color manipulation like saturate, desaturate, lighten, darken, make greyscale. Sass might look like this in the jQuery accordion scenario to show a lightened version of blue on inactive accordion regions:
$blue: #99CCCC;
.active {
    background-color: $blue;
}
.inactive {
    background-color: lighten($blue, 25%);
}
Importing Stylesheets
From a performance perspective, it’s ideal to have a single compiled CSS file included on each page. This can be difficult for maintainability as you try to manage an extremely large stylesheet. The CSS directive @import can import additional stylesheets, but these imported files are divided in multiple HTTP requests. Sass’s approach allows you to include stylesheets with rules and other Sass functionality, where a single file will be created at compile time. In the Paper Source example, we could do the following to include styles for thumbnails on various pages:
_product_thumbnails.scss
@mixin product_thumbnail {
    a {
        color: $blue;
        text-decoration: none;
        &:hover { color: $red; }
    }
    img { padding-top: 10px; }
}

category.scss
@import "product_thumbnails"
.category_products {
    @include product_thumbnail;
}

@import "product_thumbnails"
landing_page.scss
.special_products {
    @include product_thumbnail;
}
Check out the Sass documentation to read more about Sass and it’s features, including abstractions, calculations, and selector inheritence covered by Chris.
CSS Sprites with Compass
Compass is an additional gem that can be installed on top of Sass. In my opinion, the best feature of Compass mentioned in the talk was automated CSS spriting. CSS sprites is a technique where an aggregate of images is served as one image and CSS is used to show only a portion of the image in or as the DOM element. I’ve built a few different scripts in Ruby and Perl using ImageMagick that automatically build sprites, and was pleasantly surprised to hear that there is a feature in Compass that handles this. With Compass installed, CSS sprites in Sass might look like the code below, where wrapper elements are automagically compiled into a single sprited image and CSS rules are defined.
@import "wrapper_elements/*.png";
$wrapper-sprite-dimensions: true;
@include all-wrapper-sprites;
Conclusion
Admittedly, the examples shown in this blog article come from a site that runs on Perl-based Interchange, but I used these examples because I can distinctly remember each of these use cases. It might not be quite as easy to include Sass here with Interchange as it will be in Rails 3.1, where Scss/Sass is included as a new default.
Comments