Automating Windows Service Installation

By Daniel Gomm
April 23, 2021
 Photo by Science in HD on Unsplash
For me, setting up a service started as a clean one-liner that used InstallUtil.exe, but as time went on, I accumulated additional steps. Adding external files & folders, setting a custom Service Logon Account, and even an SSL cert had to be configured first before the service could be used. An entire checklist was needed just to make sure the service would start successfully. That’s when I realized a proper installation method was needed here. This article will go over how to make a dedicated .msi installer for a Windows Service that can do all these things and more.
Creating an installer can be tricky, because not all the available features are easy to find. In fact, the setup project itself is not included by default in Visual Studio; you need to install an extension in order to create one. But once the installer is created, we can use it to do things like:
- Configure the installer to copy the build output of a project to the
C:\Program Files (x86)folder, as well as add custom files & folders to the installation - Add custom CLI flags to the installer to specify the Service Logon Account at install time
- Add an installer class to the service and use the installation lifecycle hooks to write custom code that gets run at any stage of the installation.
A Note On Compatibility
For .NET Core and .NET 5.0 projects, you won’t be able to add an installer class. To use either .NET Core or .NET 5.0 to make a service instead, you’d need to make a different kind of project called a Worker Service. A Worker Service differs from a traditional Windows Service in that it’s more like a console application that spawns off a worker process on a new thread. It can be configured to run as a Windows service, but doesn’t have to be. So instead of using an installer, for a Worker Service you’d publish the project to an output directory and then use the SC.exe utility to add it as a Windows service:
dotnet publish -o C:\<PUBLISH_PATH>
SC CREATE <WORKER_NAME> C:\<PUBLISH_PATH>
Creating a Windows Setup Project
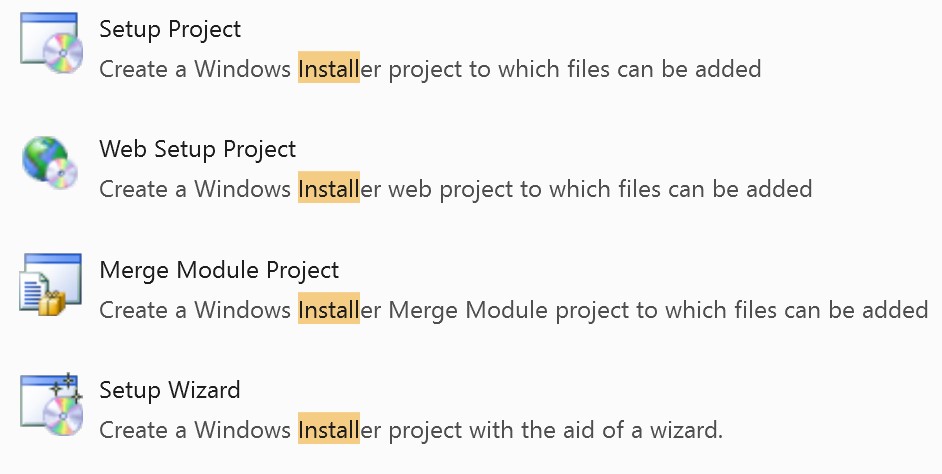
In order to create a .msi installer in Visual Studio 2019, you’ll need to install the Microsoft Visual Studio Installer Projects extension. While it’s not provided with a default installation of Visual Studio 2019, it’s an official Microsoft extension. Once you’ve installed it, you’ll be able to create any of the following projects:
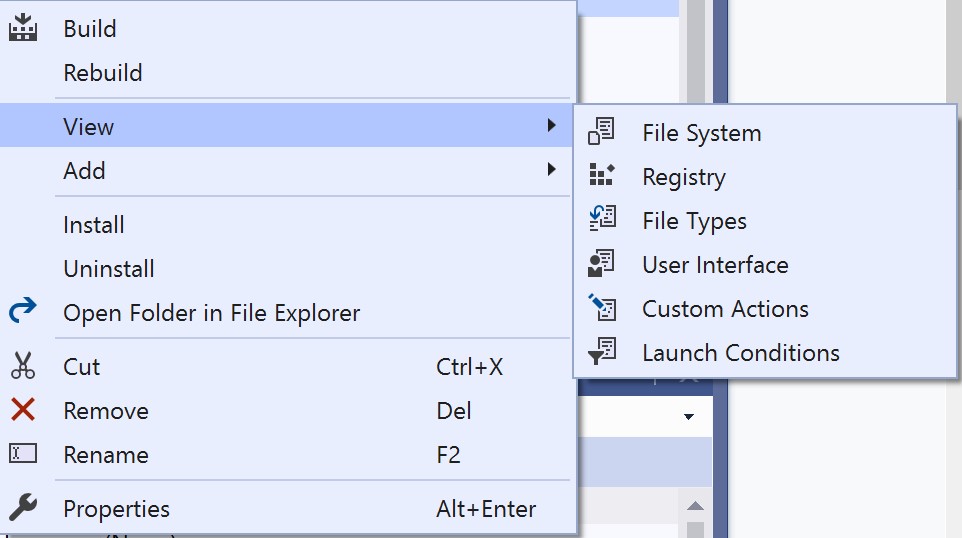
To create an installer, you can create a new Setup Project. The build output from this project will be your .msi installer. The setup project has a few different views, which you can use to configure what the installer needs to accomplish. These views can be accessed by right-clicking on the project in the Solution Explorer and expanding View from the context menu:
Configuring the Installation File System
To configure what files need to be installed, you can use the File System view, which provides a UI with some folders added to it:

Here, clicking on any folder on the left shows its contents over on the right. It also populates the Properties Window with the information about the folder:
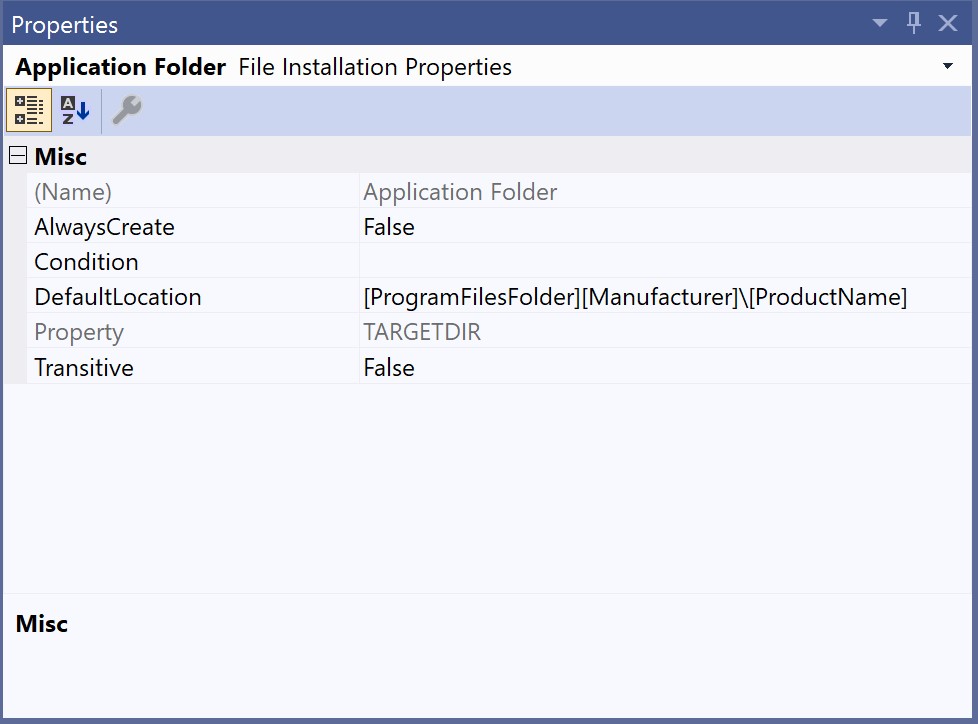
In the above example, we can see that the Application Folder is being output to a folder inside C:\Program Files (x86). You can add any folders you want to the file system by right-clicking on the file system to open the Special Folders context menu:
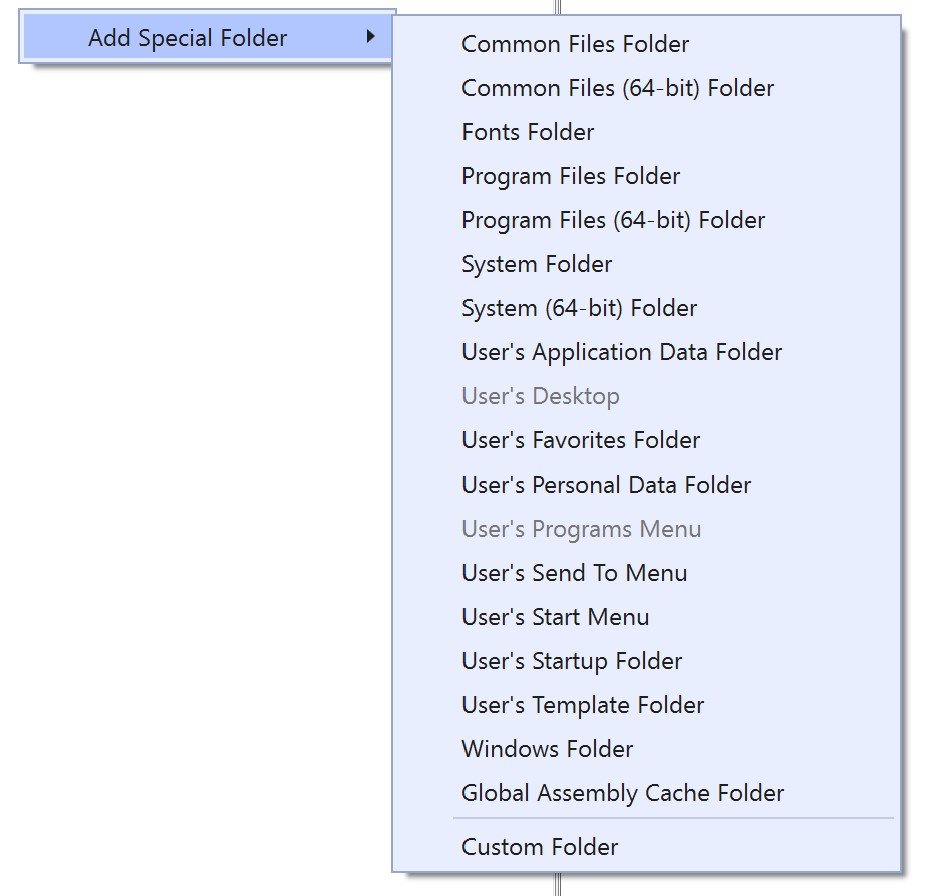
Some default folders are shown here for convenience. But let’s say we wanted to make some files get added to the C:\ProgramData folder. To do this, select “Custom Folder” and give it a name. Then, in the Properties Window, set the value of DefaultLocation to the correct path:
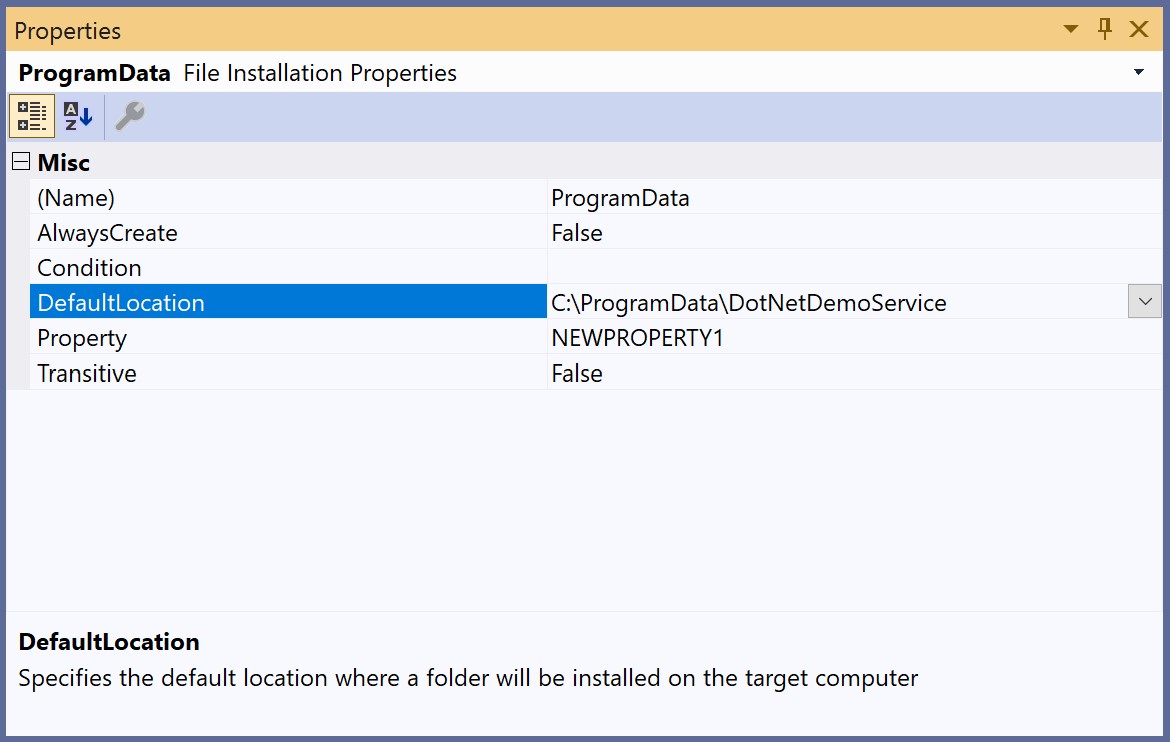
From here, you can use the right half of the view to add additional folders within C:\ProgramData\DotNetDemoService based on your needs.
Another thing you’ll likely want to do is put the DLLs from your application into a folder within C:\Program Files (x86). You can easily do this by mapping the primary build output of your project to the Application Folder in the installer’s file system. To do this, right-click on the Application Folder, and add project output:
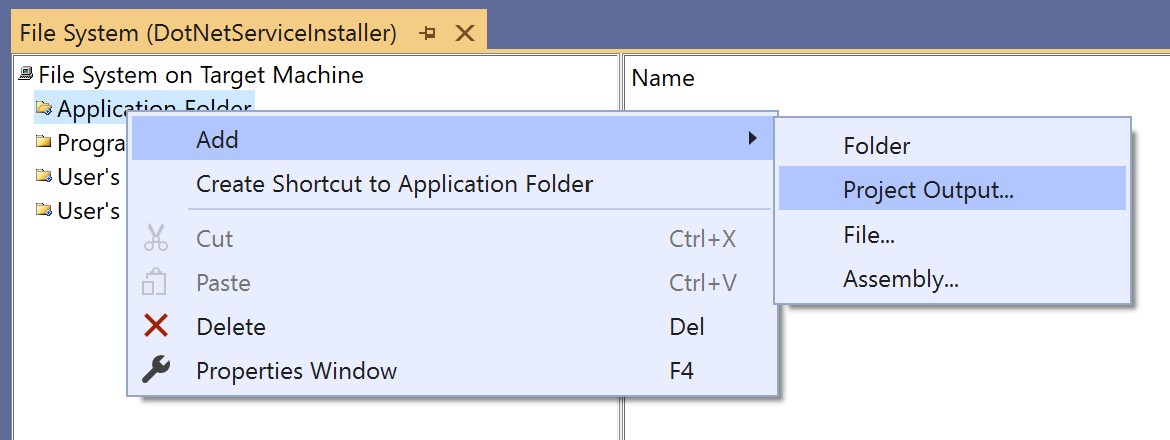
From there you’ll be prompted to select the project and output type. Select your project, and “Primary Output”:
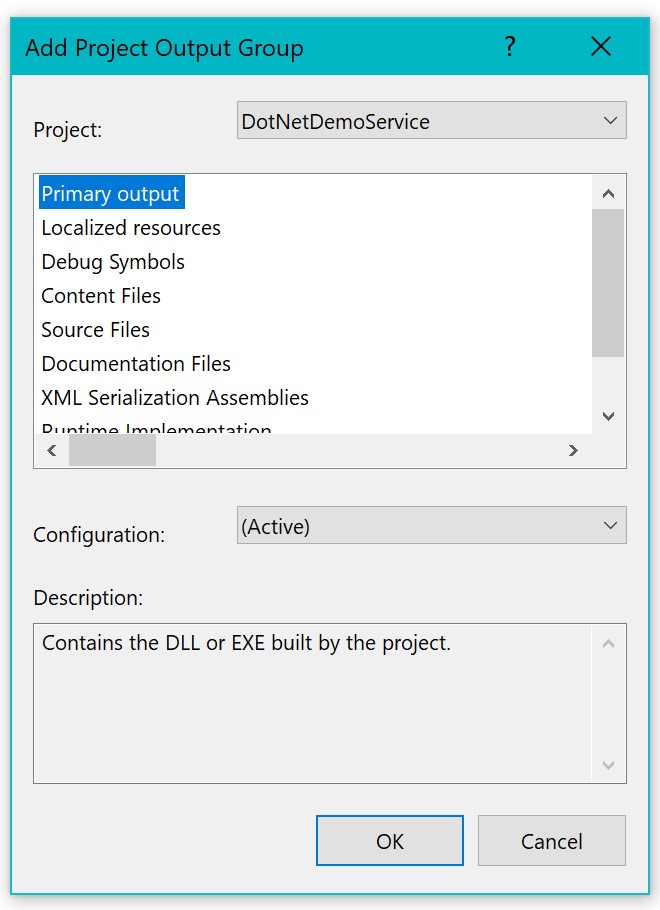
This will copy over the DLLs for your project and all of its dependencies.
Creating an Installer class
You may be wondering if it’s possible to define custom code to be run during the installation process. It is! For any project targeting .NET Framework 4.8 and under, you can add a class that extends System.Configuration.Install.Installer, and has the [RunInstaller(true)] attribute applied to it. After doing so, you’ll then be able to hook in and override any of the installation lifecycle methods. Taking a look into the definition of the System.Configuration.Install.Installer class reveals the list of overridable lifecycle hook methods you can use to add custom logic to the installation:
public virtual void Commit(IDictionary savedState);
public virtual void Install(IDictionary stateSaver);
public virtual void Rollback(IDictionary savedState);
public virtual void Uninstall(IDictionary savedState);
protected virtual void OnAfterInstall(IDictionary savedState);
protected virtual void OnAfterRollback(IDictionary savedState);
protected virtual void OnAfterUninstall(IDictionary savedState);
protected virtual void OnBeforeInstall(IDictionary savedState);
protected virtual void OnBeforeRollback(IDictionary savedState);
protected virtual void OnBeforeUninstall(IDictionary savedState);
protected virtual void OnCommitted(IDictionary savedState);
protected virtual void OnCommitting(IDictionary savedState);
It also defines event handlers for each of these steps as well:
public event InstallEventHandler BeforeInstall;
public event InstallEventHandler Committing;
public event InstallEventHandler AfterUninstall;
public event InstallEventHandler AfterRollback;
public event InstallEventHandler AfterInstall;
public event InstallEventHandler Committed;
public event InstallEventHandler BeforeRollback;
public event InstallEventHandler BeforeUninstall;
To add an installer class to the Windows Service project, there’s a helper you can use by right clicking on the designer view of the service and selecting “Add Installer” from the context menu:

This will add a new file called ProjectInstaller.cs to your project, which has its own designer view. The designer view has a corresponding ProjectInstaller.Designer.cs file that amends the ProjectInstaller class with the code generated by the designer. You’ll notice that this designer view already defines two objects, serviceInstaller1 and serviceProcessInstaller1.
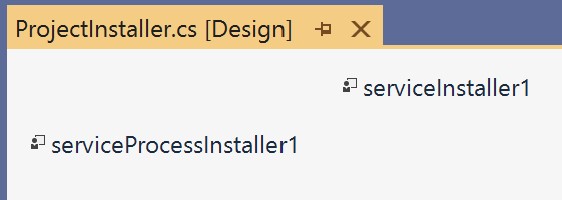
These are special installer classes that will handle all the default installation tasks for your service. serviceInstaller1 is of type ServiceInstaller and handles defining the service name and if it should auto start when the machine boots up. serviceProcessInstaller1 is of type ServiceProcessInstaller and handles setting up the Service Logon Account, which the service will run with once installed. Both of these are already set up and invoked by the designer generated code in ProjectInstaller.Designer.cs.
Since both of these special service installers extend System.Configuration.Install.Installer, you can add custom code to occur at any point of the installation on these as well. The designer view again provides a GUI helper to add this in. Double-clicking on serviceInstaller1 will automatically add a new method to ProjectInstaller:
private void serviceInstaller1_AfterInstall(object sender, InstallEventArgs e) { }It will also put some code into ProjectInstaller.Designer.cs which adds this method to the AfterInstall event of serviceInstaller1.
Adding Installer CLI Options
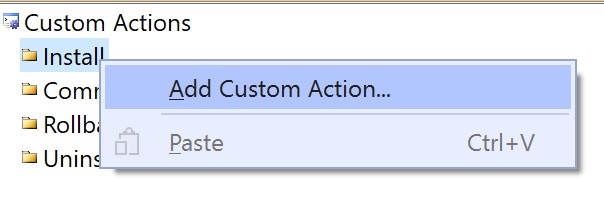
It’s also possible to add custom properties that you can pass to the installer as command line arguments. These can be done by defining Custom Actions on the primary build output of your project. To do this, go to the Custom Actions view of the installer project, right click on “Install” and select “Add Custom Action” from the context menu:
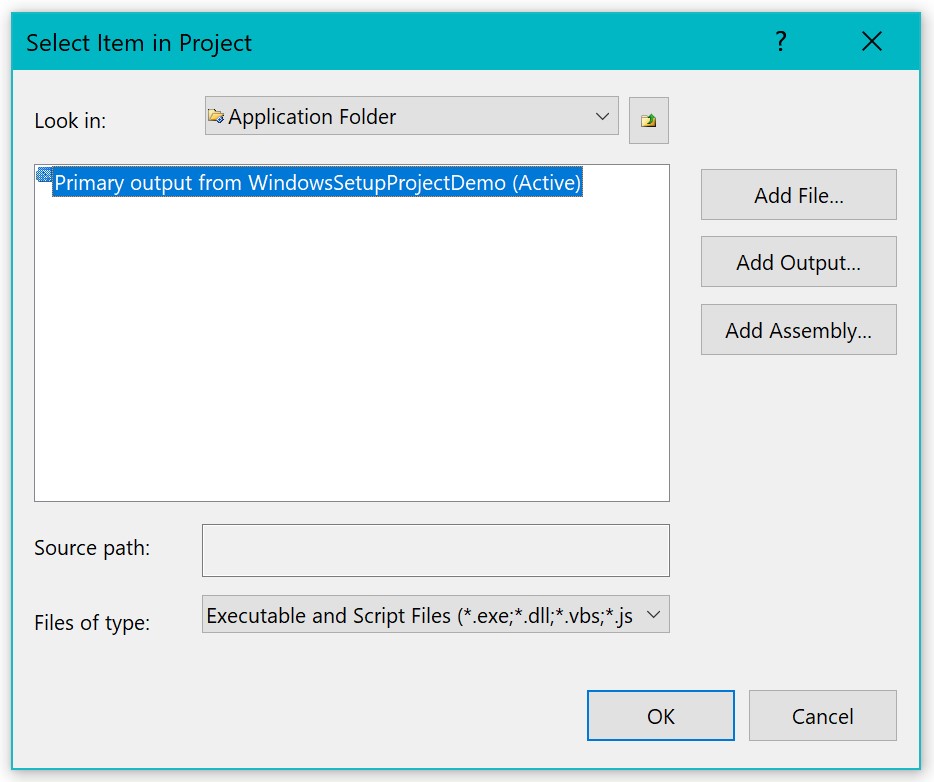
This will open up a dialog that prompts you to select a file in the installer’s file system to define a custom action for. In this case, we want to define a custom action on the primary build output. This way, the custom CLI options we are about to define will be passed to the project’s installer class.
After you click “OK”, the primary build output will show up in the Custom Actions view. When you click on it, you’ll notice that the properties window has a property called CustomActionData. In short, you can use it to define custom CLI arguments like this:
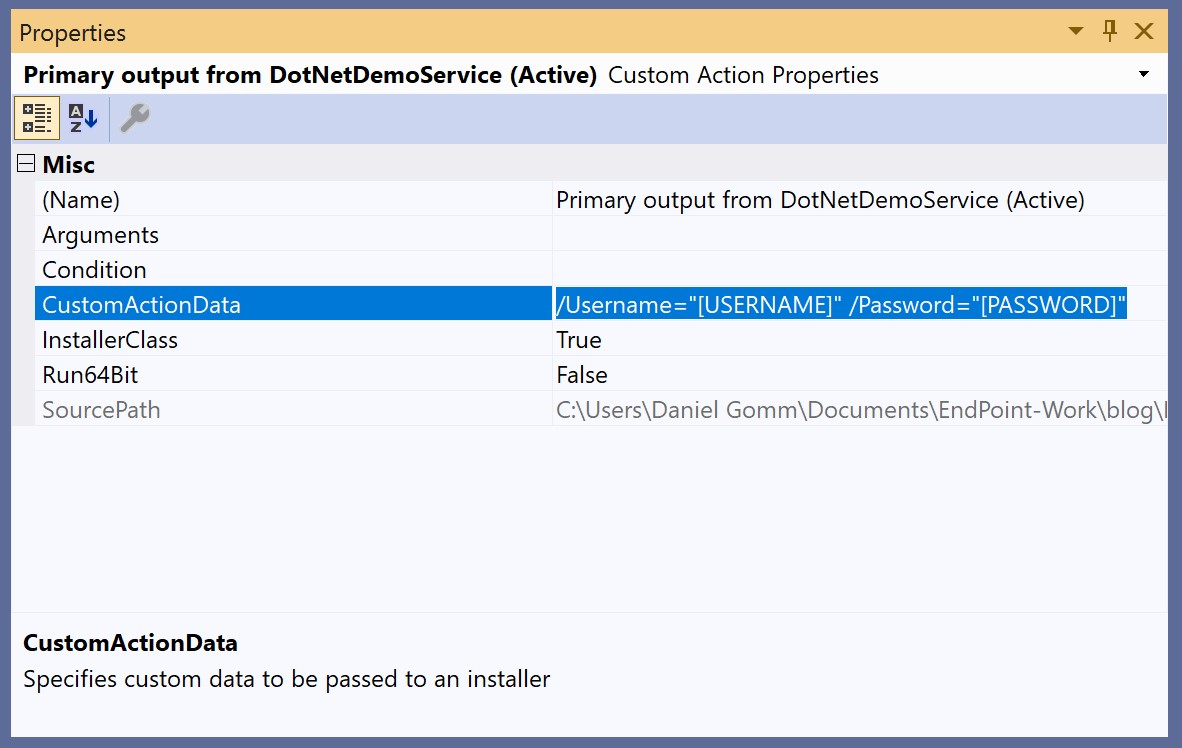
CustomActionData has its own syntax, so let’s dive deeper into what this actually does. We’re mapping the value of USERNAME and PASSWORD from the installer’s Properties Collection to the InstallContext of the installer class of your project under the Username and Password keys, respectively. The square brackets denote that the value is to be taken from the Properties Collection, and the quotes allow the value of the property to contain spaces. The forward slash denotes that we are adding a new key to the context. Any command line arguments passed to the installer are added to the Properties Collection by default.
Using Custom CLI Options in the Installer Class
Now that we have defined our custom action with the CLI arguments, we can go over to the project’s Installer class and access them via the Context property. In this example, we’re using the custom properties to define the Logon account for the service, which needs to be set right before the installation happens. We can use the Install(IDictionary stateSaver) lifecycle hook method for this purpose:
public override void Install(IDictionary stateSaver)
{
    // If no username or password is specified, fall back to installing the service to run as the SYSTEM account
    if (
        string.IsNullOrEmpty(this.Context.Parameters["Username"])
        || string.IsNullOrEmpty(this.Context.Parameters["Password"])
    ) {
        this.serviceProcessInstaller1.Account = System.ServiceProcess.ServiceAccount.LocalSystem;
    }

    // Otherwise, configure the service to run under the specified account.
    else
    {
        this.serviceProcessInstaller1.Username = this.Context.Parameters["Username"];
        this.serviceProcessInstaller1.Password = this.Context.Parameters["Password"];
    }

    // Run the base class install after the service has been configured.
    base.Install(stateSaver);
}
Conditionally Installing Files
It’s also possible to make the installer conditionally install files based on a value from the Properties Collection. One example of how this can be useful would be swapping in the production or development configuration file based on the value of a command line argument. We don’t need to write any additional code to do this, we just have to add a value for the Condition property in the Properties Window for the file:

The above condition will make the file settings.production.config be installed only if the DEBUG command line argument is not defined or is set to “false”. Like the custom actions, this property is also sourced from the Properties Collection.
Conclusion
And that’s it! I found that having a dedicated .msi installer was handy for making the setup of my Windows Service completely hands-free. While some of the features you need might seem buried within context menus, the flexibility of having the installer handle the service setup is well worth the effort.
Have any questions? Feel free to leave a comment!
Comments