Demonstrating the QuickBooks Desktop SDK

By Daniel Gomm
December 4, 2020

Is your client or company thinking about switching to QuickBooks? If so, you might be discovering that migrating your existing financial and sales data out of your old system and into QuickBooks is both time consuming and tedious. You might even have an existing ecommerce site or database with tons of data and no clear way of getting the orders into QuickBooks without manual entry.
Recently I was tasked with solving this problem. Our client needed to migrate data from an existing MySQL database into QuickBooks, and automatically add orders from our ecommerce site directly into QuickBooks going forward.
In this article I’ll go over how to use the QuickBooks Desktop SDK (also referred to as QBFC for “QuickBooks Foundation Classes” in the API documentation) to send and receive data from QuickBooks.
QuickBooks primer for developers
For the uninitiated, QuickBooks is an accounting software made by Intuit. It can be used to manage lots of data, including lists of customers, inventory items, sales orders, and invoices. All of this data is stored in a “company file”, which is a file with a .qbw extension that uses a proprietary data format. This file gets created when setting up QuickBooks for the first time, and may be served to multiple machines across a network depending on the “open mode”.
The open mode determines how the company file can be accessed. In multi-user mode, there is one company file stored in a central location on the network which all users can access. You can use multi-user mode if your license supports multiple users, otherwise you will only be able to use single-user mode. In single-user mode, only one user can access the company file at a time.
There are two methods of communicating with QuickBooks: The QuickBooks Desktop SDK, which I mentioned earlier, and the QuickBooks Web Connector. Both use qbXML, an XML data format that is used to communicate with QuickBooks, and defines tags for each type of request it can process.
The QuickBooks Web Connector is a utility that comes included with QuickBooks and can send/receive SOAP messages from a web server. In order to set up the web connector, you need to make a web service that implements the SOAP methods specified in the documentation (using, for example, ASP.NET). The web connector is configured by the user to check in with your web service at regular intervals, during which the web service can respond with qbXML requests for QuickBooks to process and respond back with.
The QuickBooks Desktop SDK is a Windows COM-based library that allows you to write code that can communicate directly with a local installation of QuickBooks. In order to use the SDK, you’ll need to make an application that runs on a machine that has QuickBooks installed locally, and is on the same local network where the company file is being served. It can be used to send qbXML requests to QuickBooks at any time, and provides a library of foundation classes that abstract away qbXML into an object-oriented API. For migrating data into a new installation of QuickBooks, this SDK is the best solution.
Getting started
To get started, you’ll need to download the latest version of the QuickBooks Desktop C# SDK, and Visual Studio on your computer. In order to download the SDK, you’ll also need to create a developer account with Intuit.
After the installer is done, the SDK is located in C:\Program Files (x86)\Intuit\IDN. Included in this folder are the assemblies for the SDK, and a local copy of the documentation. You can navigate to this documentation in your browser by going to the following URL:
http://localhost:2211/QBSDK13.0/doc/html/GettingStarted.html
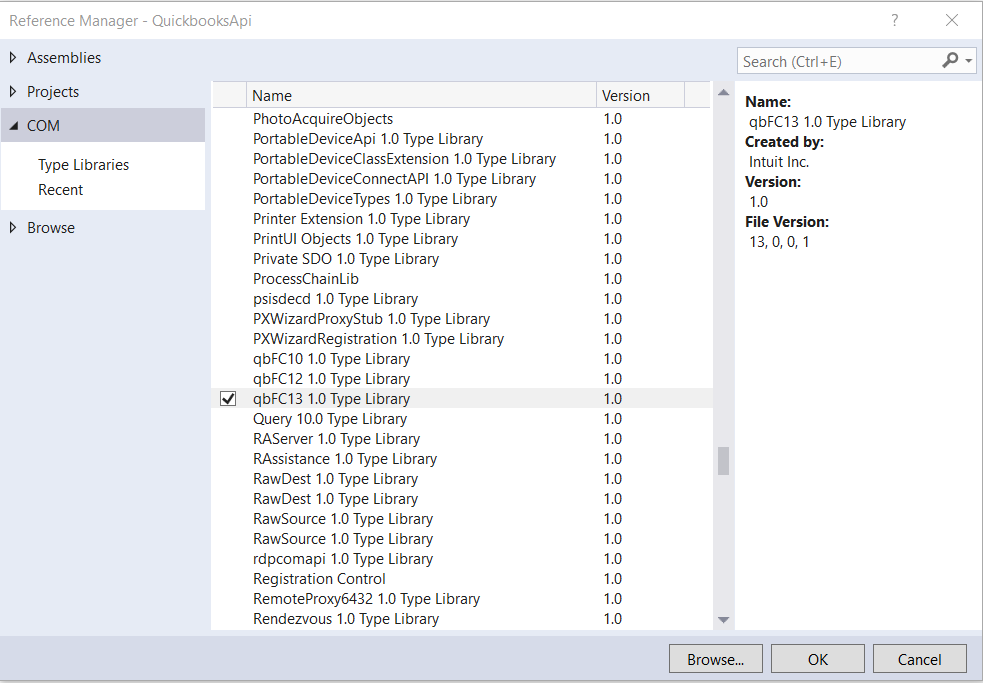
To add the SDK to your project in Visual Studio, right click on References -> Add Reference, and in the COM tab scroll down to qbFC13 1.0 Type Library, and click add. This should already be in the list once you’ve installed the SDK.
Opening a session with QuickBooks
In order to start communicating with QuickBooks, you’ll have to open a new session using the QBSessionManager class provided in the SDK. This is the class you will use to send to and receive data from QuickBooks. Before you write any code, make sure that you have a copy of QuickBooks installed on your machine, and that it’s currently running. The below code snippet shows how to connect to QuickBooks via the QBSessionManager:
// Open a new connection to QuickBooks within a try-catch. An exception
// will be thrown if the connection fails.
try
{
    // Create a new QBSessionManager. This object is the entry point to
    // interfacing with QuickBooks.
    QBSessionManager sessMgr = new QBSessionManager();

    // Opens a new connection, which needs to happen before starting
    // a session. The second argument is the application name, which
    // QuickBooks will use to identify your application in the future.
    sessMgr.OpenConnection("", "QuickBooks Web Api");
    sessMgr.BeginSession("", ENOpenMode.omDontCare);
    return "Connected";
}

catch (Exception ex)
{
    return ex.Message;
}
Now, make sure you aren’t running Visual Studio as administrator, then build and run the project. QuickBooks and your application need to be running on the same user level, otherwise you’ll receive the error message “Could not start QuickBooks.”
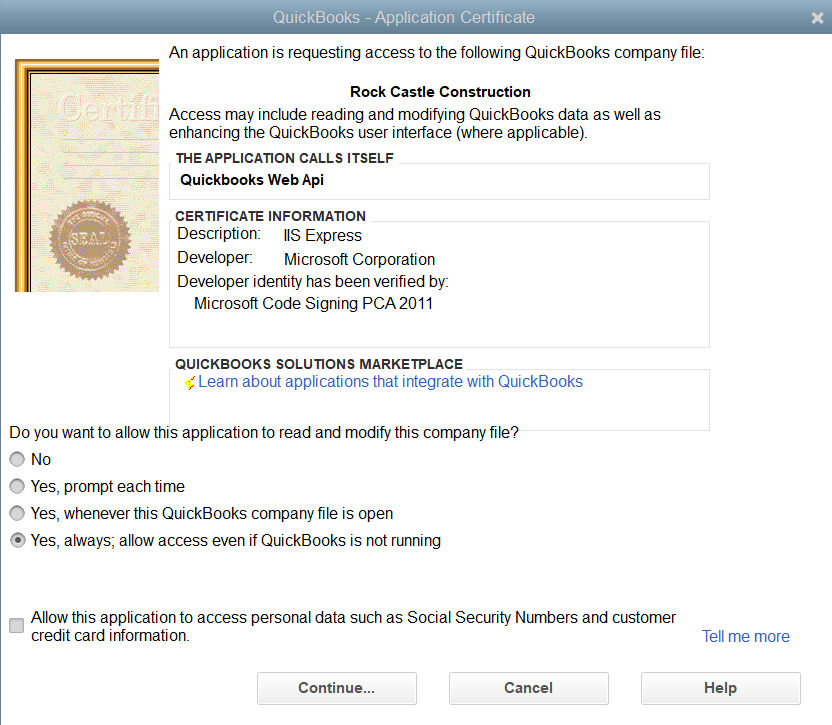
Once you’ve run your application, a popup should appear from QuickBooks, asking you if you want to allow this application to access your company file. Select “Yes, always; allow access even if QuickBooks is not running”, then click “Continue.”
Now, when you run the code example, it should return “Connected.” QuickBooks will make you verify your application the first time it tries to connect. In the sample, we’ve put “QuickBooks Web Api” as the application name. If you change this later, you’ll be prompted to verify your application again.
Communicating with QuickBooks
Now that you can successfully open a connection and start a session, we’ll look at some code to send requests to QuickBooks. We’ll again be using the QBSessionManager class from the SDK to accomplish this. The key methods to be aware of here are:
IMsgSetRequest QBSessionManager::CreateMsgSetRequest(string, short, short)IMsgSetResponse QBSessionManager::DoRequests(IMsgSetRequest)
The QBSessionManager sends a set of requests, contained in an SDK object of type IMsgSetRequest, to QuickBooks, which processes each of these requests and responds to each. All the responses are returned in another SDK object of type IMsgSetResponse.
The IMsgSetRequest object contains methods to create each type of request. For example, if you wanted to get a list of all customers from QuickBooks, you could use the IMsgSetRequest.AppendCustomerQueryRq() method, which creates a new ICustomerQuery request object, appends it to the message set, and returns the request object. Try creating a new IMsgSetRequest object in Visual Studio and typing . to see a list of all the Append methods available. There’s one for each request listed in the API reference!
Sending a request to QuickBooks
Next, we’ll write some code that gets all the customers in the QuickBooks company file. To do this, we’ll create an ICustomerQuery object, add it to the request message set, and then parse the response to gain a list of the customers.
// Create a QBSessionManager
QBSessionManager sessMgr = new QBSessionManager();

// Put your code in a try-catch, as the session manager will throw an
// exception if an error occurs while sending the request or opening a
// connection to QuickBooks.
try
{
    // Connect to QuickBooks and open a new session using the open mode
    // currently in use by your local QuickBooks installation.
    sessMgr.OpenConnection("", "QuickBooks Web Api");
    sessMgr.BeginSession("", ENOpenMode.omDontCare);

    // Create a request message set, which will contain the customer
    // query. The arguments specify the country (should match your
    // QuickBooks version) and qbXML version.
    IMsgSetRequest requestMessageSet = sessMgr.CreateMsgSetRequest("US", 13, 0);

    // Create the customer query and add to the request message set. The
    // append method adds the request to the set, and returns the new
    // request.
    ICustomerQuery customerQuery = requestMessageSet.AppendCustomerQueryRq();

    // Add a filter to the request that limits the number of items in
    // the response to 50.
    customerQuery.ORCustomerListQuery
        .CustomerListFilter
        .MaxReturned
        .SetValue(50);

    // Execute all requests in the session manager’s request message
    // set. The response list contains the responses for each request
    // sent to QuickBooks, in the order they were sent.
    IMsgSetResponse resp = sessMgr.DoRequests(requestMessageSet);
    IResponseList respList = resp.ResponseList;

    // Since we only made one request, our data is in the first (and
    // only) item in the response list.
    IResponse curResp = respList.GetAt(0);

    // Make sure response code is not less than 0 (which would denote an
    // error).
    if (curResp.StatusCode >= 0) {
        // Get the customer list from the response Detail property
        // (see OSR) and cast to the expected type.
        ICustomerRetList custList = (ICustomerRetList)curResp.Detail;

        // Iterate through all customers and process.
        for (int i = 0; i < custList.Count; i++)
        {
            ICustomerRet cust = custList.GetAt(i);
            // < Process the response data >
        }
    }
    else {
        // < Handle error response >
    }
}

// Catch any exceptions that occur and report them in the response.
catch (Exception ex)
{
    // < Handle the exception here >
}

// Finally close connection & session no matter what happens.
finally
{
    sessMgr.EndSession();
    sessMgr.CloseConnection();
}
There are a few things to note here. First, the response list type IResponseList is defined by the SDK and doesn’t implement IEnumerable or IQueryable; we have to use the Count property and the GetAt(int) method to get data from it. All list types defined by the SDK are structured in this manner.
Second, each IResponse contains a Details property which has the data. The type of the Details property differs depending on which request was sent. In this case, its type is ICustomerRetList. When getting the response, you’ll need to cast the Details property to the expected type, as it’s defined as the base SDK object type, IQBBase, in the IResponse interface:
ICustomerRetList custList = (ICustomerRetList)curResp.Detail;Additionally, you can get this type programmatically from the response using the IResponse.Type property. Refer to the online documentation for the type of the response details received for each type of request.
The second argument passed to the QBSessionManager.BeginSession() method is the open mode, whose possible values are defined by the ENOpenMode enum. This open mode determines how users can access the company file, and has values for multi-user mode, single-user mode, and a “don’t care” mode, which defaults to whatever mode the local QuickBooks is currently using.
After creating the customer query, this next line adds a filter to the request:
customerQuery.ORCustomerListQuery.CustomerListFilter.MaxReturned.SetValue(50);In this case we’re limiting the amount of customers in the response to 50. Each request is a unique object with different properties, but many of the requests that receive data from QuickBooks provide a filter object that can be used to control the data that’s included in the response.
Conclusion
The QuickBooks Desktop SDK makes it simple to move data around between your application and your company’s QuickBooks installation. If you end up doing extensive work with the SDK, I recommend wrapping the QBSessionManager in a new class that can convert the responses into a List<IResponse>. This way, you can easily get any response’s Detail property by its type in a single line using a LINQ query.
If you have any questions about the SDK, feel free to leave a comment!
Comments