Rclone: upload to the cloud from your command line and much more

By Ardyn Majere
September 9, 2020
The Swiss army knife of storage
Cloud storage providers like Google Drive are great solutions for storing files. You can upload your data and not worry about maintaining a separate system to host it, or all the security hassles that can bring. However, very few major cloud storage providers offer a command line interface or any other official way to upload without using their web interface or closed-source binary tools, if they even offer that.
This obviously makes uploading files from servers difficult, but not impossible if you know the right tools.
About a year ago Jon Jensen penned a blog post about gdrive, a Google Drive command-line tool. However, due to changes with Google’s Drive security, that tool no longer works. This led me to look for a replacement.
Our use case
Recently I had to put some large files in to long term storage on Google Drive, since we needed the local space back. We wanted to retain the data, but didn’t foresee needing to access it for some time, if ever. Google Drive was a good solution for us, but the problem became how to get it there.
The files were too big, and some of them were not stored sparsely—empty space was tacked on to the disk images. We wanted to encrypt them, as the drives potentially contained customer information. So we had to sequentially process the files, encrypt them, and upload them. I felt like this would take quite a bit of time.
Enter rclone. Rclone can connect to many different kinds of cloud storage providers, DIY cloud storage solutions, and even things like FTP and WebDAV. You can use rclone to copy files directly like rsync, or even use it to mount the remote storage as a local drive. We chose to do the latter.
Rclone connects to a dizzying array of remote web services including Dropbox, Box, Amazon S3, Mega, SugarSync, and even homebrew cloud like ownCloud! This example uses Google Drive, but the instructions for many cloud providers are similar. The setup wizard can guide you through each step.
We decided to mount the remote storage, then encrypt and compress the files with gpg outputting directly to the remote mount point. This would allow us to set several different keys for decryption. Rclone offers a crypt module for encrypting backups, but this requires keeping a password. We prefer each person who may need to decrypt this be able to use a key. This also allowed me to run the command and walk away rather than try to shepherd the process along manually.
Once the rclone mount was in place, encrypting the files for upload was very simple. Having the storage mounted locally negated the need to encrypt it locally before uploading. We simply ran the following:
gpg --output /mnt/rclone/drive/sensitive_file.gpg --recipient recipient@email.com --encrypt ~/sensitive_fileDoes this sound useful? Well, if it does…
How to do this yourself
Installing rclone is as simple as downloading the binary from rclone.org or cloning the Git repository and compiling it yourself. They also offer a script to automatically download the most recent version. Packages are also available in most operating system repositories, though as usual those tend to be a little older.
Whichever method you choose, once you have rclone installed, you’ll need to configure it to use your remote storage.
$ rclone config
2020/08/28 11:33:19 NOTICE: Config file "/home/user/.config/rclone/rclone.conf" not found - using defaults
No remotes found - make a new one
n) New remote
s) Set configuration password
q) Quit config
n/s/q>
Choose ‘n’ for a new remote, and name it something memorable.
n/s/q> n
name> gdrive
Type of storage to configure.
Choose a number from below, or type in your own value
[snip]
XX / Google Drive
   \ "drive"
[snip]
Storage> drive
(At this point you could also choose a different storage type, and the rest of these instructions should still work.)
** See help for drive backend at: https://rclone.org/drive/ **

Google Application Client Id
Setting your own is recommended.
See https://rclone.org/drive/#making-your-own-client-id for how to create your own.
If you leave this blank, it will use an internal key which is low performance.
Enter a string value. Press Enter for the default ("").
client_id>
At this point, follow the instructions on how to make your own client id from rclone’s website or keep reading. If you leave this blank, the app will use a shared client id and there is global rate limiting in effect for every rclone instance.
client_id> [snip].apps.googleusercontent.com
Google Application Client Secret
Setting your own is recommended.
Enter a string value. Press Enter for the default ("").
client_secret> [snip]
Scope that rclone should use when requesting access from drive.
Enter a string value. Press Enter for the default ("").
Choose a number from below, or type in your own value
 1 / Full access all files, excluding Application Data Folder.
   \ "drive"
 2 / Read-only access to file metadata and file contents.
   \ "drive.readonly"
   / Access to files created by rclone only.
 3 | These are visible in the drive website.
   | File authorization is revoked when the user deauthorizes the app.
   \ "drive.file"
   / Allows read and write access to the Application Data folder.
 4 | This is not visible in the drive website.
   \ "drive.appfolder"
   / Allows read-only access to file metadata but
 5 | does not allow any access to read or download file content.
   \ "drive.metadata.readonly"
scope> 3
At this point, choose a scope for the drive access. I’m not sure what the use cases are for the higher numbers, but 1–3 seem to be the most useful. For this demonstration, I chose 3—I want the app to be able to create new files but not read existing ones. For backups, I recommend 1 or 2.
ID of the root folder
Leave blank normally.

Fill in to access ‘Computers’ folders (see docs), or for rclone to use
a non root folder as its starting point.

Note that if this is blank, the first time rclone runs it will fill it
in with the ID of the root folder.

Enter a string value. Press Enter for the default ("").
root_folder_id>
You can also jail the app to a specific subfolder. You’ll need to use a folder ID for this, rather than a folder name. See the documentation if you need to do this.
Needed only if you want use SA instead of interactive login.
Enter a string value. Press Enter for the default ("").
service_account_file>  # I left this blank
Edit advanced config? (y/n)
y) Yes
n) No (default)
y/n> n
Remote config
Use auto config?
 * Say Y if not sure
 * Say N if you are working on a remote or headless machine
y) Yes (default)
n) No
For our use case, we are setting this up on a remote machine, but you can use the interactive login if you have a graphical user interface on the machine in question.
y/n> n
Please go to the following link: https://accounts.google.com/o/oauth2/auth?access_type=offline&client_id=[snip]
Log in and authorize rclone for access
Enter verification code>
At this point copy the URL and follow the instructions on screen. Agree to the data sharing—If you have created your own API key, this data will be only shared with yourself, another reason to create your own.
Configure this as a team drive?
y) Yes
n) No (default)
y/n> n
--------------------
[gdrive]
type = drive
client_id = [snip]
client_secret = [snip]
scope = drive.file
root_folder_id = rclone
token = [snip]
--------------------
y) Yes this is OK (default)
e) Edit this remote
d) Delete this remote
y/e/d> y
Current remotes:

Name                 Type
====                 ====
gdrive               drive
At this point, you can quit the configuration mode, and your new rclone remote is ready to use!
Mounting the remote drive (putting it all together)
$ sudo mkdir -p /mnt/rclone/drive
$ sudo chown -R $USER /mnt/rclone/
$ rclone mount gdrive: /mnt/rclone/drive/
Note: If you wish to have the above command run in the background, add & to the end of the command. You’ll have to unmount it later with fusermount -u /mnt/rclone/drive
At this point you can copy any files you like into the mount above. However, you could just do that with rclone directly: rclone sourcefile gdrive:/. will work. Instead, I used the following command, which I showed at the very beginning of the blog post:
for i in $( ls /drives/source/directory ); do
  gpg --output /mnt/rclone/drive/$i.gpg --recipient recipient@email.com --encrypt /drives/source/directory/$i
done
Quite a bit of setup. But the result is a mounted folder into which you can copy encrypted files directly, without any intermediary steps. The above command took a while, but by automating the task, the total work time was still less than it would have been trying to do it manually, especially given that we didn’t have the spare disk space to store a separate encrypted copy of our files.
Want to do more? You could take a whole drive image with dd, run it through gpg, and pipe the output to the remote storage. You could use the crypt module for your own backups, rather than relying on gpg. The mount point acts as though it was a drive on your system, so any system utility like Timeshift could back up to the drive.
If you have any other suggestions for how this might be used, please leave a comment!
DIY Google API key
These instructions can also be found on the rclone website.
For this blog post I used my personal account and went through the steps below. Some of the steps may be different for a G Suite account. It’s a little cumbersome but will only take 5–10 minutes.
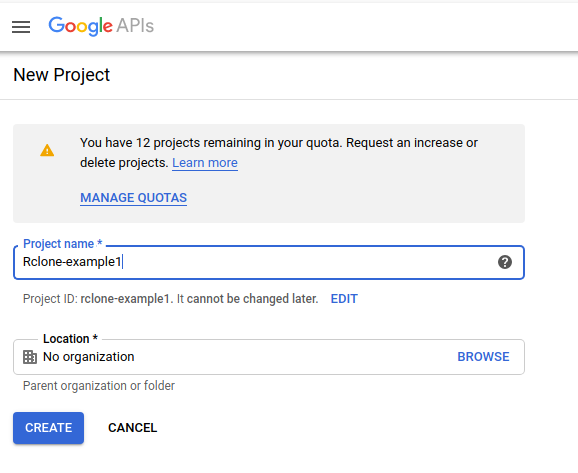
Log in to the API console and create a new project.
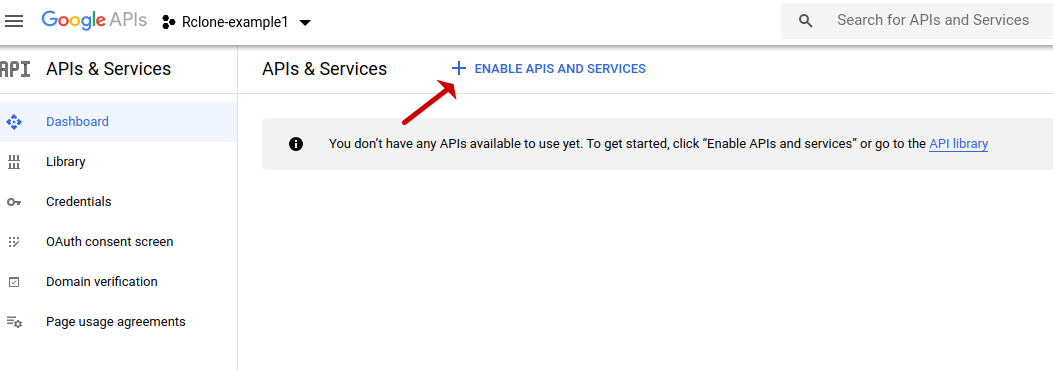
Once you’ve created the project, click on ‘Enable APIs and Services’.
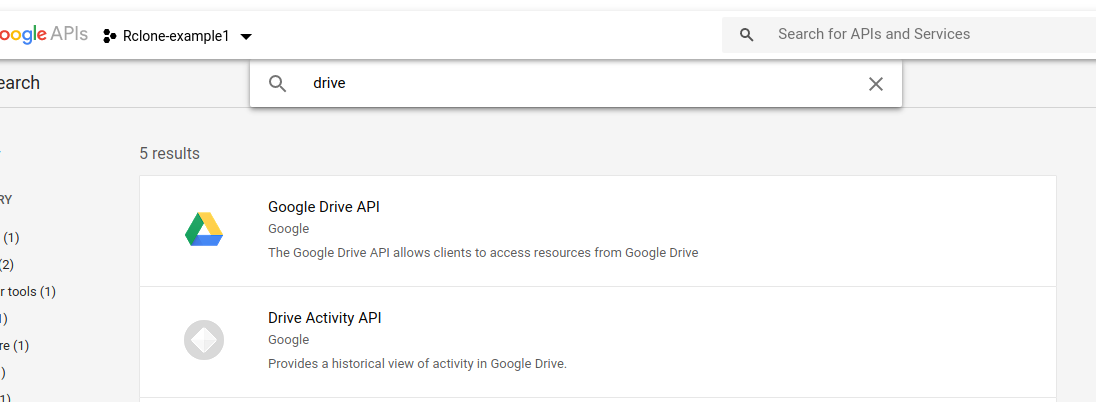
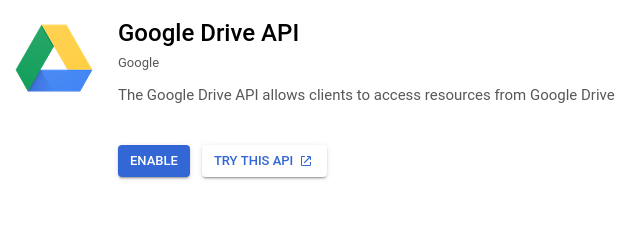
Search for ‘Drive’ and click on the Google Drive API, which should be the first option.
Enable the Google Drive API.
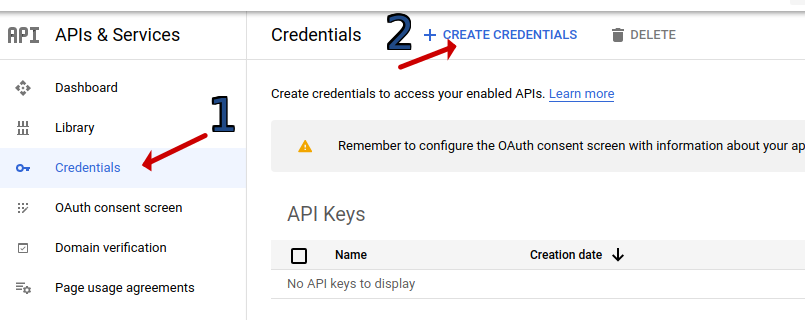
Once you have enabled this, do not click ‘Create Credentials’ directly — this takes you to the wrong wizard. Instead, click on Credentials in the left navigation pane, then ‘Create Credentials’, which gives you the option to just create OAuth credentials, which is what we need.
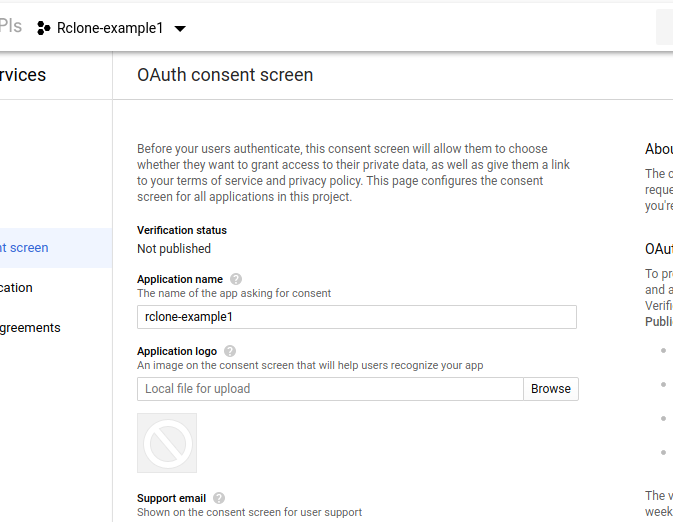
Choose ‘OAuth credentials’ and fill in the OAuth consent screen if necessary. You can fill in limited information here, and just use ‘rclone’ for the name. If you are using a G Suite account you can choose ‘Internal’ rather than ‘External’.
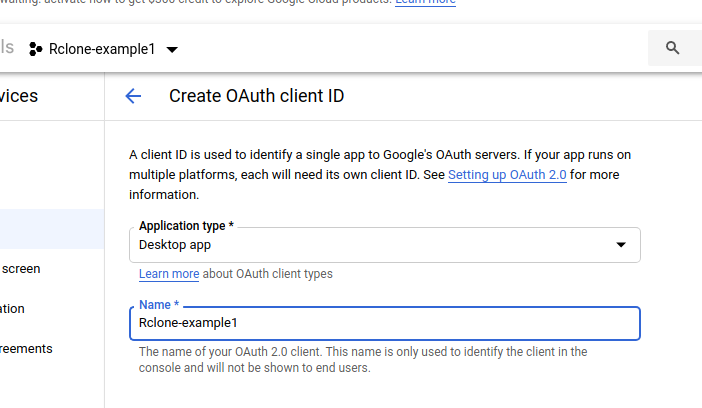
Once you have done that, create your OAuth ID. Again, you can just name this rclone. Choose the application type of ‘Desktop App’.
You’re done! You can now use the OAuth ID displayed on this screen with rclone. Or go back and see it again from the dashboard under ‘Credentials’, then clicking the name of the OAuth ID you created.
When creating the ID, it’ll say you will need to verify the app. This is only true if you plan on heavy use. You can use it quite easily without this step for smaller use cases.
(These instructions were originally written by GitHub user @balazer, and are adapted here with many thanks.)
Comments