Full Screen Gallery with Supersized and video slides

By Marina Lohova
January 26, 2016
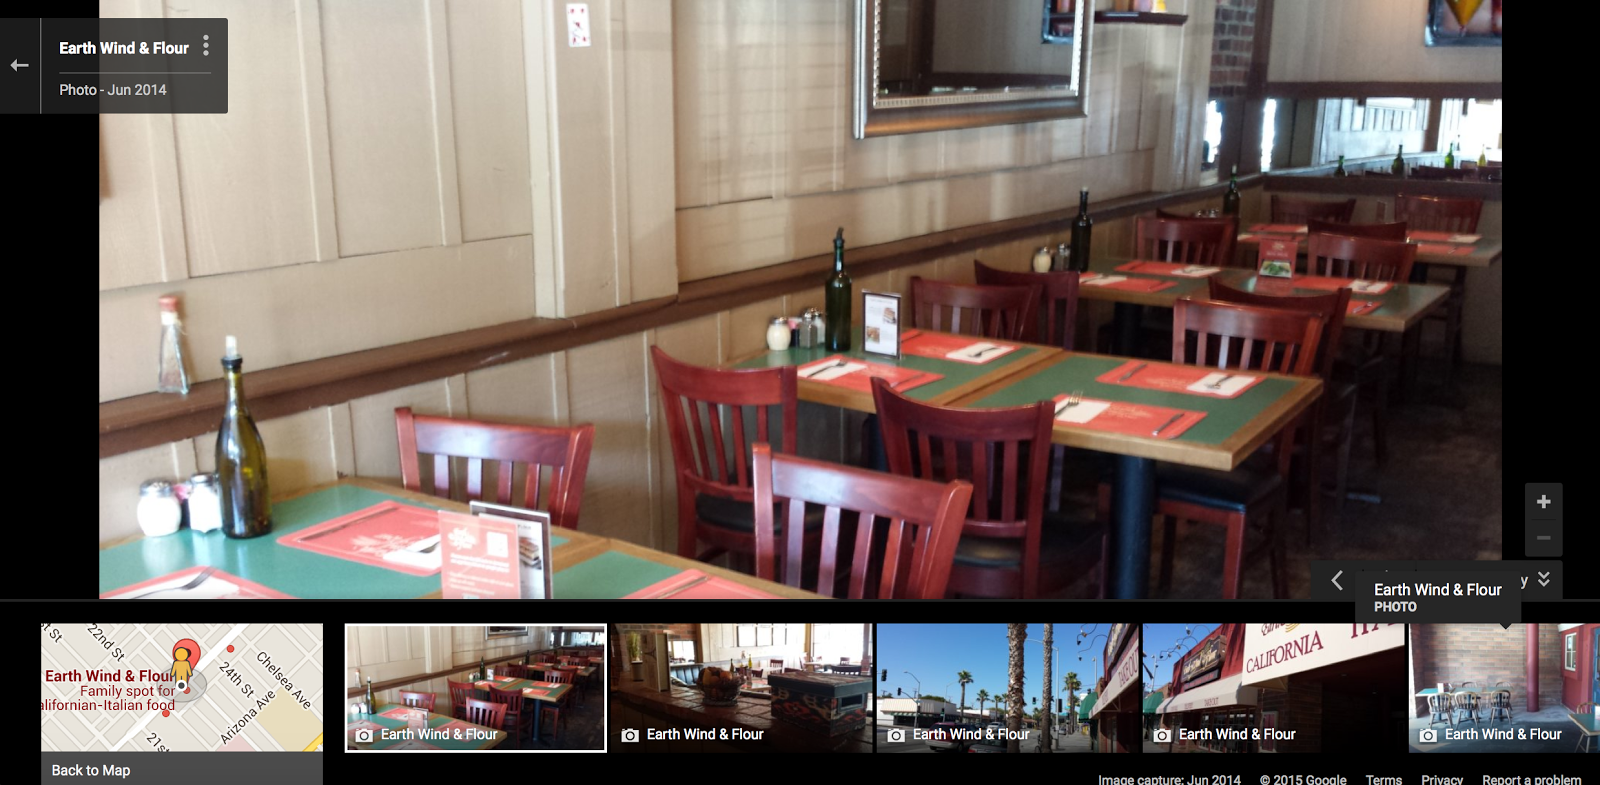
I was recently looking to build a full screen image and video gallery for our client Mission Blue. Something similar to the Google Maps interface you can see in the screenshot below:
After scouring the Internet to find a suitable jQuery plugin I finally decided on Supersized, Full screen background slideshow plugin for jQuery.
After downloading the library, include it on the page:
<link href="/wp-content/plugins/wp-supersized/theme/supersized.shutter.css?ver=4.2.2" id="supersized_theme_css-css" media="all" rel="stylesheet" type="text/css"></link>
<script src="/wp-includes/js/jquery/ui/effect.min.js?ver=1.11.4" type="text/javascript"></script>
<script src="/wp-content/plugins/wp-supersized/js/jquery.easing.min.js?ver=1.3" type="text/javascript"></script>
<script src="/wp-content/plugins/wp-supersized/js/jquery.easing.compatibility.js?ver=1.0" type="text/javascript"></script>
<script src="/wp-content/plugins/wp-supersized/js/jquery.animate-enhanced.min.js?ver=0.75" type="text/javascript"></script>
<script type='text/javascript' src='/wp-content/plugins/wp-supersized/js/supersized.3.2.7.min.js?ver=3.2.7'></script>
Basic functionality
Let’s create a variable that will hold all the images in the slideshow:
var images = [];
images.push({
  type: 'IMAGE',
  image: 'img1.jpg',
  title: 'Image 1',
  thumb: 'img1_thumb.jpg',
  url: 'https://www.endpointdev.com'
});
images.push({
  type: 'YOUTUBE',
  image: 'screenshot1.jpg',
  title: 'YouTube slide',
  videoid: 'abc12345678',
  thumb: 'screenshot1_thumb.jpg',
  url: 'https://www.youtube.com/watch?v=abc12345678'
});
Let’s initialize Supersized:
jQuery.supersized({
  slideshow: 1,
  autoplay: 0,
  min_width: 0,
  min_height: 0,
  vertical_center: 1,
  horizontal_center: 1,
  fit_always: 0,
  fit_portrait: 1,
  fit_landscape: 0,
  slide_links: 'blank',
  thumb_links: 1,
  thumbnail_navigation: 1,
  slides: images,
  mouse_scrub: 0
});
Customizing the toolbar
<div id="thumb-tray" class="load-item">
  <div id="thumb-back"></div>
  <div id="thumb-forward"></div>
</div>
<div id="slidecaption"></div>
Customizing the screen image size
I didn’t want to have the full screen image as it was a little overwhelming for the user. I wanted the black bars just like in the Google interface. Supersized allows for easy customization. This CSS did the trick:
#supersized, #supersized li {
  width: 70% !important;
  left: 0 !important;
  right: 0 !important;
  top: 1px !important;
  margin:auto;
}
Introducing video (YouTube) slides
First, I added the Youtube API:
<script type="text/javascript" src="https://www.youtube.com/iframe_api"></script>Then I added a couple of CSS styles:
#supersized .player {
  margin: auto;
  display: block;
}
Finally, I went into the Supersized library source and modified it. To allow for the video slides to appear, I added the new condition and the slide type ‘YOUTUBE’
base._renderSlide = function(loadPrev, options) {
  var linkTarget = base.options.new_window ? ' target="_blank"' : '';
  var imageLink = (base.options.slides[loadPrev].url) ? "href='" + base.options.slides[loadPrev].url + "'" : "";
  var slidePrev = base.el + ' li:eq(' + loadPrev + ')';
  var imgPrev = $('<img src="' + base.options.slides[loadPrev].image + '"/>');

  if (base.options.slides[loadPrev].type == 'YOUTUBE') {
    imgPrev.load(function () {
      var video = $('<div class="player" id="player'+ base.options.slides[loadPrev].videoid + '"></div>');
      video.appendTo(slidePrev);
      var player = new YT.Player('player' + base.options.slides[loadPrev].videoid, {
        height: 390,
        width: 640,
        videoId: base.options.slides[loadPrev].videoid
      });
    });// End Load
  }
  else {
    imgPrev.appendTo(slidePrev).wrap('<a ' + imageLink + linkTarget + '></a>').parent().parent().addClass('image-loading ' + options['class']);

    imgPrev.load(function () {
      $(this).data('origWidth', $(this).width()).data('origHeight', $(this).height());
      base.resizeNow();// Resize background image
    });// End Load
  }
};
Final Result
This is how gallery looks with the customizations:

This is what a video slide looks like:

Hope you found this writeup useful!
css design html javascript jquery extensions video wordpress
Comments